Celestix Networks delivers an exceptional combination of secure connectivity features, scalability, and simplicity in cost-efficient virtual and hardware appliances. Ready-to-deploy appliances offer easier management that reduces the risk and cost of security solutions. Celestix® solutions offer flexibility to protect access to IT resources.
The Celestix® CelestixEdge VE Series Appliance provides simplified configuration for Microsoft® Windows Server® 2012 R2 remote connectivity solutions. The VE Series facilitates access management, bring your own device (BYOD) programs, and anywhere access to work files.
A well-planned cloud blueprint can help users to work how and when they are most productive. Through the VE Series, organizations can choose the connectivity options best suited to organizational goals.
- Always-on remote connection for both end user access and client management.
- RADIUS and multifactor authentication.
- Encrypted access to internal resources without a VPN.
- Streaming access to hosted applications from any device.
- Synced work files access by supported devices from wherever, even without network connectivity.
The foundation of your Celestix virtual appliance is the award-winning Comet engine. Comet provides a web user interface (web UI) for convenient access to administration functions like setup, network configuration, and server task management. For the VE Series, it also provides simplified installation and configuration for secure connectivity and supporting technologies.
The product installs as a trial version. A license activation key must be purchased from Celestix and uploaded to the virtual appliance before the 30-day trial period ends.
The Celestix VE Series is a hardened and secure virtual appliance platform that is optimized for secure Windows deployment.
The 2.2.0.0 VE Series offers the following functionality:
- SecureAccess client
- Read-only access to the web UI
- SSO portal update
This guide will help system administrators to efficiently install and configure a new virtual appliance with a base level setup. The guide does not provide extensive reference information. The instructions cover steps for some common deployment scenarios. They usually offer one option to accomplish a task, though there may be other ways to achieve the same thing.
Document Conventions
- Instructions are generally intended for administrators to manage the server installation through Comet’s web user interface administration tool, referred to as the web UI.
- Instructions are presented in the best order to follow for setup.
- The following text formats are used for clarification:
- Web UI on-screen items are noted in this style.
- File names are delineated as filename.xxx.
- Titles are delineated as documentname.
- Examples and code are delineated in this style.
- When referring to subsections in this document, the hierarchy is delineated by the symbol for a colon (:).
For example, the location of the section To find updates would be delineated as:
Update Software : To find updates.
- Instructions assume the reader will navigate from the web UI main menu bar to access features.
For example, to access Software Updates, the navigation path from the menu bar would be delineated as:
System|Software Updates.
- Though network interface connections are commonly referred to as NICs, ports, and adapters, documentation uses the term network adapters.
- Documentation generally refers to the virtual appliance when discussing the VE Series Appliance.
The CelestixEdge virtual appliance simplifies the process to set up and manage access to IT resources. The diagram below provides a reference for features that are available on the appliance.
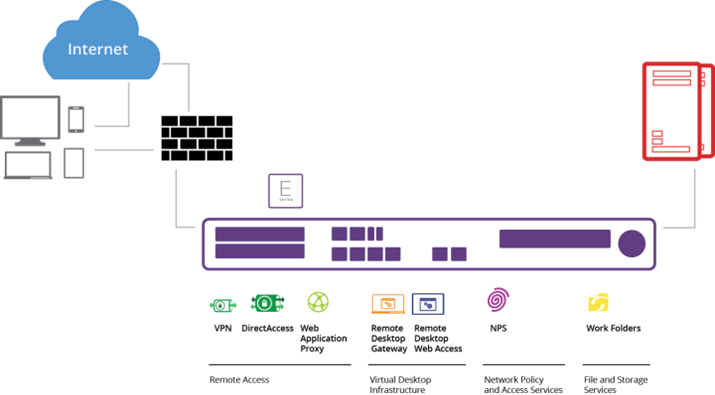
Illustration 1: E Series Connectivity Features
Example Deployment Topologies
The diagrams that follow are intended to provide reference for IT administrators or architects. The examples provide a few scenarios for common aspects of CelestixEdge virtual appliance deployment, while the potential options are certainly numerous.
DirectAccess Deployment with Manage-Out
Access for external users with strong authentication that allows system administrators to support and manage remote clients.
Requirements:
- Secure remote access for managed Windows 7 and Windows 8 clients.
- Anytime, anywhere access to applications and data on the organization network.
- Compliance mandate for One-Time Password (OTP) authentication.
- System administrators inside the organization network need connectivity to initiate remote desktop sessions and push software updates to remote clients.
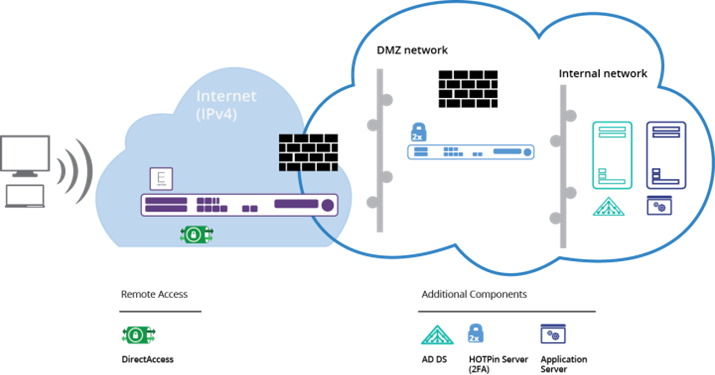
Illustration 2: DirectAccess Role
VPN
Access for external users that includes a wide range of systems, like PCs, Macs, tablets, and smart phones.
Requirements:
- Secure remote access for nonmanaged clients that include commonly used operating systems (Windows, Linux, OS X, Android, and iOS).
- Remote access to applications and data on the organization network.
- Web-based applications need users to be pre-authenticated at the edge.
- Applications individually provisioned based on user roles.
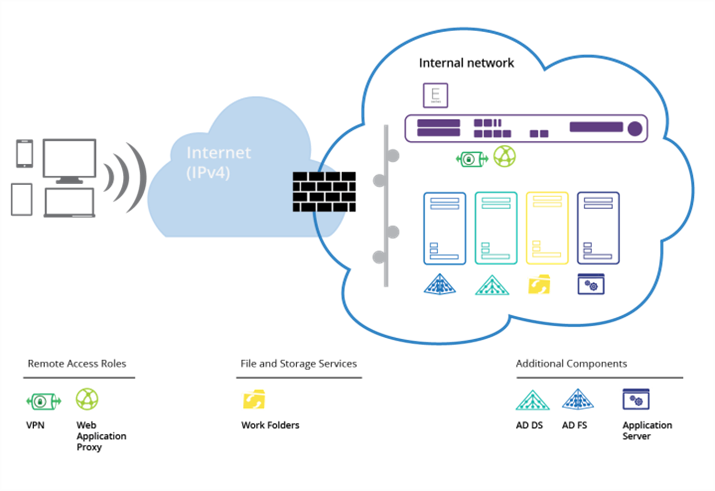
Illustration 3: VPN Role With Web Application Proxy
Gateway
Cross-premises network connectivity for internally hosted and cloud resources.
Requirement: Seamless connectivity between on-premises data center and virtual machines hosted in the public cloud.
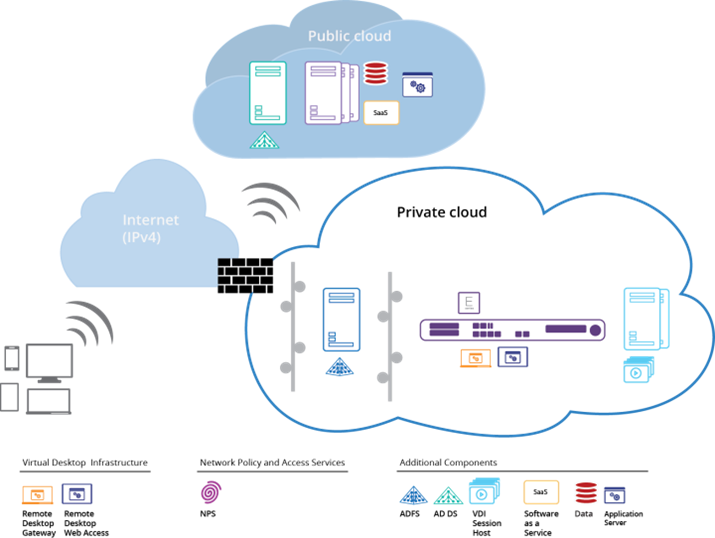
Illustration 4: Remote Desktop Services Role
Configuration Overview
The following lists network components that most commonly require configuration to support feature deployments.
Note: Some items are optional. Details for feature configuration are discussed in the topic Resource Worksheet.
Network Policy Server
- CelestixEdge virtual appliance serves as the RADIUS server; it must be domain joined
- Network Access Server (RADIUS Client)
- IP Address
- Shared secret
- Network policies
- Authentication protocol options
Remote Access
- DirectAccess
- An Active Directory® Domain Services (AD DS) domain
- At least one domain-joined DirectAccess server (E Series)
- A public key infrastructure (PKI) [recommended]
- Network location server (optional)
- DirectAccess clients running Windows 7 Enterprise or Ultimate, or Windows 8.x Enterprise
- VPN
- SSL certificate (if using SSTP)
- External firewall exceptions for configured ports
- Web Application Proxy
- CelestixEdge virtual appliance serves as the reverse proxy
- ADFS installed on separate Windows 2012 R2 server
- SSL certificate
- Firewall rules for traffic between Web Application Proxy server (VE Series) and ADFS server
Remote Desktop Services Components
- Remote Desktop Gateway
- CelestixEdge virtual appliance must be domain joined
- RD Connection Broker and RD Web Access Server
- RD Session Host server
- RD Gateway server
- SSL certificate
- AD DS Group Managed Service Account
- Firewall exceptions maybe required
- End Users: RDP client that supports RD Gateway (like Windows Remote Desktop Client)
- Remote Desktop Web Access
- CelestixEdge virtual appliance must be domain joined
- Remote Desktop Connection Broker
- RD Session Host server with RemoteApp programs configured
- SSL certificate
- Firewall exceptions will be required for the WMI Service
- Option – virtual desktop: Remote Desktop Virtualization Host server
Work Folders
- CelestixEdge virtual appliance serves as the sync server; it must be domain joined
- Domain-joined Windows Server 2012 R2 as the sync share; share volume formatted as NTFS
- Sync share DNS entry (recommended)
- SSL certificate
- User group (recommended)
- End users: Windows 8.1/RT 8.1
The web UI is a management tool to access the most common Celestix product features. Initially, use it to quickly set up the server. Subsequently, use the web UI to access administrative features for both Comet and Remote Access roles.
See the Appendix topic Web User Interface Content Overview for features included in the web UI. See the online help topic Web User Interface Overview for more information about using the web UI (Help|Web UI Overview).
Version Information
Version information for virtual appliance components are noted on the main web UI page. Click the E Series logo link from any page to access:
2 Installation
The guide provides a system administrator with concise instructions for a base deployment. The document covers common installation requirements and is not intended to be comprehensive. Every network environment is different, and installation for an individual organization may require either additional or other configuration not discussed herein.
Review the skills, knowledge, and the server requirements for virtual appliance deployment.
Skills and Knowledge
CelestixEdge administrators should have the following skills, knowledge, and consequent access privileges:
- Virtualization, including hypervisor administration
- Server administration
- Networking technology
Server Requirements
The VE Series server specification are covered below.
Table: VE 3400 Server Specifications
| Operating System | Windows Server® 2012 R2 |
| CPU (Processor) | 2.4 GHz or greater with 2 cores |
| RAM (Memory) | 4 GB; 8 GB recommended |
| Network Card | 1-2 virtual adapters (depending on the design of DA) |
| Available Disk Space | 50 GB or greater |
Table: VE 6400 Server Specifications
| Operating System | Windows Server® 2012 R2 |
| CPU (Processor) | 2.4 GHz or greater with 2 cores; 2.8 GHz recommended with 4 cores recommended |
| RAM (Memory) | 8 GB; 16 GB recommended |
| Network Card | 1-2 virtual adapters (depending on the design of DA) |
| Available Disk Space | 50 GB or greater |
Table: VE 8400 Server Specifications
| Operating System | Windows Server® 2012 R2 |
| CPU (Processor) | 2.8 GHz or greater with 2 cores; 2.8 GHz recommended with 6-12 cores recommended |
| RAM (Memory) | 8 GB; 32 GB recommended |
| Network Card | 1-2 virtual adapters (depending on the design of DA) |
| Available Disk Space | 50 GB or greater |
Complete the following:
- Log in to the server using an administrator account.
- Navigate to the installation file: vCelestixEdge-2.1.03.exe
- Right-click the file and select: Run as administrator.
- Use the installation wizard to run through the setup process.
- Accept the license agreement to proceed.
- Select components prompt: leave the default options unless customization is necessary.
- The wizard will inform when the process is complete.
3 Log in to the Web UI
Accessing the web UI is necessary to continue to deploy and manage the virtual appliance. The IP address for the internal network adapter is used to access the web UI.
To log in
- Open the web UI in a browser:
- From a client computer on the network, default access to the appliance web UI is through a web browser at https://ServerName|IP address:8098.
For example, if the server LAN IP address is 192.168.30.4, the web UI URL would be https://192.168.30.4:8098
- From an RDP/KVM session on the server, access the web UI at: https://localhost:8098
- Enter local administrator credentials when prompted.
Important: A certificate warning may display because the site uses a self-signed certificate. Accept the certificate to access the web UI.
4 Configuration
After the application has been installed on a server, settings need to be configured. General setup uses a wizard to step through configuration in the web UI. Instructions cover the steps common to most deployments, but again, an individual organization may require different or additional configuration.
For setup, the administrator needs access to the following resources:
- The external firewall (see Firewall Ports Reference)
- The VE Series appliance web UI
Also, it’s recommended that administrators complete the Resource Worksheet in advance to expedite installation and setup.
The section General Information provides necessary details to complete configuration.
The following topics cover requirements, assumptions, and terminology used in the CelestixEdge VE Series Appliance Installation Guide.
Terminology Disambiguation
The following list explains how terms to describe components are used in documentation.
- On-premises domains are sometimes referred to as AD domains, but documentation uses the term internal domain.
- Off-premises domains are sometimes qualified by the terms external or public, but documentation uses the term federated domain.
- Servers configured with the role Active Directory Domain Services may be referred to as the domain controller (DC) or designated by the acronym AD DS. The acronym AD is used as a general referent for the internal domain directory.
- Unified Remote Access refers to the collection of technologies that Microsoft offers to allow external clients to access internal network resources. Documentation uses the short name Remote Access. The VE Series includes the Remote Access features Direct Access, VPN, and Web Application Proxy.
- The terms roles, services, and features are used to refer to Server 2012 R2 functionality for remote connectivity.
- Remote Desktop Services (desktop virtualization) refers to the collection of technologies that Microsoft offers to allow organizations to publish cloud resources. The VE Series can be used for the Remote Desktop Gateway (RD Gateway) and Remote Desktop Web Access (RD Web Access) desktop virtualization server roles.
- Network Policy Server (NPS) is the Microsoft implementation of RADIUS authentication.
- Remote Access:
- DirectAccess – computer account security groups (security groups) can be created in AD to manage client access efficiently by using group policy objects (GPOs).
- WAP – A federation service namespace is sometimes referred to as the ADFS or authentication namespace, but documentation generally uses the shortened term federation namespace. It is used as the Service Principle Name (Service Name) for ADFS. The federation namespace is based on the FQDN that represents the SSL certificate Subject (or Common Name).
- Work Folders:
- A Sync share is a collection of user folders that use the same policy settings.
- A Sync server has the Work Folders role installed. It can contain multiple sync shares.
- User account security groups (security groups) should be created in AD to manage folder access efficiently by using group policy objects (GPOs).
Deployment Assumptions
Information presented in the VE Series setup instructions is based on the following:
- Active Directory (AD) is used as the domain controller.
- The virtual server has not been joined to the domain yet.
- Remote connectivity system administrators are familiar with:
- Windows Server management
- Microsoft Active Directory®
- Microsoft Unified Remote Access
- Network Policy Server*
- Work Folders*
- Remote Desktop Web Access*
*As required for deployment.
Requirement Checklist
The following items will be required to set up the VE Series. Plan ahead so that items are available when needed to complete configuration.
- Domain administrator credentials
- PowerShell remoting is enabled
Example Information
To help make the instructions clear, these examples are used to identify components.
| CelestixEdge Appliance | |
| FQDN | CelestixEdge01.example.com |
| Host Name | CelestixEdge01 |
| Domain Name | example.com |
While working through the wizard, the virtual appliance may need to reboot.
- Administrator Password – change the local administrator password if necessary. If not, enter the current password.
- User name – the Administrator Password feature only changes the local administrator password, which must be the logged in account.
- Password – enter and confirm a new password. Complexity requirements are noted on the screen.
- Date and Time – use onscreen controls to enter the date, time, and time zone, then configure for daylight savings if necessary.
- Network Interfaces – if necessary, select the LAN network adapter to set a static address. A static address includes these settings:
- Internet Protocol (IP) address
- Subnet mask
- Gateway address
- Automatic or preferred DNS server
- Hostname and Domain
Note: Fields will be autopopulated with available settings if the virtual appliance was joined to the domain previously; the reboot will be skipped if they are left unchanged.
- Hostname – specify a name for the virtual appliance; it must be unique.
For example: CelestixEdge
- Domain – enter the name for the internal domain the virtual appliance will join.
For example: example.com.
- Username – enter an account with domain administrator access to AD (domain\username).
For example: example\adminuser
- Password – provide the account password.
- Reboot
- Click Next to apply changes and reboot the virtual appliance.
Note: Domain administrator credentials (example: example\adminuser) will be required to access the web UI after the reboot.
- Alerts Email – optional; general appliance notifications can be sent to designated recipients through a connection to a network SMTP server.
- Select Enable alert email.
- Complete the following:
- Alert Message settings
- To – indicate one or multiple recipients. For multiple addresses, use a comma to separate addresses.
- From – enter an address that recipients will recognize.
- Select check boxes for the alert levels that will generate email.
- Send error alert email – includes alert types where the level is set to Error.
- Send warning alert email – includes alert types where the level is set to Warning.
- Send informational alert email – includes types where the level is set to Information.
- SMTP server settings
- Name – indicate the network SMTP server name or IP address.
- Port – enter the number used for SMTP communication.
- Use SSL/TLS – select to require encryption.
- SMTP settings – select and provide credentials with permission to access the SMTP server.
- Send Test Message – create a test email using the settings entered above.
- Alert Message settings
Note: The alert email function will indicate whether a test email was sent. If the test email is not received after the alert email feature indicates that one was sent, the error is most likely due to SMTP server settings. An error will occur if the SMTP service is not running or if the virtual appliance is not correctly configured to see the SMTP server. Confirm the SMTP server and network settings before trying to test again.
- Click Save to add configuration.
The wizard is complete when the congratulations screen displays.
Once general setup and configuration are complete the Features configuration tool installs the roles and services necessary for CelestixEdge VE Series Appliance remote connectivity. Depending on the purpose for deployment, one or more roles can be installed. Instructions cover the steps common to most deployments, but again, an individual organization may require different or additional configuration.
The following features are available:
- Network Policy Server – basic RADIUS authentication or RADIUS proxy; can also serve as a NAP policy server.
- Remote Access with VPN – configuration for DirectAccess with an option for VPN. DirectAccess provides always-on remote connectivity and management for Internet-connected Windows 7 and 8 computers. VPN provides access for nonmanaged devices.
- Web Application Proxy – external access by authenticated users to published applications.
- Remote Desktop Gateway – RDS desktop virtualization component; firewall friendly external access to internal network remote desktop servers.
- Remote Desktop Web Access – RDS desktop virtualization component; access to RemoteApp in Windows 7, or to Desktop Connection through a web browser. RD Web Access can also include remote access to internal computers through a browser.
- Work Folders – a server sync share that hosts work files for anywhere access from supported devices (BYOD functionality).
To install a feature
- Navigate to CelestixEdge|Features.
- Click the toggle button to On for a feature.
- Click Apply to confirm.
- The feature’s status indicator will rotate while the system processes the request.
- A confirmation will display when the process is complete.
- Click the restart system link if prompted.
See the topic Feature Details for more information about feature options.
Once installed, some of the features include links that launch RDP applications to management consoles (MMCs). These links serve two purposes:
- Some features require additional configuration that can only be accomplished through the MMC.
- The links provide convenient access to advanced management functions.
Some features do not do not contain an RDP link, usually because no additional configuration is required.
To access management tools
- Navigate to CelestixEdge|Features.
- Click a feature name with a link in the list.
For example, Network Policy Server:
A RemoteApp will download: confirm if necessary.
- Launch the app.
- Enter administrator credentials for the appliance when prompted.
Important: When the VE Series is joined to an AD domain, a valid domain administrator account is required for logon.
Notes:
- If prompted, allow the connection.
- If a self-signed certificate is used, accept the certificate when prompted.
- Once launched the app opens as a Remote Desktop Connection.
- Use the MMC to configure settings as needed.
- When done, navigate to File|Exit in the remote desktop window to close and return to the DirectAccess screen in the web UI. Closing the application logs off the RDP session to the appliance and is recommended to release management resources.
Note: If the File menu is not visible, use the quick close button (boxed x).
The following sections provides details about remote connectivity features.
The Need to Knows section in the feature descriptions below cover important details about configuration. They are organized as follows:
- Installs – lists roles and features that will be installed.
- Affected Appliance Features – notes any conditions that may affect other features available on the appliance.
- Required Configuration After Installation – notes any configuration that will be necessary once the feature is installed.
NPS provides basic RADIUS authentication, authorization, and accounting, or RADIUS proxy (connection request referral).
The following summary information is provided for reference.
Installs
Role Service: Network Policy Server
Feature: RSAT – Network Policy and Access Service Tools
Affected Appliance Features
NPS is required for Remote Desktop Gateway (RD Gateway). If RD Gateway is deployed, the NPS role is installed automatically as part of that feature setup.
Required Configuration After Installation
Configuration must be customized for an environment. Use the Network Policy Server link to open an RDP session in the browser to access RADIUS server/client configuration.
Remote Access with VPN configures DirectAccess (DA) on the VE Series server. DirectAccess provides an automated, always-on secure connection for end user access to internal network resources in addition to manage-out functionality for remote domain-joined computers. Remote Access includes the option to enable a VPN that can be used for nonmanaged devices.
The following summary information is provided for reference.
Installs
Role Service: DirectAccess and VPN (RAS)
Feature: RSAT – Remote Access Management Tools (GUI and Command-Line Tools, module for Windows PowerShell)
Feature: Group Policy Management
Feature: RAS Connection Manager Administration Kit (CMAK)
Affected Appliance Features
Deployments with nonmanaged remote devices will require the VPN option to be enabled.
Cannot be colocated with Web Application Proxy
Required Configuration After Installation
Configuration must be customized for an environment; there are two options:
- Click the Wizard button to open the Remote Access configuration tool.
- Click the Remote Access with VPN link to open the Remote Access console as an RDP application.
Web Application Proxy publishes access to internal web applications for external users. The VE Series adds a portal to make accessing applications more convenient. It also leverages authentication, authorization, and SSO functionality. It is configured for deployments where ADFS runs on a separate server.
Notes:
- Web Application Proxy cannot be colocated with the following roles:
- ADFS – Web Application Proxy requires ADFS, but cannot be installed on the same server.
- DirectAccess
- The VE Series only supports forms based authentication.
The following summary information is provided for reference.
Installs
Role Service: Web Application Proxy
Feature: RSAT – Remote Access Management Tools (GUI and Command-Line Tools, module for Windows PowerShell)
Affected Appliance Features
Web Application Proxy requires the Remote Access role to be installed.
Web Application Proxy is deployed when ADFS is intended to reside on a separate server from the E Series; information for that server will be used in Web Application Proxy configuration.
Required Configuration After Installation
Configuration must be customized for an environment; there are two options:
- Click the Wizard button to open the Web Application Proxy configuration tool.
- Click the Web Application Proxy link to open the Remote Access console as an RDP application.
Remote Desktop Gateway (RD Gateway) provides access to internal resources for remote users. Access is through the Remote Desktop Connect (RDC) client, and avoids the need for a VPN. User connections are encrypted and authorization policies set standards for client access.
Important: RD Gateway requires NPS.
Installs
Role Services: Network Policy Server, Remote Desktop Gateway, RPC over HTTP Proxy
Features: RSAT – Network Policy and Access Service Tools, Remote Desktop Services Tools/Remote Desktop Gateway Tools
Affected Appliance Features
RD Gateway requires NPS, which will be installed at the same time unless NPS is already installed, in which case the installation process proceeds just for RD Gateway.
Required Configuration After Installation
Configuration must be customized for an environment. Use the Remote Desktop Gateway link to open an RDP session to the Remote Desktop Gateway Manager Console in the browser.
Note: Firewall rules may need to be adjusted to allow traffic.
RD Web Access (RD Web Access) provides streaming access to hosted applications. Windows 7 uses RemoteApp to start an RD Services session. Other devices can use a web browser to access them through Desktop Connection. RD Web Access also uses the RD Web Connection feature to let users access computers that have Remote Desktop enabled.
The following summary information is provided for reference.
Installs
Role Service: RD Web Access
Affected Appliance Features
None
Required Configuration After Installation
Rules for the external firewall must be adjusted to allow WMI traffic. See the topic Firewall Ports Reference for additional information about firewall configuration.
Work Folders uses an internal file server to host work files for anywhere access from supported computers and devices. Data is synced across devices over an Internet connection. This supports a bring your own device (BYOD) program without sacrificing control over data. Once synced, files can be worked on from wherever and will be updated on the sync share when the device has Internet connectivity.
Important: Work Folders is supported for Windows 8.1/8.1 RT devices.
Work Folders provides options to:
- Use a folder that already contains user data so Work Folders can be employed without migrating servers and data, or affecting existing share options (for example, Folder Redirection, Offline Files, and home folders).
- Add policies for encryption and lock-screen passwords.
The following summary information is provided for reference.
Installs
Role Services: File Server, File Server Resource Manager, Work Folders
Feature: RSAT – File Server Resource Manager Tools
Affected Appliance Features
None
Required Configuration After Installation
Configuration must be customized for an environment:
- Click the Wizard button to run the Work Folders configuration tool.
- Next, use the Remote Desktop management console (System|Remote Desktop) to open an RDP session from the local computer to the VE Series appliance.
- In Windows Server, open the Server Manager.
- Navigate to File and Storage Services|Work Folders.
- Click the link to create a sync share to open the Windows configuration wizard.
The wizard provides the steps to configure DirectAccess and VPN settings for the CelestixEdge VE Series Appliance. Instructions cover the steps common to most deployments, but again, an individual organization may require different or additional configuration.
For setup, the administrator needs access to the following resources:
- The external firewall (see Firewall Ports ReferenceFirewall Ports Reference)
- The VE Series appliance web UI
General Information provides necessary details to complete configuration. The topic Additional Configuration Notes provides details about conditional configuration that applies to some deployments.
The following deployment notes provide information that qualifies setup processes to understand Remote Access configuration.
Information presented in the E Series setup instructions is based on the following:
- The Remote Access with VPN feature has been installed through the web UI.
- Deployment is a single server.
- Network planning for virtual appliance placement is complete.
- Necessary certificates have been acquired for:
- IPsec
- IP-HTTPS
- NLS
- Certificates have not been previously imported to the certificate store.
- Firewall rules have been configured to allow traffic if the DirectAccess server is on an IPv4 network:
- Teredo
- 6to4
- IP-HTTPS
- If the virtual appliance only has one configured network adapter, TCP port 62000 must be opened on the appliance.
Additional firewall configuration details are discussed in the topic Firewall Ports Reference.
- If using a security group to manage access for clients, the group has been created in AD prior to running the setup up wizard.
- If customized GPOs will manage settings for clients and servers, they have been created prior to running the setup wizard.
- AD will be used for DirectAccess authentication and authorization.
- DNS needs to resolve to either the public host name of the DirectAccess entry point, or the NAT device for the DirectAccess server.
The following items will be required to set up Remote Access. Plan ahead so that items are available when needed to complete configuration.
- Domain controller – DirectAccess requires Windows Server 2003 or higher.
- IP address – one or two address have been reserved.
- Public address – usually an FQDN that clients will use to connect to the network.
- DirectAccess clients – must be Windows clients that are domain joined. Supported options:
- 8 Enterprise and higher
- 7 (Ultimate, Enterprise)
- SSL certificate – an IPsec root certificate is required for Windows 7 DirectAccess client connections, and is a best practice for Windows 8.
- Email account – an account will be required to receive diagnostic reports for client access trouble shooting.
Additional Configuration Notes
The notes below discuss options that may apply to some deployments. They exceed the scope of these instructions, but may be helpful to consider when planning.
- DirectAccess
- Network Location Server – the wizard will configure a default NLS on the virtual appliance if an external server is not designated.
- Group Policy Objects – the wizard will create the two required GPOs with default settings unless customized group policies are available to assign.
- Security group – an AD security group is required to apply customized group polices to client computers. All remote computers in the domain can use DirectAccess unless an AD client group is specified to restrict access.
- RADIUS – configuration for an external RADIUS server can be included to add strong authentication methods like one-time passwords (OTPs).
- VPN
- VPN deployments using static IP addresses for clients need a defined range; otherwise, DHCP should be used.
- VPN deployments not using Windows authentication need settings for a RADIUS server.
Example Information
To help make the instructions clear, the following examples are used to identify components.
| Internal Domain | CelestixEdge Appliance | Public Domain | |
| FQDN | ad01.intexample.com | CelestixEdge01.intexample.com | da.example.com |
| Host Name | ad01 | CelestixEdge01 | |
| Domain Name | intexample.com | intexample.com |
The setup wizard is a walk-through to configure components for Remote Access.
While working through the wizard, the virtual appliance may need to reboot.
Access the screen through the web UI at CelestixEdge|Features|Remote Access with VPN|Wizard.
Wizard Instructions
Component Selection – select a Remote Access configuration option:
- Configure both services DirectAccess and VPN – select to add access through both DirectAccess and a VPN.
- Configure DirectAccess services only – select to add access through DirectAccess connections.
- Configure VPN services only – select to add access through a VPN connection.
Note: DirectAccess should be enabled for managed clients, while VPN should be enabled to support unmanaged clients.
Configure both services DirectAccess and VPN
- DirectAccess
- Basic – define the virtual appliance location and the URL that clients will use to access resources.
- Select the type of network environment:
- Edge – requires two network adapters; one to the public Internet and one to the internal network.
- Behind an edge device (with two network adapters) – one adapter connects to the perimeter network, and the other connects to the internal network.
- Behind an edge device (with one network adapter) – the adapter connects to the internal network.
- Public address – enter the address that external clients will use to connect to the network.
- Select the type of network environment:
- Basic – define the virtual appliance location and the URL that clients will use to access resources.
Note: While using an IP address is supported, the FQDN is a best practice.
For example: da.example.com
- Advanced – define client parameters and assign the virtual appliance network adapter that DirectAccess service will use.
- Installation type – select the DirectAccess functionality to deploy:
- Full DirectAccess installation – bidirectional tunnels for remote client access and management.
- Client management only – configure tunnel for remote client management.
- Client Group – designate an AD security group that will manage devices that connect through DirectAccess; leave blank to include all remote devices.
- Network interfaces – select interfaces for DirectAccess traffic.
- Internal – specify the internal, or LAN, network adapter in the drop menu.
- Internet – optional; if two adapters are used, specify the Internet, or WAN, network adapter in the drop menu.
- IP-HTTPS certificate – if a third-party certificate will be used to bind the Internet network adapter, navigate to and select it. If it needs to be imported first, complete the following:
- Click the Import button.
- Certificate Import – navigate to and select the certificate that will be used for authentication.
- Password – enter the certificate passphrase.
- Click the Import button.
- The imported certificate should display in the Certificate field. If not, use the drop menu to select it.
- GPO and NLS
- Group Policy Object (GPO) – leave fields blank to configure the default options, otherwise designate predefined AD policy groups that will manage settings for devices and servers.
- Client GPO – specify the name for the AD policy that will manage client access.
- Server GPO – specify the name for the AD policy that will manage access to the DirectAccess server.
- Network Location Server – the NLS server will be installed on the virtual appliance unless an external server is designated.
- NLS Certificate – if an SSL certificate will be used, navigate to and select it. If it needs to be imported first, complete the following:
- Click the Import button.
- Certificate Import – navigate to and select the certificate that will be used for authentication.
- Password – enter the certificate passphrase.
- Click the Import button.
- The imported certificate should display in the Certificate field. If not, use the drop menu to select it.
- NLS URL – if an external NLS server is deployed, enter the HTTPS URL.
- NLS Certificate – if an SSL certificate will be used, navigate to and select it. If it needs to be imported first, complete the following:
- Group Policy Object (GPO) – leave fields blank to configure the default options, otherwise designate predefined AD policy groups that will manage settings for devices and servers.
- Client Settings
- Connection Name – create a name for the network connection that end users will recognize.
- Support Email – enter the email account that will receive diagnostic reports created by the DirectAccess Diagnostics tool.
- Allow local name resolution – select to allow users to temporarily disconnect the intranet connection and use local DNS servers for Internet traffic.
- Installation type – select the DirectAccess functionality to deploy:
Notes:
- Force tunneling must be disabled to employ this feature.
- The infrastructure connection remains active, so manage out capabilities are not affected.
- Enable for mobile computers only – allow only mobile computers in the specified security groups to connect through DirectAccess.
Important: Remote Access will create a WMI filter that will only allow mobile computers to join DirectAccess security groups. This setting requires that the administrator account configured for Remote Access have create/modify privileges.
- Enable Windows 7 Client Support – select for environments that require support for Windows 7 clients.
- IPsec Root Certificate – conditional; designate a certificate to validate authentication for client connections; required for Windows 7 users, and recommended for Windows 8. See the following:
- If GPOs are used to push security certificates to domain servers, use the Certificate drop menu to select the certificate issued from the domain root CA.
- If the certificate needs to be added manually, use the import feature:
- Click the Import button.
- Certificate Import – navigate to and select the certificate that will be used for authentication.
- Password – enter the certificate passphrase.
- Click the Import button.
- The imported certificate should display in the Certificate field. If not, use the drop menu to select it.
- Click the Import button.
- Intermediate CA – select if the certificate was not imported from the domain root CA.
- Click Next.
- IPsec Root Certificate – conditional; designate a certificate to validate authentication for client connections; required for Windows 7 users, and recommended for Windows 8. See the following:
- VPN
- Address Assignment
- Assign addresses automatically – use DHCP to assign client addresses.
- Assign addresses from a static address pool – enter a range of IP addresses that RRAS will assign to clients when they connect to the network.
- Address Assignment
Enter the start and end IP addresses to define the range.
- Authentication
- Use Windows Authentication – use AD to authenticate users.
- Use RADIUS Authentication – configure VPN connections to use RADIUS authentication.
- Radius Server – designate the server name or IP address.
- Shared Secret – create a secret to authenticate communication between the virtual appliance and RADIUS server.
- Confirm – confirm the shared secret.
- Timeout – the default is usually sufficient, but customize the duration the virtual appliance will try to connect to the RADIUS server as necessary.
- Score – the default is usually sufficient, but customize the initial responsiveness score as necessary.
- Port – the default is UPD 1812 for authentication. Legacy RADIUS servers may use 1646.
- Always use message authenticator – select if the attribute Request must contain the Message Authenticator attribute has been configured on the RADIUS server.
- Finish – review the settings; click Next to configure.
Configure DirectAccess services only
- DirectAccess
- Basic – define the virtual appliance location and the URL that clients will use to access resources.
- Select the type of network environment:
- Edge – requires two network adapters; one to the public Internet and one to the internal network.
- Behind an edge device (with two network adapters) – one adapter connects to the perimeter network, and the other connects to the internal network.
- Behind an edge device (with one network adapter) – the adapter connects to the internal network.
- Public address – enter the address that external clients will use to connect to the network.
- Select the type of network environment:
- Basic – define the virtual appliance location and the URL that clients will use to access resources.
Note: While using an IP address is supported, the FQDN is a best practice.
For example: da.example.com
- Advanced – define client parameters and assign the virtual appliance network adapter that DirectAccess service will use.
- Installation type – select the DirectAccess functionality to deploy:
- Full DirectAccess installation – bidirectional tunnels for remote client access and management.
- Client management only – configure tunnel for remote client management.
- Client Group – designate an AD security group that will manage devices that connect through DirectAccess; leave blank to include all remote devices.
- Network Interfaces – select interfaces for DirectAccess traffic.
- Internal – specify the internal, or LAN, network adapter in the drop menu.
- Internet – optional; if two adapters are used, specify the Internet, or WAN, network adapter in the drop menu.
- IP-HTTPS certificate – if a third-party certificate will be used to bind the Internet network adapter, navigate to and select it. If it needs to be imported first, complete the following:
- Click the Import button.
- Certificate Import – navigate to and select the certificate that will be used for authentication.
- Password – enter the certificate passphrase.
- Click the Import button.
- The imported certificate should display in the Certificate field. If not, use the drop menu to select it.
- GPO and NLS
- Group Policy Object (GPO) – leave fields blank to configure the default options, otherwise designate predefined AD policy groups that will manage settings for devices and servers.
- Client GPO – specify the name for the AD policy that will manage client access.
- Server GPO – specify the name for the AD policy that will manage access to the DirectAccess server.
- Network Location Server – the NLS server will be installed on the virtual appliance unless an external server is designated.
- NLS Certificate – if an SSL certificate will be used, navigate to and select it. If it needs to be imported first, complete the following:
- Click the Import button.
- Certificate Import – navigate to and select the certificate that will be used for authentication.
- Password – enter the certificate passphrase.
- Click the Import button.
- The imported certificate should display in the Certificate field. If not, use the drop menu to select it.
- NLS URL – if an external NLS server is deployed, enter the HTTPS URL.
- NLS Certificate – if an SSL certificate will be used, navigate to and select it. If it needs to be imported first, complete the following:
- Group Policy Object (GPO) – leave fields blank to configure the default options, otherwise designate predefined AD policy groups that will manage settings for devices and servers.
- Client Settings
- Connection Name – create a name for the network connection that end users will recognize.
- Support Email – enter the email account that will receive diagnostic reports created by the DirectAccess Diagnostics tool.
- Allow local name resolution – select to allow users to temporarily disconnect the intranet connection and use local DNS servers for Internet traffic.
- Installation type – select the DirectAccess functionality to deploy:
Notes:
- Force tunneling must be disabled to employ this feature.
- The infrastructure connection remains active, so manage out capabilities are not affected.
- Enable for mobile computers only – allow only mobile computers in the specified security groups to connect through DirectAccess.
Important: Remote Access will create a WMI filter that will only allow mobile computers to join DirectAccess security groups. This setting requires that the administrator account configured for Remote Access have create/modify privileges.
- Enable Windows 7 Client Support – select for environments that require support for Windows 7 clients.
- IPsec Root Certificate – conditional; designate a certificate to validate authentication for client connections; required for Windows 7 users, and recommended for Windows 8. See the following:
- If GPOs are used to push security certificates to domain servers, use the Certificate drop menu to select the certificate issued from the domain root CA.
- If the certificate needs to be added manually, use the import feature:
- Click the Import button.
- Certificate Import – navigate to and select the certificate that will be used for authentication.
- Password – enter the certificate passphrase.
- Click the Import button.
- The imported certificate should display in the Certificate field. If not, use the drop menu to select it.
- Click the Import button.
- Intermediate CA – select if the certificate was not imported from the domain root CA.
- Click Next.
- IPsec Root Certificate – conditional; designate a certificate to validate authentication for client connections; required for Windows 7 users, and recommended for Windows 8. See the following:
- Finish – review the settings; click Next to configure.
- VPN
- Address Assignment
- Assign addresses automatically – use DHCP to assign client addresses.
- Assign addresses from a static address pool – enter a range of IP addresses that RRAS will assign to clients when they connect to the network.
- Address Assignment
Enter the start and end IP addresses to define the range.
- Authentication
- Use Windows Authentication – use AD to authenticate users.
- Use RADIUS Authentication – configure VPN connections to use RADIUS authentication.
- Radius Server – designate the server name or IP address.
- Shared Secret – create a secret to authenticate communication between the virtual appliance and RADIUS server.
- Confirm – confirm the shared secret.
- Timeout – the default is usually sufficient, but the duration the virtual appliance will try to connect to the RADIUS server can be customized as necessary.
- Score – the default is usually sufficient, but the initial responsiveness score can be customized as necessary.
- Port – the default is UPD 1812 for authentication. Legacy RADIUS servers may use 1646.
- Always use the same message authenticator – select if the attribute Request must contain the Message Authenticator attribute has been configured on the RADIUS server.
- Finish – review the settings; click Next to configure.
The wizard is complete when the congratulations screen displays. Depending on the configuration to be completed, this may take some time.
The base level setup for Remote Access options is now complete. Clients can now be configured to access resources.
Configure Web Application Proxy
The wizard provides the steps to configure Web Application Proxy (WAP) settings for the CelestixEdge VE Series Appliance. Instructions cover the steps common to most deployments, but again, an individual organization may require different or additional configuration.
For setup, the administrator needs access to the following resources:
- The external firewall (see Firewall Ports Reference)
- The VE Series appliance web UI
- Deployments that include the SSO Portal will require additional DNS records and firewall rules
General Information provides necessary details to complete configuration.
The following deployment notes provide information to understand Web Application Proxy configuration.
Deployment Assumptions
Information presented in the VE Series setup instructions is based on the following:
- The Web Application Proxy feature has been installed through the web UI.
- Deployment is a single proxy server.
- AD will be used for authentication and authorization through ADFS.
- Internal DNS entries have been configured for Web Application Proxy to resolve hostnames for backend servers.
- Public DNS entries have been configured to resolve external URLs for each published application.
- Firewall rules have been configured to allow traffic for the following connectivity:
- To ADFS through port 443
- To AD
- To published applications as required
The following items will be required to set up the proxy. Plan ahead so that items are available when needed.
- ADFS – must be deployed on a separate server.
- ADFS administrator account – required to access ADFS for authentication.
- Publicly signed certificate – an SSL certificate is required; it is strongly recommended to use a third-party certificate from a trusted vendor. The certificate subject is the same as the federation service namespace.
- SSO portal address – optional configuration; if the portal is deployed, an FQDN will be needed to assign to the SSO portal for end user access to hosted applications.
Example Information
To help make the instructions clear, the following examples are used to identify components.
| Internal Domain | Federated Domain | CelestixEdge Appliance | |
| FQDN | ad01.intexample.com | adfs.fedexample.com | CelestixEdge01.intexample.com |
| Host Name | ad01 | adfs | CelestixEdge01 |
| Domain Name | intexample.com | fedexample.com | intexample.com |
The setup wizard is a walk-through to configure components for proxy services.
Access the screen through the web UI at CelestixEdge|Features|Web Application Proxy|Wizard.
Wizard Instructions
- ADFS Service – enter the fully qualified domain name.
Example: adfs.fedexample.com
- Username – enter ADFS administrator account.
For example: intexample\adminuser
- Password – enter the password for the ADFS account.
Note: Entering the address creates the portal.
- Certificate
- Click the Import button.
- Complete the following:
- Certificate – navigate to and select the certificate that will be used for authentication.
- Password – enter the certificate passphrase.
- Click the Import button.
- The imported certificate should display in the Certificate field. If not, use the drop menu to select it.
- Click Next.
- Finish – review the settings; click Next to configure.
- The wizard is complete when the congratulations screen displays.
- SSO portal deployment: Click the PowerShell link to download a script that must be run on the ADFS server to set up a relying party trust.
The base level setup for Web Application Proxy is now complete.
Related Topics
Reconfigure Web Application Proxy
The wizard provides the steps to configure Work Folders settings for the CelestixEdge VE Series Appliance. Instructions cover the steps common to most deployments, but again, an individual organization may require different or additional configuration.
For setup, the administrator needs access to the following resources:
- The domain controller
- The external firewall (see Firewall Ports Reference)
- The VE Series appliance web UI
- Windows Server Manager
General Information provides necessary details to complete configuration.
The following deployment notes provide information to understand Work Folders configuration.
Information presented in the E Series setup instructions is based on the following:
- The Work Folders feature has been installed through the web UI.
- Deployment is a single sync server with a single sync share.
- The user security group is created prior to setting up the sync share.
- If DNS is configured for Work Folders access, it is completed before using the setup wizard.
The following items will be required to set up the Work Folders service. Plan ahead so that items are available when needed to complete configuration.
- Domain controller – Windows Server 2012 or higher.
- Publicly signed certificate – an SSL certificate is required for Work Folders; it must be a third-party certificate from a trusted vendor. Additional requirements:
- The certificate subject needs to be the same as the Work Folders public URL (format: workfolders.<domain_name>)
- Certificate subject alternative names (SANs) must list the server name for each sync server in use.
Note: A certificate is required for each server hosting the Work Folders feature.
- AD security group – a user group to control access to the sync share.
- Clients – supported options:
- Windows 8.1, 8.1 R, 7 (Professional, Ultimate, Enterprise)
- iPad with iOS 8.1 or later
Additional Configuration Notes
The notes below discuss options that can extended Work Folders functionality. They exceed the scope of these instructions, but will be helpful to consider when planning deployment.
- DNS configuration is required for the following instances:
- To sync files over the Internet, a public domain name with a DNS Host (A) record is required to allow clients to resolve the Work Folders URL.
- To sync files on an intranet, a DNS alias record is required on the internal network for the Work Folders URL that resolves to the server names of all sync servers on the network.
- ADFS facilitates the following services:
- Device Registration Service for Workplace Join
- RADIUS and multifactor authentication.
- Web Application Proxy allows clients to sync files over the Internet.
Configure Security Group
The best practice is to use security groups to manage Work Folder access. Set up for security groups in AD is described briefly and requires familiarity with AD domain administration.
To Create a User Group
- Create a dedicated Work Folders user group with these settings:
- Scope: Global
- Type: Security
- Add user accounts to the group.
The setup wizard is a walk-through to assign a certificate to encrypt remote access to work files.
Access the screen through the web UI at CelestixEdge|Features|Work Folders|Wizard.
Wizard Instructions
Use the following instructions to import the SSL certificate for Work Folders.
- Certificate – import a certificate to encrypt authentication:
- Click the Import button.
- Complete the following:
- Certificate Import – navigate to and select the Work Folders certificate that will be used for authentication.
- Password – enter the certificate passphrase.
- Click the Import button.
- The imported certificate should display in the Certificate field. If not, use the drop menu to select it.
- Click Next.
- Finish – review the settings; click Next to configure.
The wizard is complete when the congratulations screen displays. Next, a sync share directory must designated on the virtual appliance.
Required Configuration After Setup Wizard: Sync Share
Configuration must be customized for an environment:
- Open an RDP session from the local computer to the VE Series virtual appliance, using Remote Access Console (CelestixEdge|System|Remote Desktop).
- In Windows Server, open the Server Manager.
- Navigate to File and Storage Services|Work Folders.
- Click the link to create a sync share to open the Windows configuration wizard.
- When done, navigate to File|Exit in the remote desktop window to close and return to the Maintenance screen. Closing the application logs off the RDP session to the virtual appliance and is recommended to release management resources.
Note: If the File menu is not visible, use the quick close button.
The base level setup that allows external access to work files is now complete. Supported clients can now be configured to access sync services.
If all features have been configured, save a copy of the system image in the hypervisor to preserve initial configuration.
Celestix recommends running the Windows backup utility (System|Backup) once configuration is complete to provide a remediation option for issues that may result from future system updates or changes.
7 Update Software
The Software Update Service allows administrators to keep system software current through hotfixes, service packs, and upgrades. They are necessary for the security and proper functioning of the virtual appliance.
Access the update service through the web UI (System|Software Updates).
To find and install updates
- Navigate to System|Software Updates|Appliance Updates.
- Complete the following:
– click the Check for Updates button.
- Select an item.
- Install – install selected update.
- Confirm if prompted.
Once applicable updates are installed, Celestix recommends checking for Windows updates (System|Windows Updates).
Thank you for choosing the CelestixEdge VE Series Appliance for your remote connectivity solution. This completes the setup and configuration steps for base-level deployment.
Email questions to [email protected]
Use the links to jump to a topic:
- Web User Interface Content Overview
- Additional Features
- Firewall Ports Reference
- Glossary
- Index
- Resource Worksheet
Web User Interface Content Overview
The menu structure for the web UI is outlined below. Use it to quickly find features.
The descriptions below explain components that are not required for a base level deployment, but may be necessary functionality for a given deployment.
Read-Only Access
Read-only access allows organizations to give limited access to the web UI for reviewing log data or connectivity statistics without allowing access to settings or advanced tools. For information about configuring the feature, see the online help (System|Read-Only Access).
SecureAccess
SecureAccess is a remote access client application that provides automatic, always-on access to network resources and manage out functionality for Windows Home/Professional and Mac computers. For information about configuring the feature, see the online help (CelestixEdge|Remote Access Dashboard|SecureAccess).
Use the port reference information below to plan for deploying the virtual appliance.
Celestix Technology
The ports in the section below are required for Comet or application functionality.
TCP ports 80 and 443 outbound for Celestix licensing
TCP port 443 inbound to connect
TCP port 8098 inbound and outbound for licensing and to download configuration files
Microsoft Technology
The following reference information is provided here for convenience. It is based on Microsoft® TechNet articles for each of the technologies listed. It. Please see TechNet (https://technet.microsoft.com/) for the most current information.
Last update: 4/14/2016
DA (behind firewall unless otherwise stated)
Required
TCP port 443 inbound and outbound
Conditional
Protocol 41 inbound and outbound for 6to4
UDP port 3544 inbound and outbound for Teredo
VPN (behind firewall unless otherwise stated)
TCP port 1723 inbound and outbound for PPTP
Protocol 47 inbound and outbound for PPTP
TCP port 443 inbound and outbound for SSTP
UDP port 500 inbound and outbound for L2TP/IPsec/IKEv2
UDP port 4500 inbound and outbound for L2TP/IPsec/IKEv2
Protocol 50 inbound and outbound for L2TP/IPsec/IKEv2
UDP port 1701 inbound and outbound for L2TP/IPsec/IKEv2 (perimeter deployment)
TCP port 443 inbound and outbound
TCP port 22 inbound and outbound for SSH when SSO Portal is deployed
UDP port 1812
UDP port 1813
UDP port 1645
UDP port 1646
TCP 5504 for connection RD Connection Broker
TCP 5985 for WMI and PowerShell Remoting for administration
TCP 443 inbound for traffic from RD Clients
UDP 3391 inbound for traffic from RD Clients
TCP 88 inbound and outbound for Kerberos user authentication
TCP 135 inbound and outbound for RPC Endpoint Mapper
TCP|UDP 389 inbound and outbound for LDAP user authentication
TCP|UDP 53 inbound and outbound for internal resource name resolution, DNS
TCP|UDP 389 inbound and outbound for LDAP Certificate Revocation List (CRL)
TCP 80 inbound and outbound for HTTP Certificate Revocation List (CRL)
TCP 21 inbound and outbound for FTP Certificate Revocation List (CRL)
TCP 5985 inbound and outbound for WMI and PowerShell Remoting
TCP|UDP 3389 inbound and outbound for RDP
TCP port 443 inbound and outbound for folder synching
TCP port 80 inbound and outbound for folder synching
For reference if WAP or the SSO Portal are deployed.
TCP port 443 inbound
TCP port 49443 inbound for client TLS authentication using X509 user certificates
TCP 80 inbound and outbound for Certificate Revocation List (CRL)
A
Active Directory
Microsoft’s directory service for Windows domains.
Active Directory Federation Services
The Microsoft implementation of single sign-on (SSO).
AD
Acronym for Active Directory
ADFS
Acronym for Active Directory Federation Services
C
CA
Acronym for certificate authority
Certificate
The tool that TLS/SSL uses to encrypt communication.
Certificate authority
An entity that issues certificates to encrypt digital communication.
Certificate revocation list
A list of certificates that are no longer valid for encryption.
Comet
Comet provides a web user interface (web UI) for convenient access to administration functions like setup, network configuration, and server task management.
CRL
Acronym for certificate revocation list
D
DA
Acronym for DirectAccess
Device Registration Service
A feature of ADFS that facilitates Workplace Join, which allows users to register unmanaged devices to be known entities to the domain.
DirectAccess
A secure Remote Access connection that provides remote access to the internal network and manage-out capabilities.
Directory synchronization
A Microsoft tool that synchronizes users, groups, and attributes (like distribution groups or user phone numbers) to an Office365 instance.
DirSync
Abbreviation for Directory Synchronization
DNS
Acronym for Domain Name System
Domain Name System
A service that translates domain names into IP addresses.
DRS
Acronym for Device Registration Service
F
Failover
A part of high availability where switching from failed to redundant components occurs, usually automatically.
Federation
Federation refers to the mechanism that creates trust relationships for identity management. These trust relationships then allow single sign-on for multiple independent systems.
H
HA
Acronym for high availability
High availability
A system implementation that minimizes downtime, meaning unavailability to users.
I
Identity provider
An entity that authenticates a user to a service provider.
M
Multifactor authentication
Employs additional forms of user data for authentication. Two-factor authentication using one-time passwords is a common example.
N
Namespace
A unique identifier for the authentication environment.
Network access server
A component of RADIUS authentication. Abbreviated NAS.
Network Policy Server
How Microsoft implements RADIUS.
NPS
Acronym for NPS
O
Office 365
The cloud implementation of the Microsoft Office productivity suite.
P
Password Sync
A component of the Microsoft Directory Synchronization tool that coordinates password hashes between internal Active Directory and Office365.
portal page
The portal page consolidates external access to published applications.
R
RADIUS
Remote Access Dial In User Service (RADIUS) is an authentication protocol (RFC 2865). The HOTPin system uses the Microsoft application Network Policy Server (NPS) to implement RADIUS.
RADIUS client
A RADIUS client is a network access server (NAS) that facilitates authentication requests between access clients and the HOTPin system when RADIUS is used as the authentication protocol.
Read-only access
Read-only access provides configuration to designate access with a low level of access to the web UI to check configuration and monitor connectivity data.
Redundancy
A part of high availability design that employs additional resources, like extra servers, to carry out required functionality in the event one component fails.
Relying party trust
Designates a service provider as a partner organization for ADFS. The service provider is a relying party that ADFS will trust authentication requests from.
Remote Access Dial In User Service
See RADIUS.
S
SecureAccess
SecureAccess is a remote access technology that provides Windows Professional and Mac computers an experience similar to DirectAccess. It creates an always-on connection to the organization network using VPN protocols. Once users install the client and provide credentials, computers automatically connect to the network whenever there is an Internet connection.
Service provider
An entity that trusts an identity provider for user authentication in a federated system.
Single sign-on
Allows login to multiple system using one set of credentials. In ADFS, once users log in with their organization AD credentials, they can access federated resources without being prompted further for authentication.
SSO
Acronym for single sign-on
U
UAG trunk
A repository of published applications for user access; this term only applies to Celestix WSA environments or other UAG deployments.
V
Virtual Private Network
A secure Remote Access connection that provides access remote access to the internal network.
VPN
Acronym for virtual private network
W
WAP
Acronym for Web Application Proxy
Web Application Proxy
A reverse proxy solution that publishes internal web applications for external access.
WID
Acronym for Windows Internal Database
Windows Internal Database
A version of SQL Server Express that is automatically included with Windows Server. It is the default data store option for ADFS.
Workplace Join
The function that allows users to register devices with the domain through DRS; devices can then access application resources based on trust.
A
add Remote Access features, 14
Appendix
links, 35
Resource Worksheet, 52
Resource Worksheet Example, 47
web UI navigation, 36
appliance installation, 8
C
CelestixEdge
configuration, 11
setup wizard, 12
certificate
WAP Requirement Checklist, 27
Work Folders Requirement Checklist, 29
configuration
CelestixEdge, 11
federation, 11
conventions
document usage, 1
D
Deployment Assumptions for Remote Access, 20
Deployment Assumptions for WAP, 27
Deployment Assumptions for Work Folders, 29
DirectAccess setup, 21
E
E Series version information, 7
F
Features
install, 14
NPS, 15
RD Gateway, 17
Remote Access with VPN, 16
Remote Desktop Web Access, 18
WAP, 17
Work Folders, 18
federation
configuration, 11
firewall ports, 38
G
Glossary, 40
I
install Remote Access features, 14
Installation
install the application, 9
L
login
web UI, 10
N
NPS
install feature, 15
O
overview, 2
network components, 5
R
RD Gateway
install feature, 17
read-only access, 37
Remote Access
Deployment Assumptions, 20
Requirement Checklist, 20
Remote Access/VPN
install feature, 16
Remote Desktop Web Access
install feature, 18
Requirement Checklist for Remote Access, 20
Requirement Checklist for WAP, 27
Requirement Checklist for Work Folders, 29
resources overview, 5
S
SecureAccess, 37
setup
Remote Access with VPN, 21
WAP, 28
Work Folders, 30
setup wizard
CelestixEdge, 12
Setup Wizard for Remote Access with VPN, 21
Setup Wizard for WAP, 28
Setup Wizard for Work Folders, 30
Software
update, 34
U
Update software, 34
V
version information, 7
VPN setup, 21
W
WAP
Deployment Assumptions, 27
install feature, 17
Requirement Checklist, 27
setup, 28
web UI, 6
navigation, 36
web UI login, 10
Work Folders
Deployment Assumptions, 29
install feature, 18
Requirement Checklist, 29
Work Folders setup, 30
It will expedite the process to gather and verify resource information in the Resource Worksheet below before starting appliance installation and setup. An example of the worksheet is provided below with descriptions for the information it includes. A blank copy of the worksheet, which can be printed, is included in the Appendix.
Note: Incorrect network configuration could compromise or impede the appliance.
Table: Worksheet Form Example
| Bold items are required | ||
| Computer name | Used in – Configuration : Use the Setup Wizard : Wizard Instructions The server must be assigned a computer name. The computer name must be 15 alphanumeric characters or less. | |
| Administrator password | The local administrator password is necessary to log in to the web UI. | |
| Workgroup or domain name | Used in – Configuration : Use the Setup Wizard : Wizard Instructions : Hostname and Domain Required for server setup. Record the name of the Workgroup or Domain that will be joined during setup. | |
| LAN information Private or internal network interface | IP address Subnet mask Default gateway Primary/secondary DNS server(s) Static routes: Network address Gateway address | Used in – Configuration : Use the Setup Wizard : Wizard Instructions : Network Interfaces Required for virtual appliance setup. The LAN (private network interface) adapter of the appliance is the interface assigned to internal network traffic. |
| WAN information Public or external network interface | IP address Subnet mask Default gateway Primary/secondary DNS server(s) Static routes: Network address Gateway address | May be needed in – Configuration : Use the Setup Wizard : Wizard Instructions : Network Interfaces The WAN (public network interface) adapter of the appliance is the interface assigned to external network traffic. This configures how the WAN, or public interface, connects to the Internet. |
| DMZ information Additional network interfaces | Include the IP address/subnet mask for each adapter to be used. | May be needed in – Configuration : Use the Setup Wizard : Wizard Instructions : Network Interfaces The DMZ adapters are optional configuration. This information is only necessary to assign static IP addresses to these adapters. |
| Active Directory Domain Services (AD DS)Active Directory server | IP address Hostname User account/password | Used in – Configure Remote Access : Use the Setup Wizard : Wizard Instructions |
| ADFS | AD DS FQDN Administrator account | Used in – Configuration : Install Features : Web Application Proxy ADFS is required for Web Application Proxy. |
| Network Policy Server | Network Access Server (RADIUS Client) IP Address Shared secret Network policy criteria Authentication protocol options | May be needed in post-configuration for NPS or Remote Desktop Gateway. Setting up RADIUS authentication requires designating the NPS clients that will forward access requests, the criteria that will service as the policy to grant access, and the protocols that will be used for authentication. |
| DirectAcces/VPN | DA server Static IP address(es) Public address for client connections GPOs (if using customized policies) NLS certificate (if using external server) Infrastructure server(s) DA client Public address Subnet mask Default gateway DNS VPN server Client IP address pool (if not using DHCP) RADIUS server information (if not using Windows authentication) | Used in – Configuration : Configure Remote Access : Use the Setup Wizard : Wizard Instructions. The Remote Access/VPN wizard will require server information. The client information will be required to set up remote devices. Note: Infrastructure server information refers to resources not discoverable by Active Directory. |
| PKI (if applicable) | IP address | May be needed in post-configuration for DirectAccess. PKI is recommended but no longer required for DirectAccess deployment, with a few exceptions, like OTP authentication. Note: Root certificate required. |
| Web Application Proxy | ADFS FQDN SSL certificate | Used in – Configuration : Configure Web Application Proxy : Use the Setup Wizard : Wizard Instructions Note: Root certificate required. |
| SSO Portal | Firewall rules for HTTPS and SSH communication Application requirements: URL Certificate Hostname Port File format | The SSO portal is a WAP feature. Rules need to be created in the edge firewall to allow application communication. While each application type is different, the list of application requirements covers common information for publishing a variety of applications. |
| Syslog | SIEM: FQDN/IP Port Certificate | The Logging feature, sometimes referred to as syslog, is a security information and event management solution (SIEM) feature. Server information is needed if a SIEM server is deployed on the network. An SSL certificate is required for encrypted remote logging. |
| Remote Desktop Gateway | RD Gateway (join domain) IP address Hostname External FQDN AD DS IP address Subnet mask Default gateway DNS RD Session Host (domain joined) IP address Hostname RD Connection Broker (domain joined) IP address Hostname RD Web Access (domain joined) IP Address Hostname Firewall rules | Used in – Configuration : Install Features : Feature Details : Remote Desktop Gateway : Required Configuration After Installation |
| Remote Desktop Web Access | RD Web Access Server (domain joined) IP address Hostname AD DS IP address Subnet mask Default gateway DNS RD Session Host (domain joined) IP address Hostname RD Connection Broker (domain joined) IP address Hostname Remote Desktop Virtualization Host server (optional) IP address Hostname Firewall rules | Used in – Configuration : Install Features : Feature Details : Remote Desktop Web Access : Required Configuration After Installation |
| Work Folders | Sync share name SSL certificate AD security group for user accounts Sync share DNS entry (recommended) | Used in – Configuration : Configure Work Folders : Use the Setup Wizard : Wizard Instructions |
| RADIUS server | IP address Hostname | May be needed to set up Remote Access with VPN or NPS. |
| RADIUS clients | IP address Hostname | May be needed to set up Remote Access with VPN or NPS. |
| DNS | ADFS FQDN Host/cluster IP | DNS must be updated to resolve the SSO portal FQDN to the WAP IP address. |
| Public domain registrar | Credentials | In SSO portal deployments, the portal FQDN should be added as a record to the public DNS host service for the federated domain. |
| SMTP server | IP address SMTP gateway name | May be needed in – Configuration : Use the Setup Wizard : Wizard Instructions : Alerts Email Optional configuration; SMTP is required for Alert Email. |
| Workplace Join | AD DS FQDN AD DS service account ADFS IP address ADFS FQDN DRS DNS entry | This information would be used to extend functionality needed to set up BYOD access. |
| Application server | IP address Hostname | May be needed in post-configuration for: Web Application Proxy Remote Desktop Gateway RD Web Access |
Table: Worksheet Form Example
| Bold items are required | ||
| Computer name | ||
| Administrator password | ||
| Workgroup or domain name | ||
| LAN information Private or internal network interface | IP address Subnet mask Default gateway Primary/secondary DNS server(s) Static routes: Network address Gateway address | |
| WAN information Public or external network interface | IP address Subnet mask Default gateway Primary/secondary DNS server(s) Static routes: Network address Gateway address | |
| DMZ information Additional network interfaces | Include the IP address/subnet mask for each adapter to be used. | |
| Active Directory Domain Services (AD DS) | IP address Hostname User account/password | |
| ADFS | AD DS FQDN Administrator account | |
| Network Policy Server | Network Access Server (RADIUS Client) IP Address Shared secret Network policy criteria Authentication protocol options | |
| DirectAcces/VPN | DA server Static IP address(es) Public address for client connections GPOs (if using customized policies) NLS certificate (if using external server) Infrastructure server(s) DA client Public address Subnet mask Default gateway DNS VPN server Client IP address pool (if not using DHCP) RADIUS server information (if not using Windows authentication) | |
| PKI (if applicable) | IP address | |
| Web Application Proxy | ADFS FQDN SSL certificate | |
| SSO Portal | Firewall rules for HTTPS and SSH communication Application requirements: URL Certificate Hostname Port File format | |
| Syslog | SIEM: FQDN/IP Port Certificate | |
| Remote Desktop Gateway | RD Gateway (join domain) IP address Hostname External FQDN AD DS IP address Subnet mask Default gateway DNS RD Session Host (domain joined) IP address Hostname RD Connection Broker (domain joined) IP address Hostname RD Web Access (domain joined) IP Address Hostname Firewall rules | |
| Remote Desktop Web Access | RD Web Access Server (domain joined) IP address Hostname AD DS IP address Subnet mask Default gateway DNS RD Session Host (domain joined) IP address Hostname RD Connection Broker (domain joined) IP address Hostname Remote Desktop Virtualization Host server (optional) IP address Hostname Firewall rules | |
| Work Folders | Sync share name SSL certificate AD security group for user accounts Sync share DNS entry (recommended) | |
| RADIUS server | IP address Hostname | |
| RADIUS clients | IP address Hostname | |
| DNS | ADFS FQDN Host/cluster IP | |
| Public domain registrar | Credentials | |
| SMTP server | IP address SMTP gateway name | |
| Workplace Join | AD DS FQDN AD DS service account ADFS IP address ADFS FQDN DRS DNS entry | |
| Application server | IP address Hostname | |