Integration with Delinea via SAML Connector
Configure V-OS Cloud SAML Connector
Note: The following procedure requires copying and pasting information between V-OS Cloud and the Delinea Platform. We recommend opening both applications before you begin, and keeping both open until you are finished.
1. Log in to the V-OS Cloud Dashboard with an admin account
2. From the left navigation menu, click Connectors and then SAML 2.0.
3. Click + CREATE on the upper-right portion of the page.
4. Set the Connector Type to Generic SAML2.0 Connector.
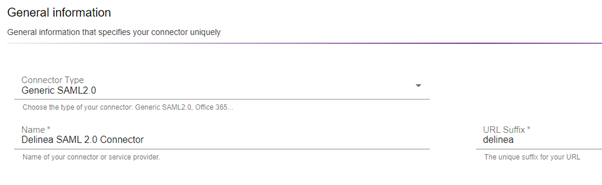
5. Assign a name to the SAML 2.0 connector for easy identification, e.g., Delinea SAML 2.0 Connector. This can be any name.
6. Fill the URL Suffix. The URL suffix can be any text without space, e.g., delinea.
7. In the Service Provider section, fill the Entity ID with some temporary text, e.g., delinea.

Note: The information is to be updated after the Delinea configuration is done.
8. Fill the Assertion Consumer Service URL with a temporary URL, e.g., https://delinea.app/
9. Fill the Default Replay State with RelayState.
10. In the SAML Response section, set the NameID Format to urn:oasis:names:tc:SAML:1.1:nameid-format:emailAddress.
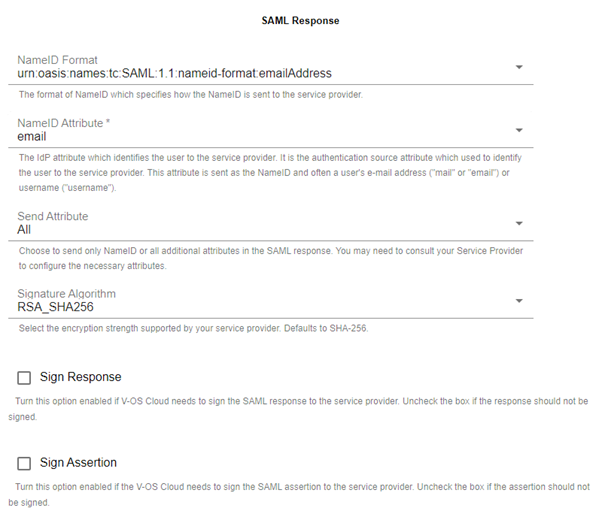
11. Set the NameID Attribute to email.
12. Set the Send Attribute to All.
13. Set the Signature Algorithm to RSA_SHA256.
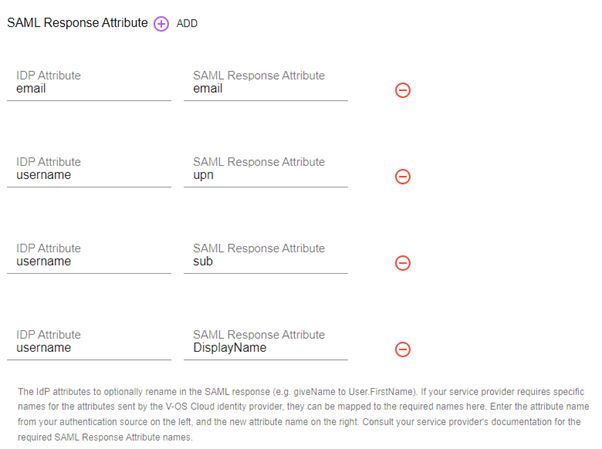
14. Click the “add” icon next to the SAML Response Attribute label and add the followings to the respective fields:
a. IDP Attribute = email
SAML Response Attribute = email
b. IDP Attribute = username
SAML Response Attribute = email
c. IDP Attribute = username
SAML Response Attribute = sub
d. IDP Attribute = username
SAML Response Attribute = DisplayName
15. In the Identity Provider Information section, the fields are all generated automatically
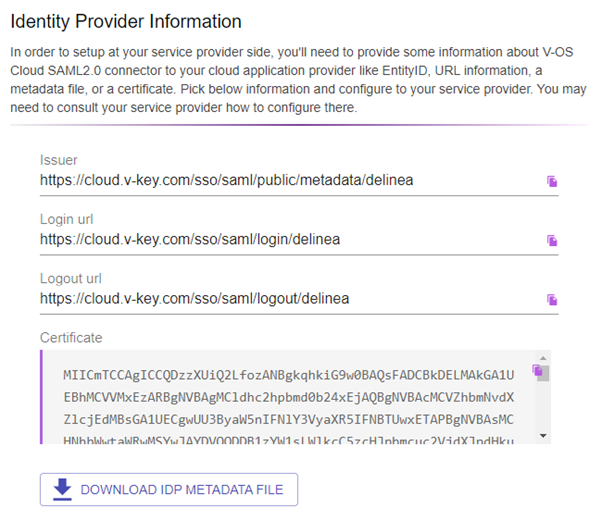
Note: The information is to be filled in the respective fields at the SSO connector configuration section at Delinea. Take note of the values in the Identity Provider Information section. You may come back to this section again when the information is needed.
16. Click DOWNLOAD IDP METADATA FILE to download the metadata file that will be uploaded to Delinea during setup.
17. Click Save to create the SAML 2.0 connector.
Add the provider to the Delinea platform
- Log in to Delinea platform.
- Navigate to Administration->User Management ->Federation Providers.
- Click Add Provider in the upper right corner.
- Select SAML from the drop-down menu. The Add Provider page opens.
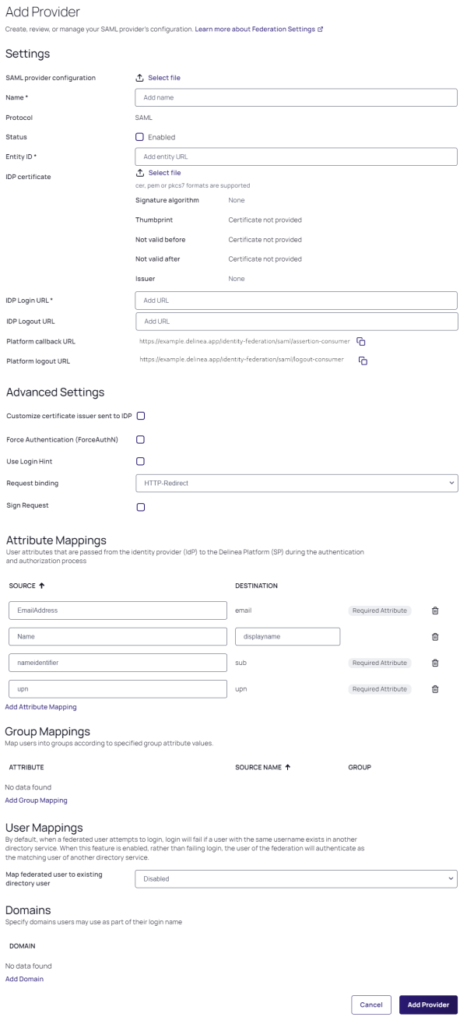
Settings
In the Settings section, the first fields are automatically populated when you select the SAML provider configuration file and click Apply
- SAML provider configuration: Click Select file.
- Navigate to and select the federation metadata XML file you downloaded. Apply appears above the right end of the SAML provider configuration field.
- Click Apply. The words Uploaded successfully will appear next to SAML provider configuration, and the empty fields below will be auto-populated:
Name: Auto-generated from metadata.
Protocol: SAML (auto-filled)
Status: Select the box next to Enabled.
Entity ID: Auto-generated from metadata. (Issuer
IDP Certificate: Click Select File to populate the following fields:
-
- Signature
- Algorithm
- Thumbprint
- Not valid before
- Not valid after
- Issuer
- IDP Login URL: Paste in the Login URL from your V-OS Cloud SAML 2.0 Connector.
- IDP Logout URL: Paste in the Logout URL from your V-OS Cloud SAML 2.0 Connector.
- Platform Callback URL: https://[HOST-NAME].delinea.app/identity-federation/saml/assertion-consumer Copy the Platform Callback URL to paste into the Allowed Callback URLs field in your V-OS Cloud SAML 2.0 Connector.
- Platform Logout URL: https://[HOST-NAME].delinea.app/identity-federation/saml/logout-consumer
- Status: Select the box next to Enabled.
Attribute Mappings
Set the following values.
For email, sub and upn, set the source to email.
For DisplayName, set the source to username.
Domains
Click Add Domain and enter the domain from the email addresses of the users you are including in this federation.
When all required fields are populated, click Add Provider.
Integration with Delinea via OIDC Connector
Configure V-OS Cloud OIDC Connector
Note: The following procedure requires copying and pasting information between V-OS Cloud and the Delinea Platform. We recommend opening both applications before you begin, and keeping both open until you are finished.
1. Log in to the V-OS Cloud Dashboard with an admin account.
2. Click Connectors > OpenID Connect on the left sidebar.
3. Click + CREATE on the upper-right portion of the page.
4. Assign a Client Name to the OIDC connector for easy identification, e.g., Delinea OIDC Connector. This can be any name
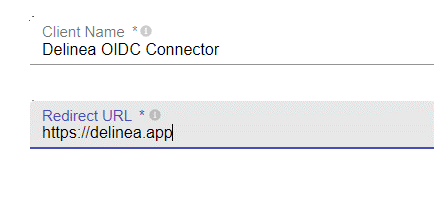
5. Fill the Redirect URL with some dummy value. This value will be replaced after the provider is added to the Delinea platform.
6. Click Save to create the OIDC connector.
7. After the OIDC connector is saved, you shall see the Client ID and Client Secret auto-generated. Take note of both values.

8. Click the OpenID Endpoint Configuration link to show the endpoint configuration. Take note of the value of authorization_endpoint key that will be used when configuring the provider in Delinea platform.
{ “issuer”:”https://cloud.v-key.com/auth/realms/░░░░░░░░”, “authorization_endpoint”:”https://cloud.v-key.com/auth/realms/░░░░░░░░/protocol/openid-connect/auth”, “jwks_uri”:”https://cloud.v-key.com/auth/realms/░░░░░░░░/protocol/openid-connect/certs”, “response_types_supported”:[“id_token”], “subject_types_supported”:[“public”,”pairwise”], “id_token_signing_alg_values_supported”:[“RS256”], “response_modes_supported”:[“form_post”], “claims_supported”:[“sub”,”VkeyMfa”], “claim_types_supported”:[“normal”], “scopes_supported”:[“openid”] }
Add the provider to the Delinea platform
- Log in to Delinea platform.
- Navigate to Administration->User Management ->Federation Providers.
- Click Add Provider in the upper right corner.
- Select OIDC from the drop-down menu. The Add Provider page opens.

Settings
- Name: Enter a unique name.
- Status: Select the box next to Enabled.
- Endpoint URL: Paste in the Issuer obtained from OpenID Endpoint Configuration link above.
- Client ID & Client Secret: Paste in the Client ID & Client Secret obtained from V-OS Cloud OIDC Connector.
- Platform Callback URL: Copy the URL and paste the copied callback URL into the Redirect URL field of V-OS cloud OIDC connector.
Attribute Mappings
Set the following values.
In the email and sub fields, change the text to http://schemas.xmlsoap.org/ws/2005/05/identity/claims/emailaddress.
In the upn field, change the text to http://schemas.xmlsoap.org/ws/2005/05/identity/claims/nameidentifier
Domain
Enter the domain from the email addresses of the users you are including in this federation.
Click Add Provider.