Introduction
Purpose
V-OS Cloud is both platform-as-a-service (PaaS) and software-as-a-service (SaaS) solution developed by V-Key, a global leader in software-based digital security, which provides online services that enable organizations with V-Key’s pioneering mobile technology powers ultra-high-security solutions for mobile identity, authentication, authorization, and payments for major banks, payment gateways, and government agencies without any expenditure of setting, operating, or maintenance for server components. On our V-OS Cloud, everything in our V-Key Suite is available there with latest versions, 24/7 supports, quickly onboarding that helps any kind of organization sign up, onboarding and implement security solutions easily.
V-OS Cloud provides the following services:
- Platform-as-a-service:
- V-OS App Protection
- V-OS PKI Smart Token
- V-OS Messaging
- V-OS eKYC
- Software-as-a-service:
- VPN 2FA
- Office 365 2FA
Scope
The scope of this guideline is to explain the concepts, components, and configuration steps for the solutions and services provided by V-OS Cloud.
Assumptions
The audience of this document are administrators or technical personnel of an organization who have the background on computer science, network, security, and system administration. Before using this guide, you are assumed to be familiar with the various concepts/tools below:
- Directory Services(Active Directory, OpenLDAP), RADIUS, or SAML2.0 protocols.
- Domain Federation on Office 365 Exchange Servers
- PowerShell command line tool
- Computer security domain, such as certificates, public key infrastructure, certification authority, etc.
Glossary
| Abbreviation | Description |
|---|---|
| PKI | Public Key Infrastructure |
| TS | Token Serial |
| APIN | Activation Personal Identification Number |
| VPN | Virtual Private Network |
| LDAP | Lightweight Directory Access Protocol |
| LDAPS | Lightweight Directory Access Protocol Secured (LDAP over TLS) |
| OpenLDAP | Open LDAP |
| AD | Active Directory |
| SSL | Secure Sockets Layer |
| TLS | Transport Layer Security |
| RADIUS | Remote Authentication Dial-In User Service |
| SAML | Security Assertion Markup Language |
| MFA | Multi-Factors Authentication |
| 2FA | Two-Factors Authentication |
| VCAG | V-OS Cloud Access Gateway |
| TP | Token Pack |
General Concepts
V-OS Cloud Portal
The V-OS Cloud Portal (the Portal) is the web interface where you can sign up, subscribe, manage subscriptions, services, payments, and orders. The URL to the Portal is https://cloud.v-key.com.
V-OS Cloud Dashboard
The V-OS Cloud Dashboard (the Dashboard) is the client area restricted by access accounts. You can log in to the Dashboard with either a root, admin, or supervisor account. You can configure (environments, services, and connectors), deploy services, and manage service users of your organization through the Dashboard. Only root and admin users have the rights to do configurations and modifications in the Dashboard. Users with supervisor access right have only view access to the Dashboard. The URL to login to the Dashboard is https://cloud.v-key.com/#/login.
V-OS Cloud Access Gateway
The V-OS Cloud Access Gateway (VCAG) is the access gateway that handles communication between the V-OS Cloud and various components such as directory, RADIUS server, SAML server, etc. that are available in your organization for initiating and performing the authorization and authentication of end users.
Accounts and Users
Accounts at V-OS Cloud Dashboard are the entry point of the V-OS Cloud services. You can configure and set up the V-OS Cloud services via the Dashboard to enable 2FA secure authentication on your end users upon login to the services such as VPN access and Office 365. You need to register a root account at the Portal to start using the V-OS Cloud services. Upon successful registration, you will be provided with a root account to access the Dashboard. You can use the root account to create admin and supervisor accounts if desired.
Root User
A root user is an administrative user with the highest privileges to your organization’s account in the Dashboard. The root user can create admin and supervisor accounts, do all type of configurations, and manage app users of your V-OS Cloud services.
Note: In order to use any of the V-OS Cloud Services, you need to have at least the root account to perform the configuration and setup tasks.
Admin User
Users with admin role are users with rights to configure V-OS Cloud services that are available to your organization and manage app users of the V-OS Cloud services via the Dashboard.
Supervisor User
Users with supervisor role are users with read-only access the Dashboard. They can access all pages on the Dashboard but have no rights to do any of the modifications.
App User
The app users are users of the apps that are integrated with V-OS Cloud services. It can be the V-Key app available in both the Apple App Store and Google Play Store, or an app built by your organization to access the V-OS Cloud services. The credentials of the app users are stored in your organization’s directory. V-OS Cloud does not manage app users’ credentials.
Token Pack
A token pack is a QR code that contains the main directory connector that is used for authenticating the end users while they log in to the V-Key app. The token pack also contains the configurations of the server environment that you have set up and the service instances that you have subscribed to. An initial token pack is automatically generated when the subscription is approved by V-Key. You can manually create new token packs for every different configuration using the root/admin accounts. You can use difference token packs to differentiate environments (development, staging, or production), regions, etc.
V-Key App
The v-key app is a mobile app developed for V-OS Cloud that can be used to do 2nd factor authentication for both VPN access and Office 365 services. It serves as a virtual token to help end users manage accounts and do authentication approval. The V-Key app is mandatory for end users to utilize the V-OS Cloud services if your organization subscribed to the Free or Professional plan. The V-Key app can be downloaded from the Apple App Store and Google Play Store. It is recommended to always upgrade your V-Key app to the latest version.
Themes
The app theming feature is available if you subscribe to the Professional or Enterprise plan. With this app theming feature, different themes can be created based on your preferences or corporate branding guidelines. The capability of customizing theme can help your organization to avoid development and maintenance cost in having an own app for the same purpose while maintaining the same corporate look and feel. You can customize the image, color, background, text displayed on each app screen. The themes created can be used for the V-Key app on both Android and iOS platforms.
When a theme is applied to the V-Key app, the end users tagged to your organization will see the V-Key app in the theme that you have assigned to the app. The V-Key app is connected to the V-OS Cloud Portal and will retrieve and apply the latest theme that you have assigned to the app. To avoid incompatibility issue, themes created will need to be reviewed and approved by V-Key before you can apply the theme to the app.
The V-Key theme is provided by default. If you do not create any custom theme, the default V-Key theme is used.
Service Instance
A service instance is an instance of the service provided by V-OS Cloud. The service instances are automatically created and available in the Dashboard upon subscription approval. You can configure, manage, start, stop, and do user control through the service instance. The 2FA for VPN and 2FA Service for O365/SAML is available by default to all subscription plans.
Connector
V-OS Cloud needs to connect to on-premise or third-party service provider components to implement services for your organization. V-OS Cloud provides connectors to connect to those components. To use the V-OS Cloud services, the following connectors are available in the Dashboard for configuration:Directory ConnectorThis connector connects to the local Active Directory, or online directories like Azure AD, JumpCloud, or even OpenLDAP that is used by your organization. Directory connector is mandatory for setting up token pack and service instances. VCAG supports both LDAP and LDAP Secure connections.RADIUS ConnectorThis is used by 2FA for VPN. VCAG needs to connect to the RADIUS server of your organization, e.g. SonicWall server. This connector receives and responds to an authentication request from the RADIUS server, which is placed in the local network of your organization.SAML2.0 ConnectorThis is used by 2FA Service for O365/SAML. VCAG will be federated with Office 365 tenant of your organization. VCAG communicates with Office 365 server via SAML2.0 connector, which receives and responds for SAML authentication request from Microsoft Office 365 server. V-OS Cloud supports SAML2.0.
License Generation Prerequisites
Note: This is only applicable if you subscribe to the Enterprise plan or solutions of PaaS. The detailed guidelines will be provided by the Professional Service Team who will get in touch with you after you have subscribed to the Enterprise plan. Select the Contact Us button under the Enterprise plan and get in touch with our Sales Team.
Dashboard Guidelines
Accounts
The Accounts section lets you create and manage the accounts in the Dashboard. You can create users, edit user roles, and deactivate users through this section. Only the user with root access will be able to create and edit account. Users with other roles have only read access.
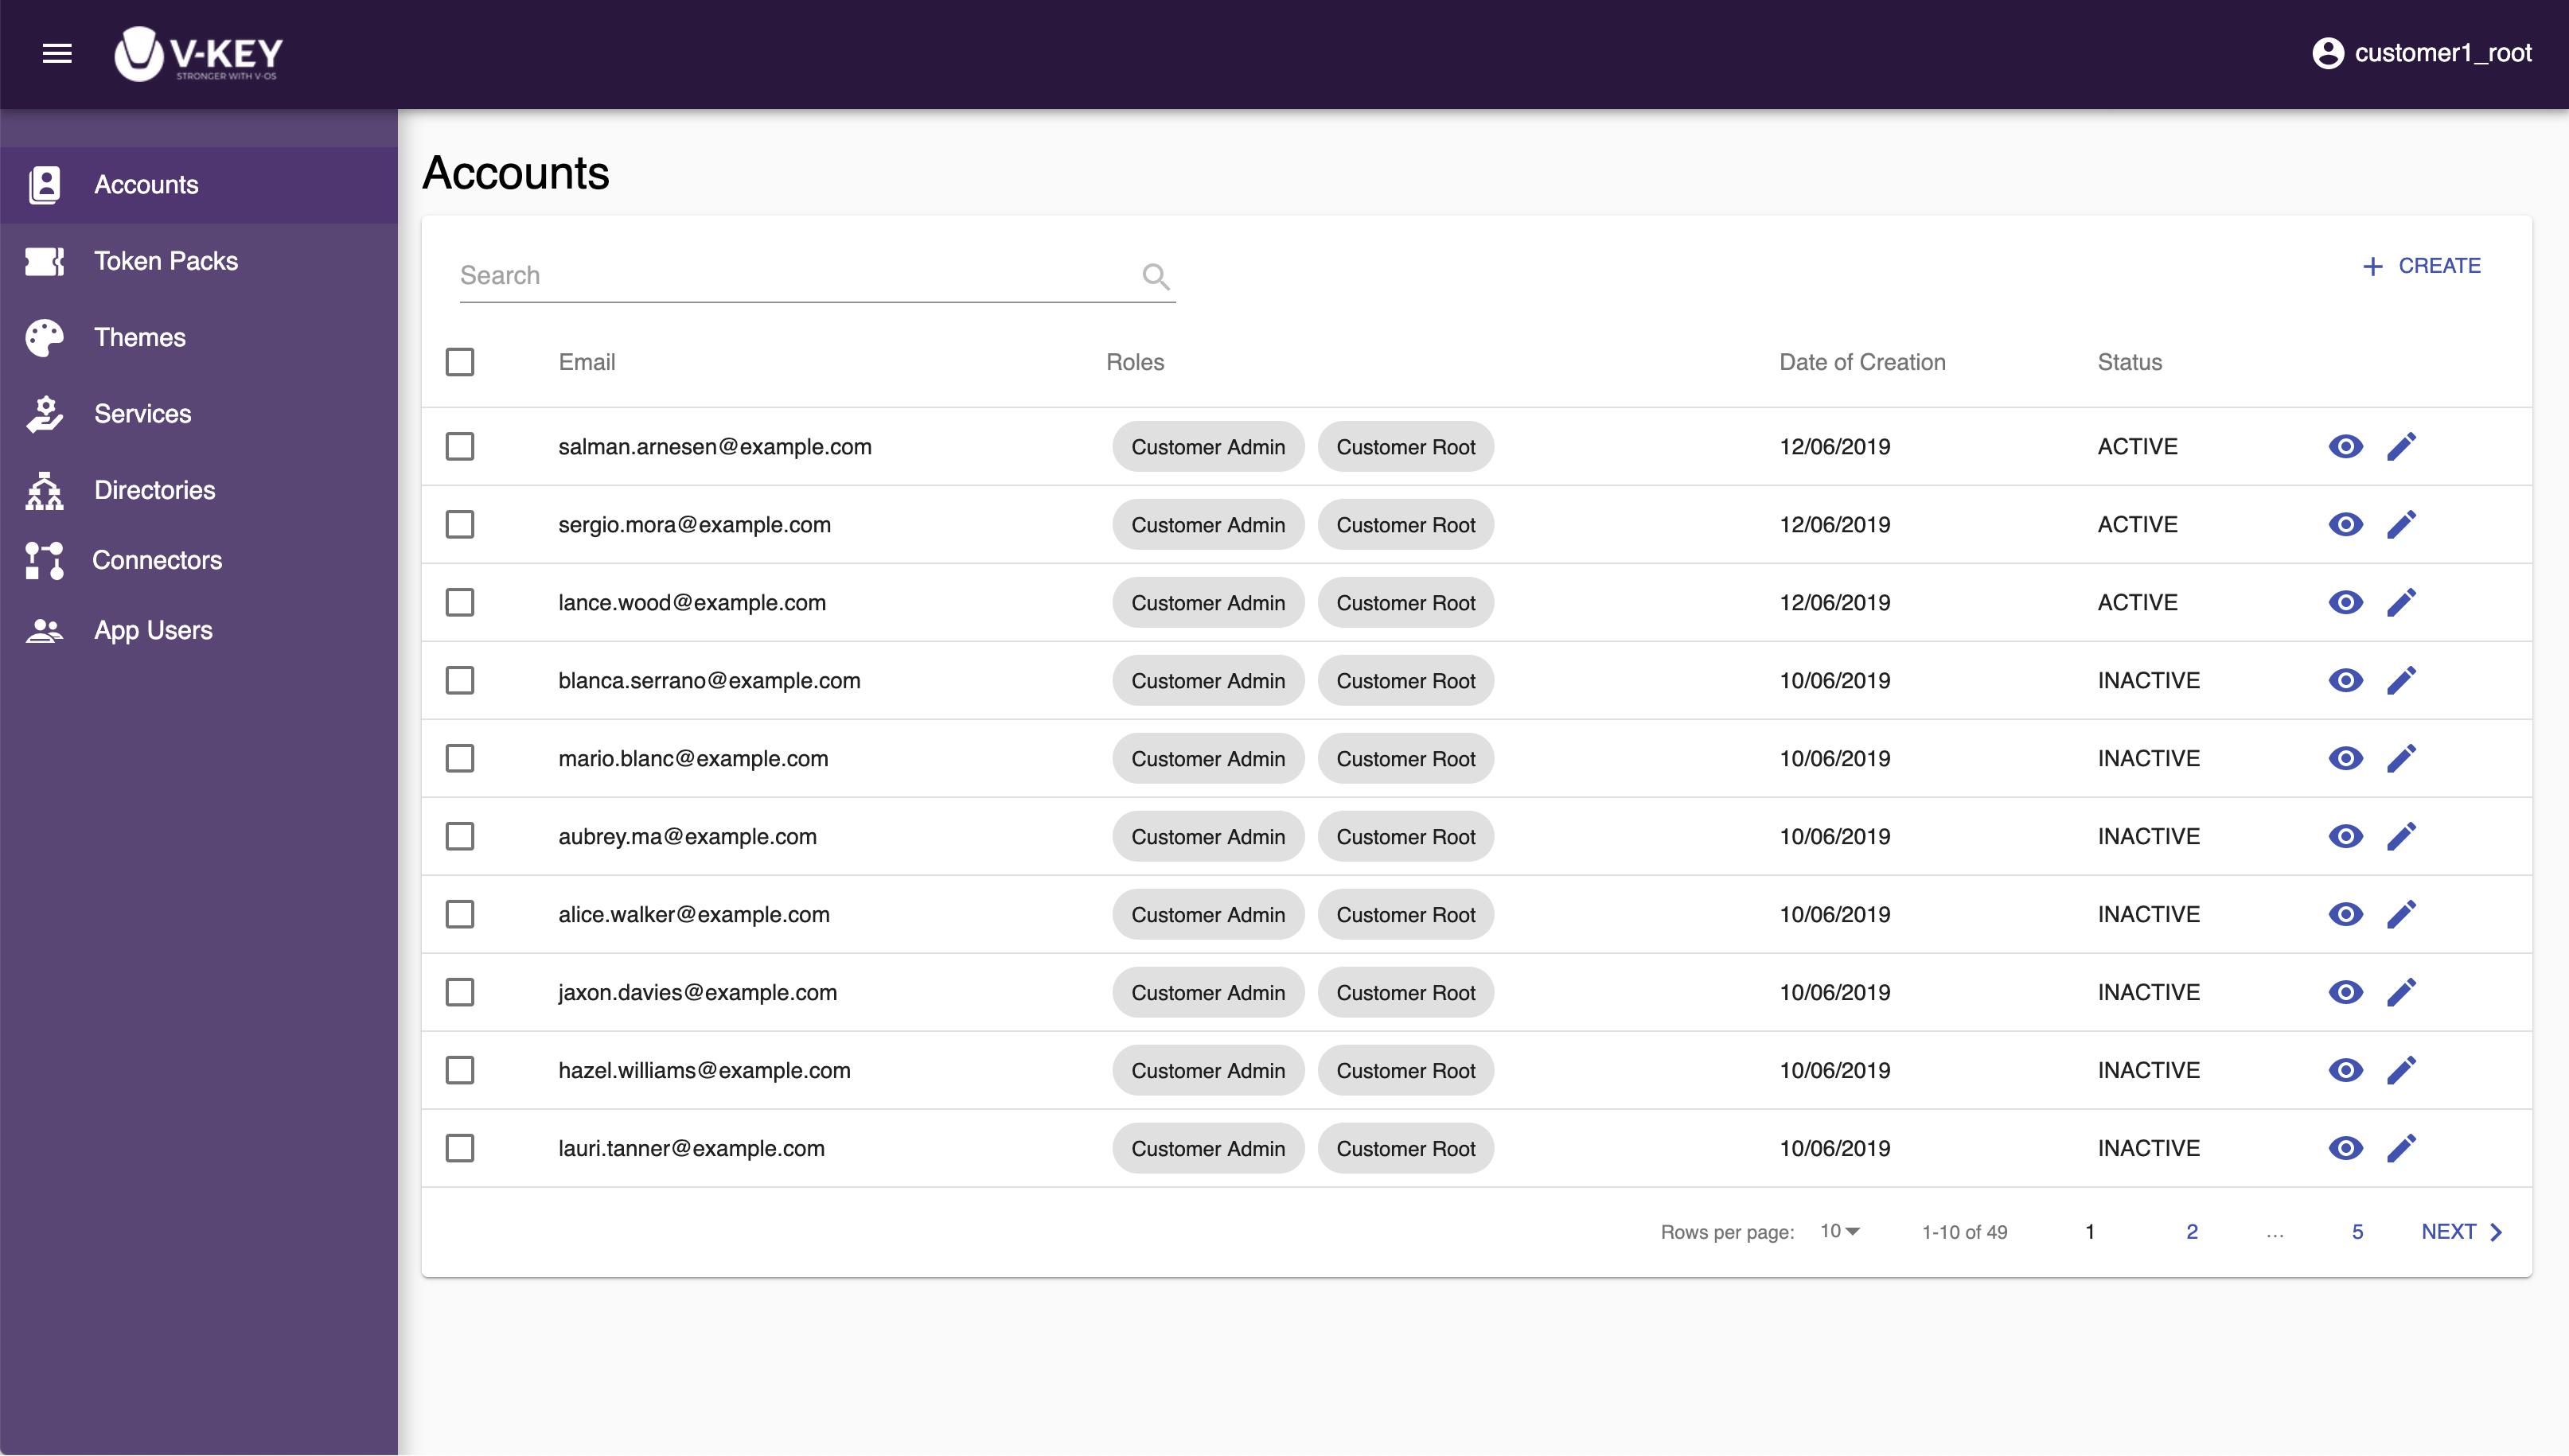
Creating Account
To create an account in the Dashboard, do the following steps:
- Log in to the Dashboard with a root account.
- Select the Accounts button on the left navigation bar if you are not already on the Accounts page.
- Select the + CREATE link on the top-right corner of the screen.
- On the Create Account page, fill the Email of the user.
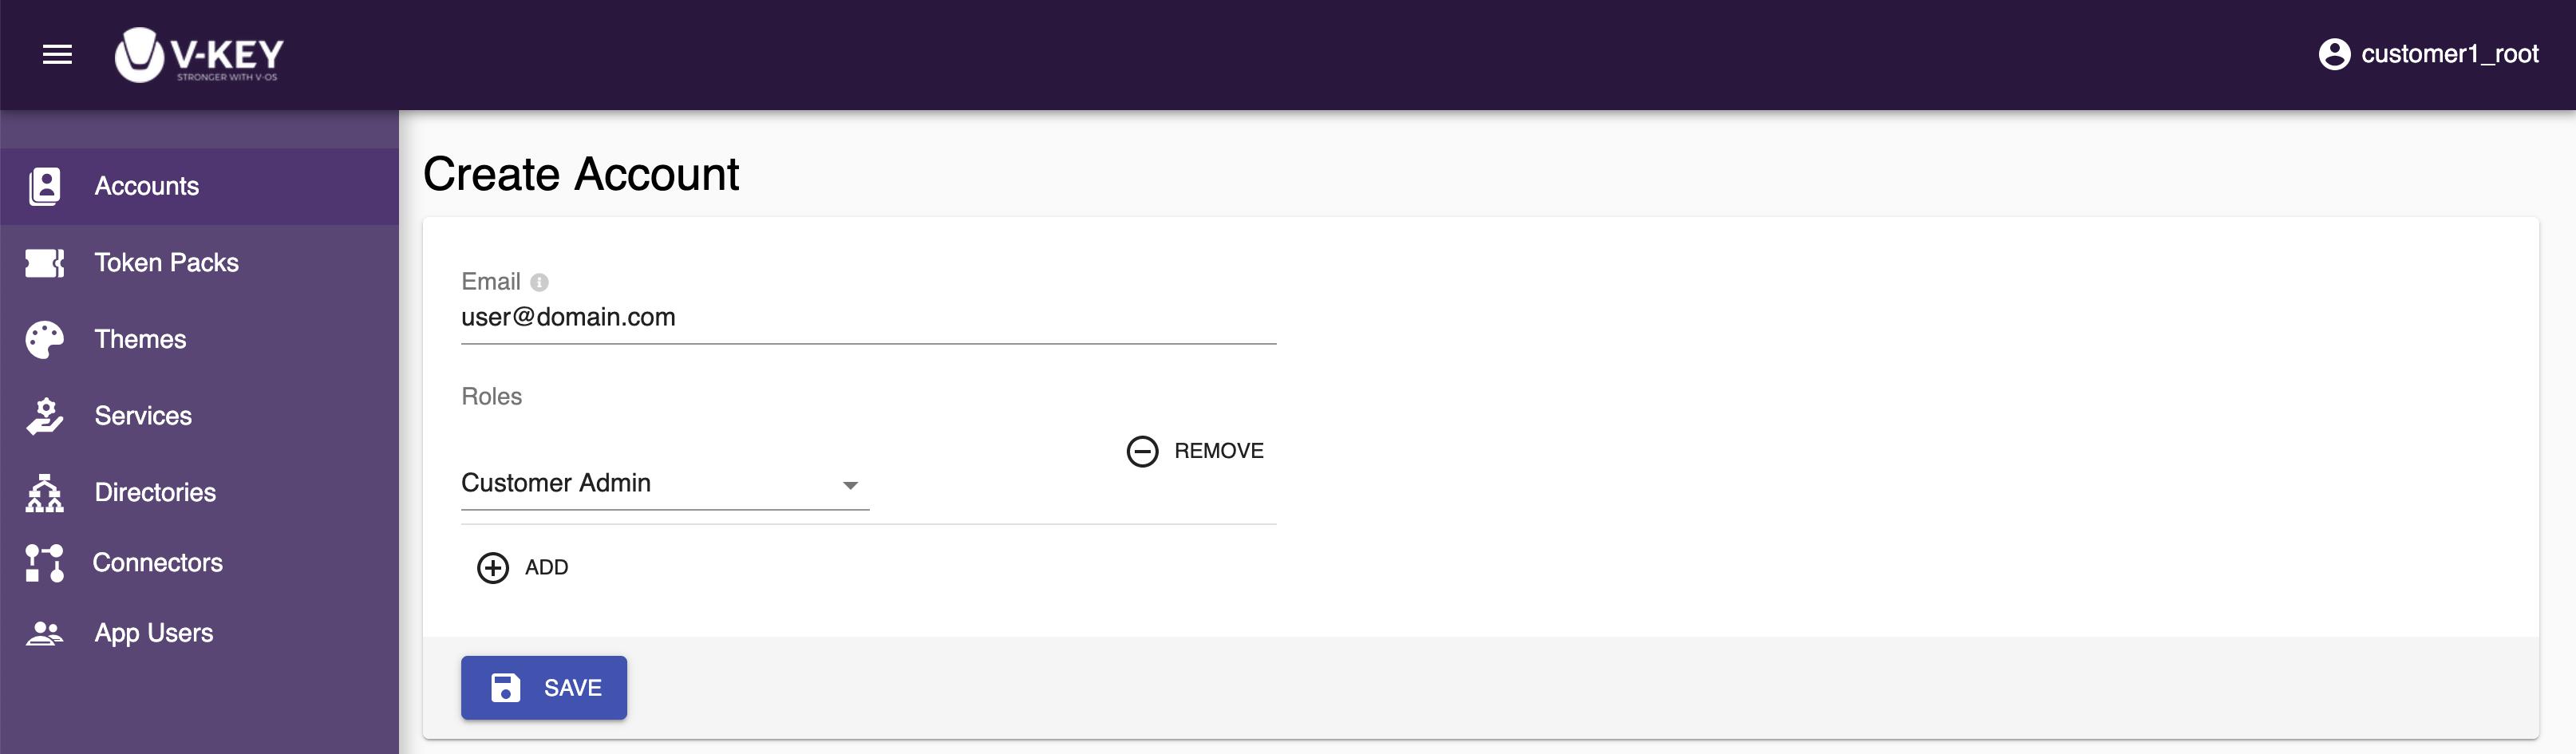
- Select ADD and select the roles that you want to add to the account.
- Select the Save button to complete the account creation.
Modifying Account
Modifying an account is similar to creating one. Select the pencil icon at the right of the account that you want to modify and start modifying. Once you are done with modifying the account, select the Save button to save the changes.
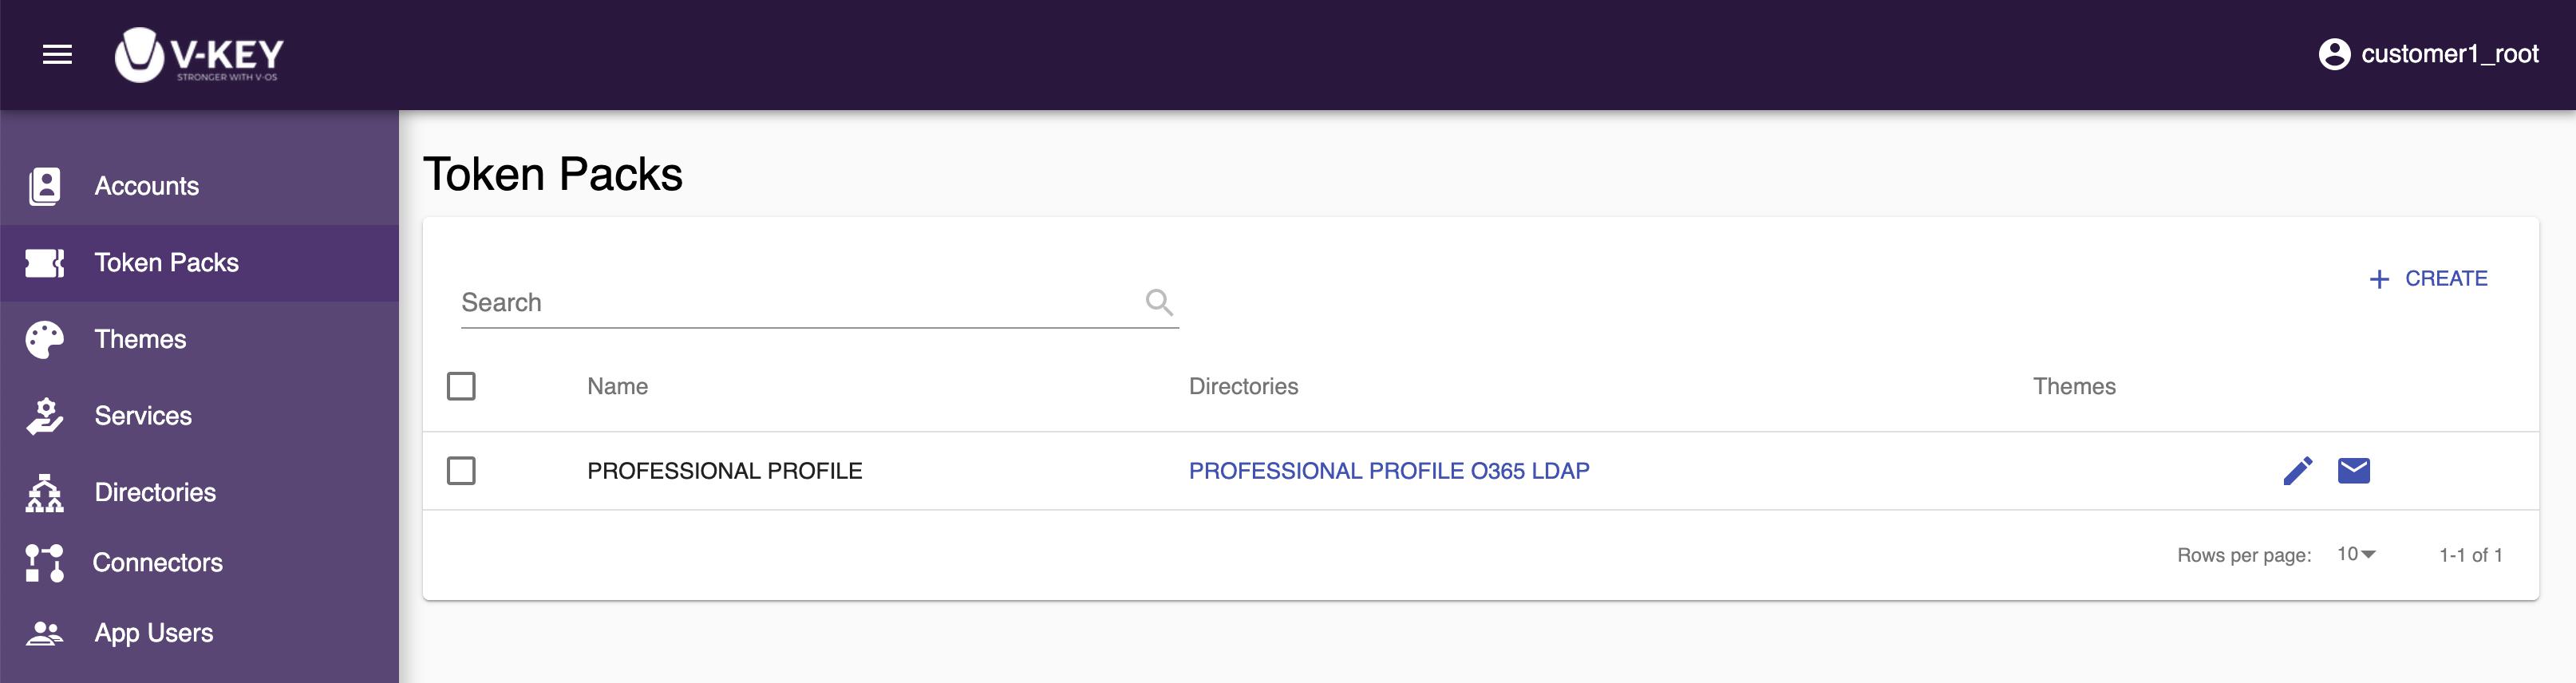
Token Packs
The Token Packs section lets you create and manage the token packs. You can create token packs and edit token packs.
The information required for a token pack is:SubscriptionThe subscription that the token pack belongs to.DirectoryThe primary LDAP directory that keeps the users’ credentials in your organization.ThemeThe custom theme to be used for the V-Key app. This is supported in the Professional or Enterprise plan.ServiceThe list of services that are available in your subscription, such as 2FA Service for VPN/RADIUS, 2FA Service for O365/SAML, etc. If you wish to remove a service from the token pack, simply uncheck the respective checkbox to remove the service. It this case, the respective service on all users tagged to this token pack will be discounted.
Creating Token Pack
To create a token pack in the Dashboard, do the following steps:
Note: Directory connectors and theme need to be created before you can assign to a token pack. Proceed to create directory connectors and theme if you have not done so. If you do not wish to use a custom theme, you can select the default theme provided by V-OS Cloud.
- Log in to the Dashboard with a root account.
- Select the Token Packs button on the left navigation bar.
- Select the + CREATE link on the top-right corner of the screen.
- Assign a name to the token pack that you going to create.
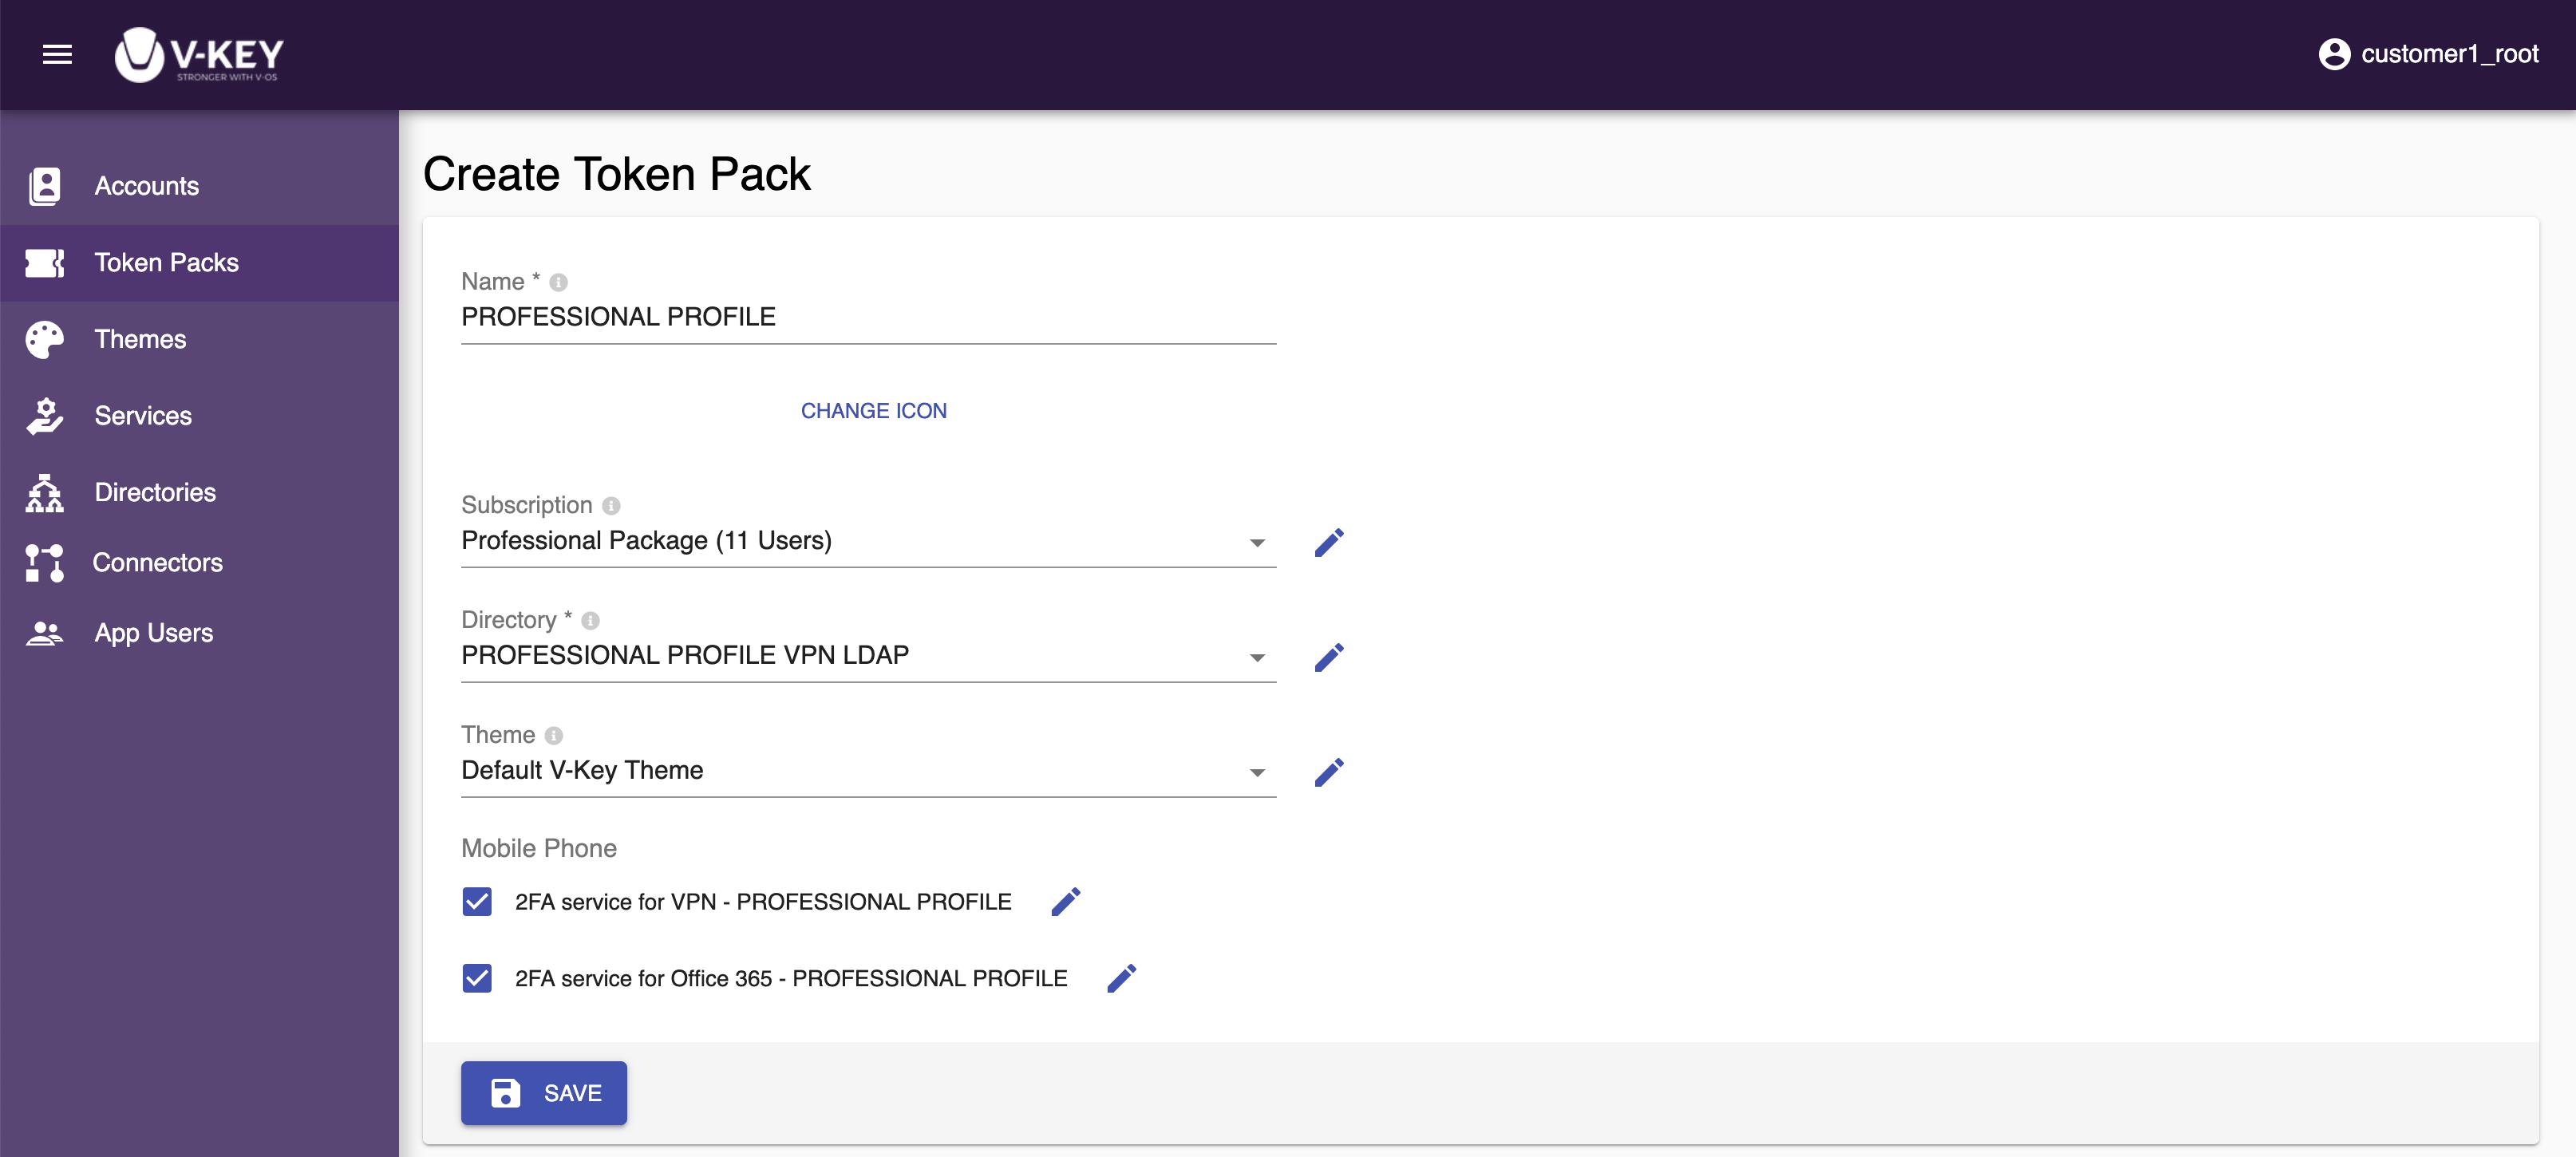
- Select CHANGE ICON and assign an icon to the token pack if desired.
- Select the Subscription, Directory, and Theme to be assigned to the token pack from the respective dropdown.
- Select the desired Service that you want to enable in the token pack.
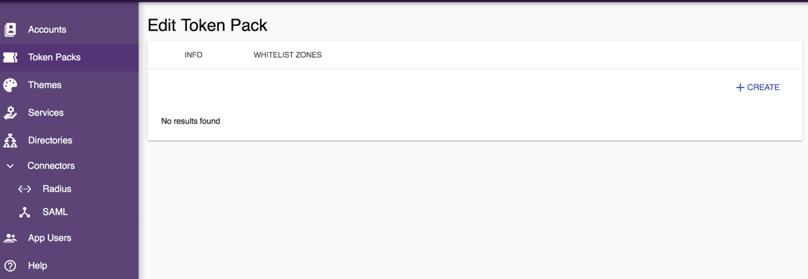
- Select the WHITELIST ZONE tab and configure the trusted networks, if desired. See Defining Whitelist Zone for details.
- Select the Save button to complete the token pack creation.
Modifying Token Pack
Modifying a token pack is similar to creating one. Select the pencil icon at the right of the token pack that you want to modify and start modifying. Once you are done with modifying the token pack, select the Save button to save the changes.
Defining Whitelist Zone
In order to ease the app users during the onboarding process, V-OS Cloud provides you with option to define the trusted network where your users’ V-Key app connects to. Users connected to the trusted network can skip the manual token provisioning steps during onboarding. The TS/APIN token QR code will only sent to users who are outside the trusted network.
To add trusted network to your token pack, do the following steps:
- Log in to the Dashboard with a root account.
- Select the Token Packs button on the left navigation bar.
- Select the token pack that you wish to add trusted network.
- Select the WHITELIST ZONE tab.
- Select the + CREATE link on the top-right corner of the screen.
- Assign a Name to the trusted network entry.
- Enter the IP Address that you want to add as the trusted network.
- Enter the Description as desired.
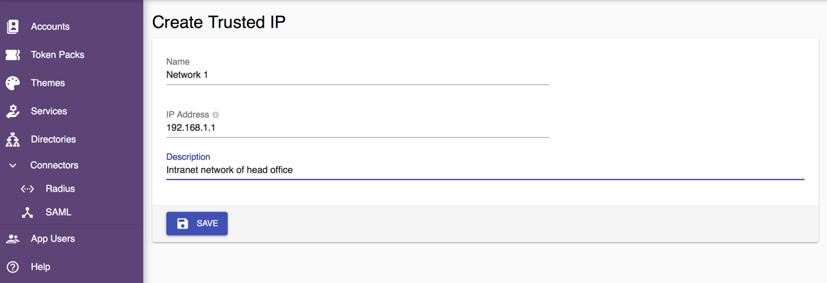
- Select the Save button to save the changes.
Sending Token Pack
If you need to send the token pack to an app user, select the envelope icon at the right of the token pack, specify the email address of the user, and select Send. After the user received the token pack, they can use the V-Key app to scan the token pack QR code and start the onboarding process.
Themes
Note: This section is only available if you subscribe to the Professional or Enterprise plan.
The Themes section lets you create and manage themes of the V-Key app based on your preferences or corporate branding guidelines. You can customize the image, color, background, text displayed on each app screen. The themes created can be used for the V-Key app on both Android and iOS platforms.
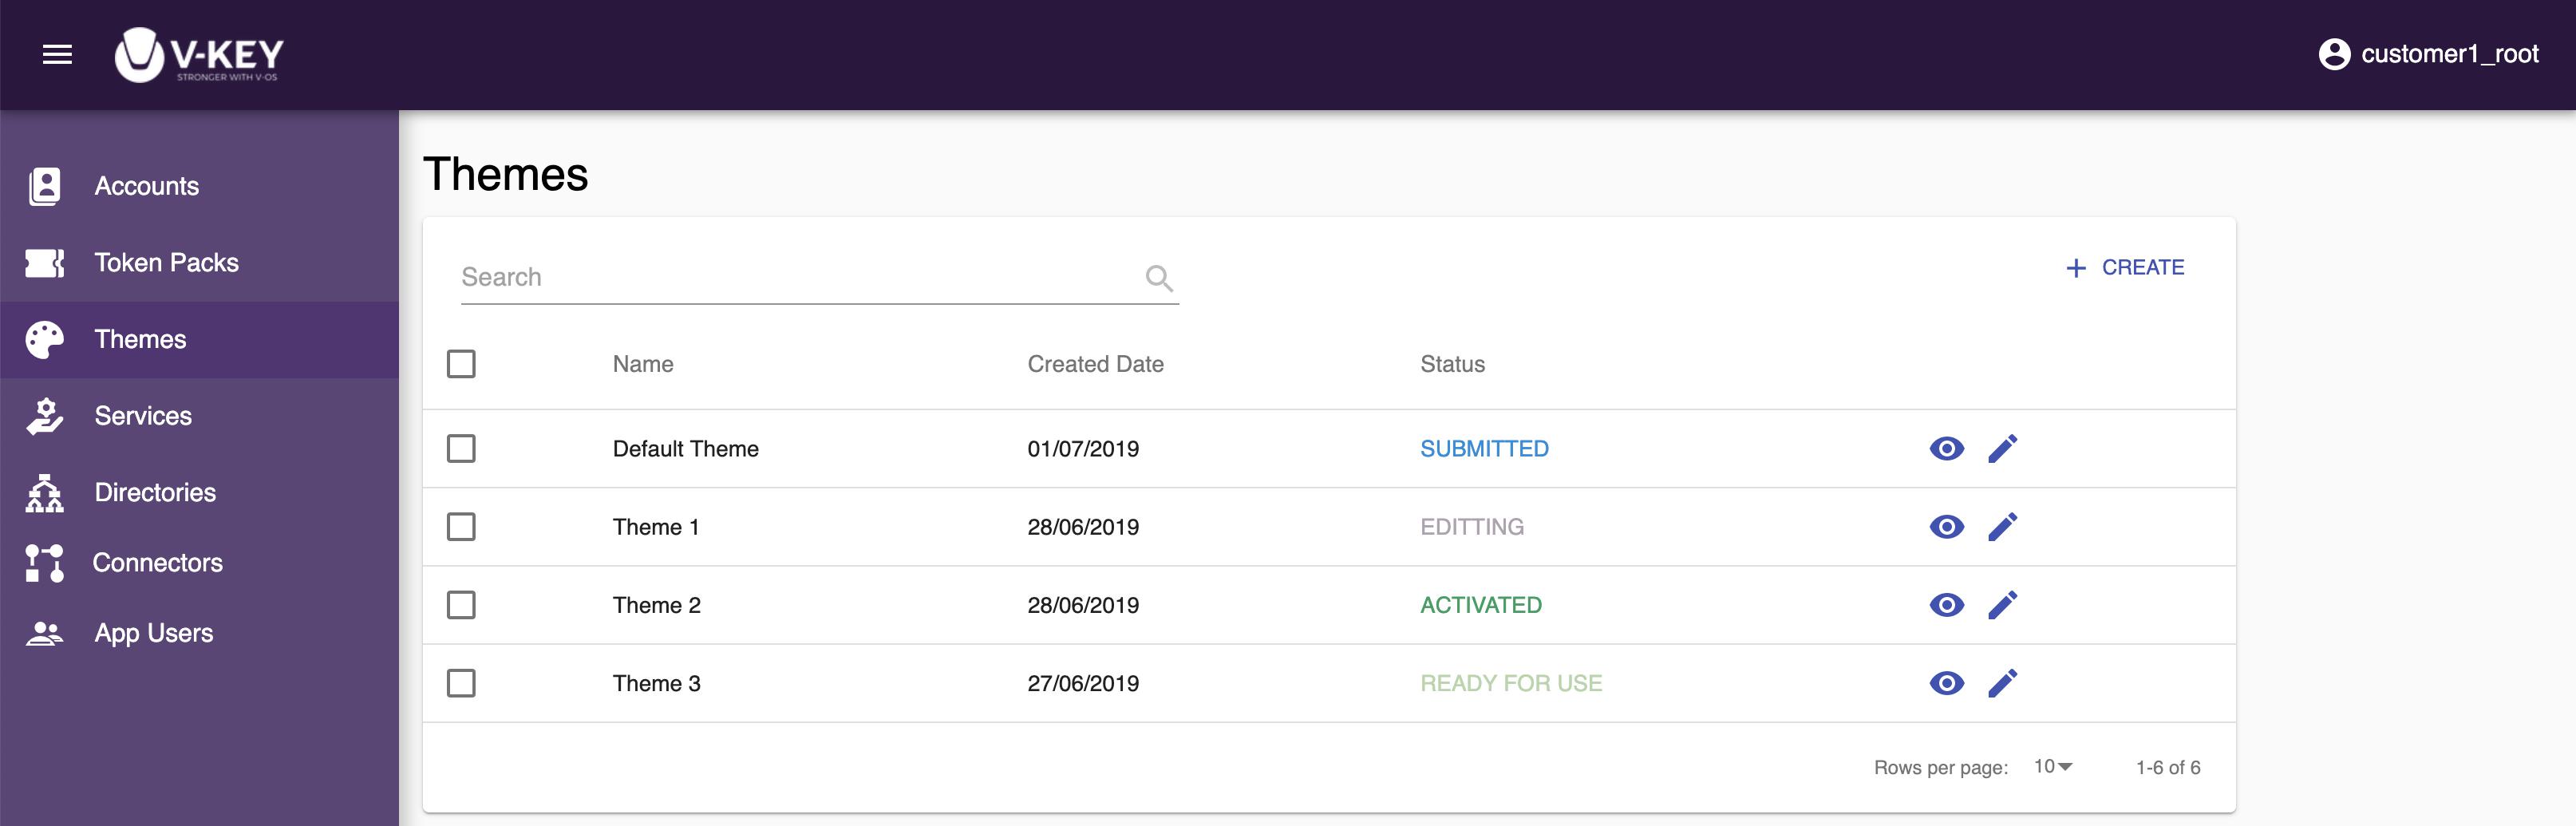
On the Themes page, you will see the list of theme available to you. The status of the theme is shown at the Status column. The following possible statuses are available:
- ACTIVATED: The theme is activated and has been assigned to a token pack.
- READY FOR USE: The theme is approved and ready to be assigned to a token pack.
- SUBMITTED: The theme is submitted and pending for V-Cloud approval.
- EDITING: The theme is being edited and has not been submitted for approval.
Creating Theme
To create a theme, do the following steps:
- Log in to the Dashboard with a root or admin account.
- Select the Themes button on the left navigation bar.
- Select the + CREATE link on the top-right corner of the screen.
- Navigation through different app screens for customization. The app screens that available for customization are as follows:
- Common
- Sign in Screen
- Setting PIN Screen
- Home Screen
- Account Screen
- Change PIN Screen
- Activating Screen
- Scan QR Screen
- History Screen
- Token Screen
- My Token Screen
- Dialog Screen
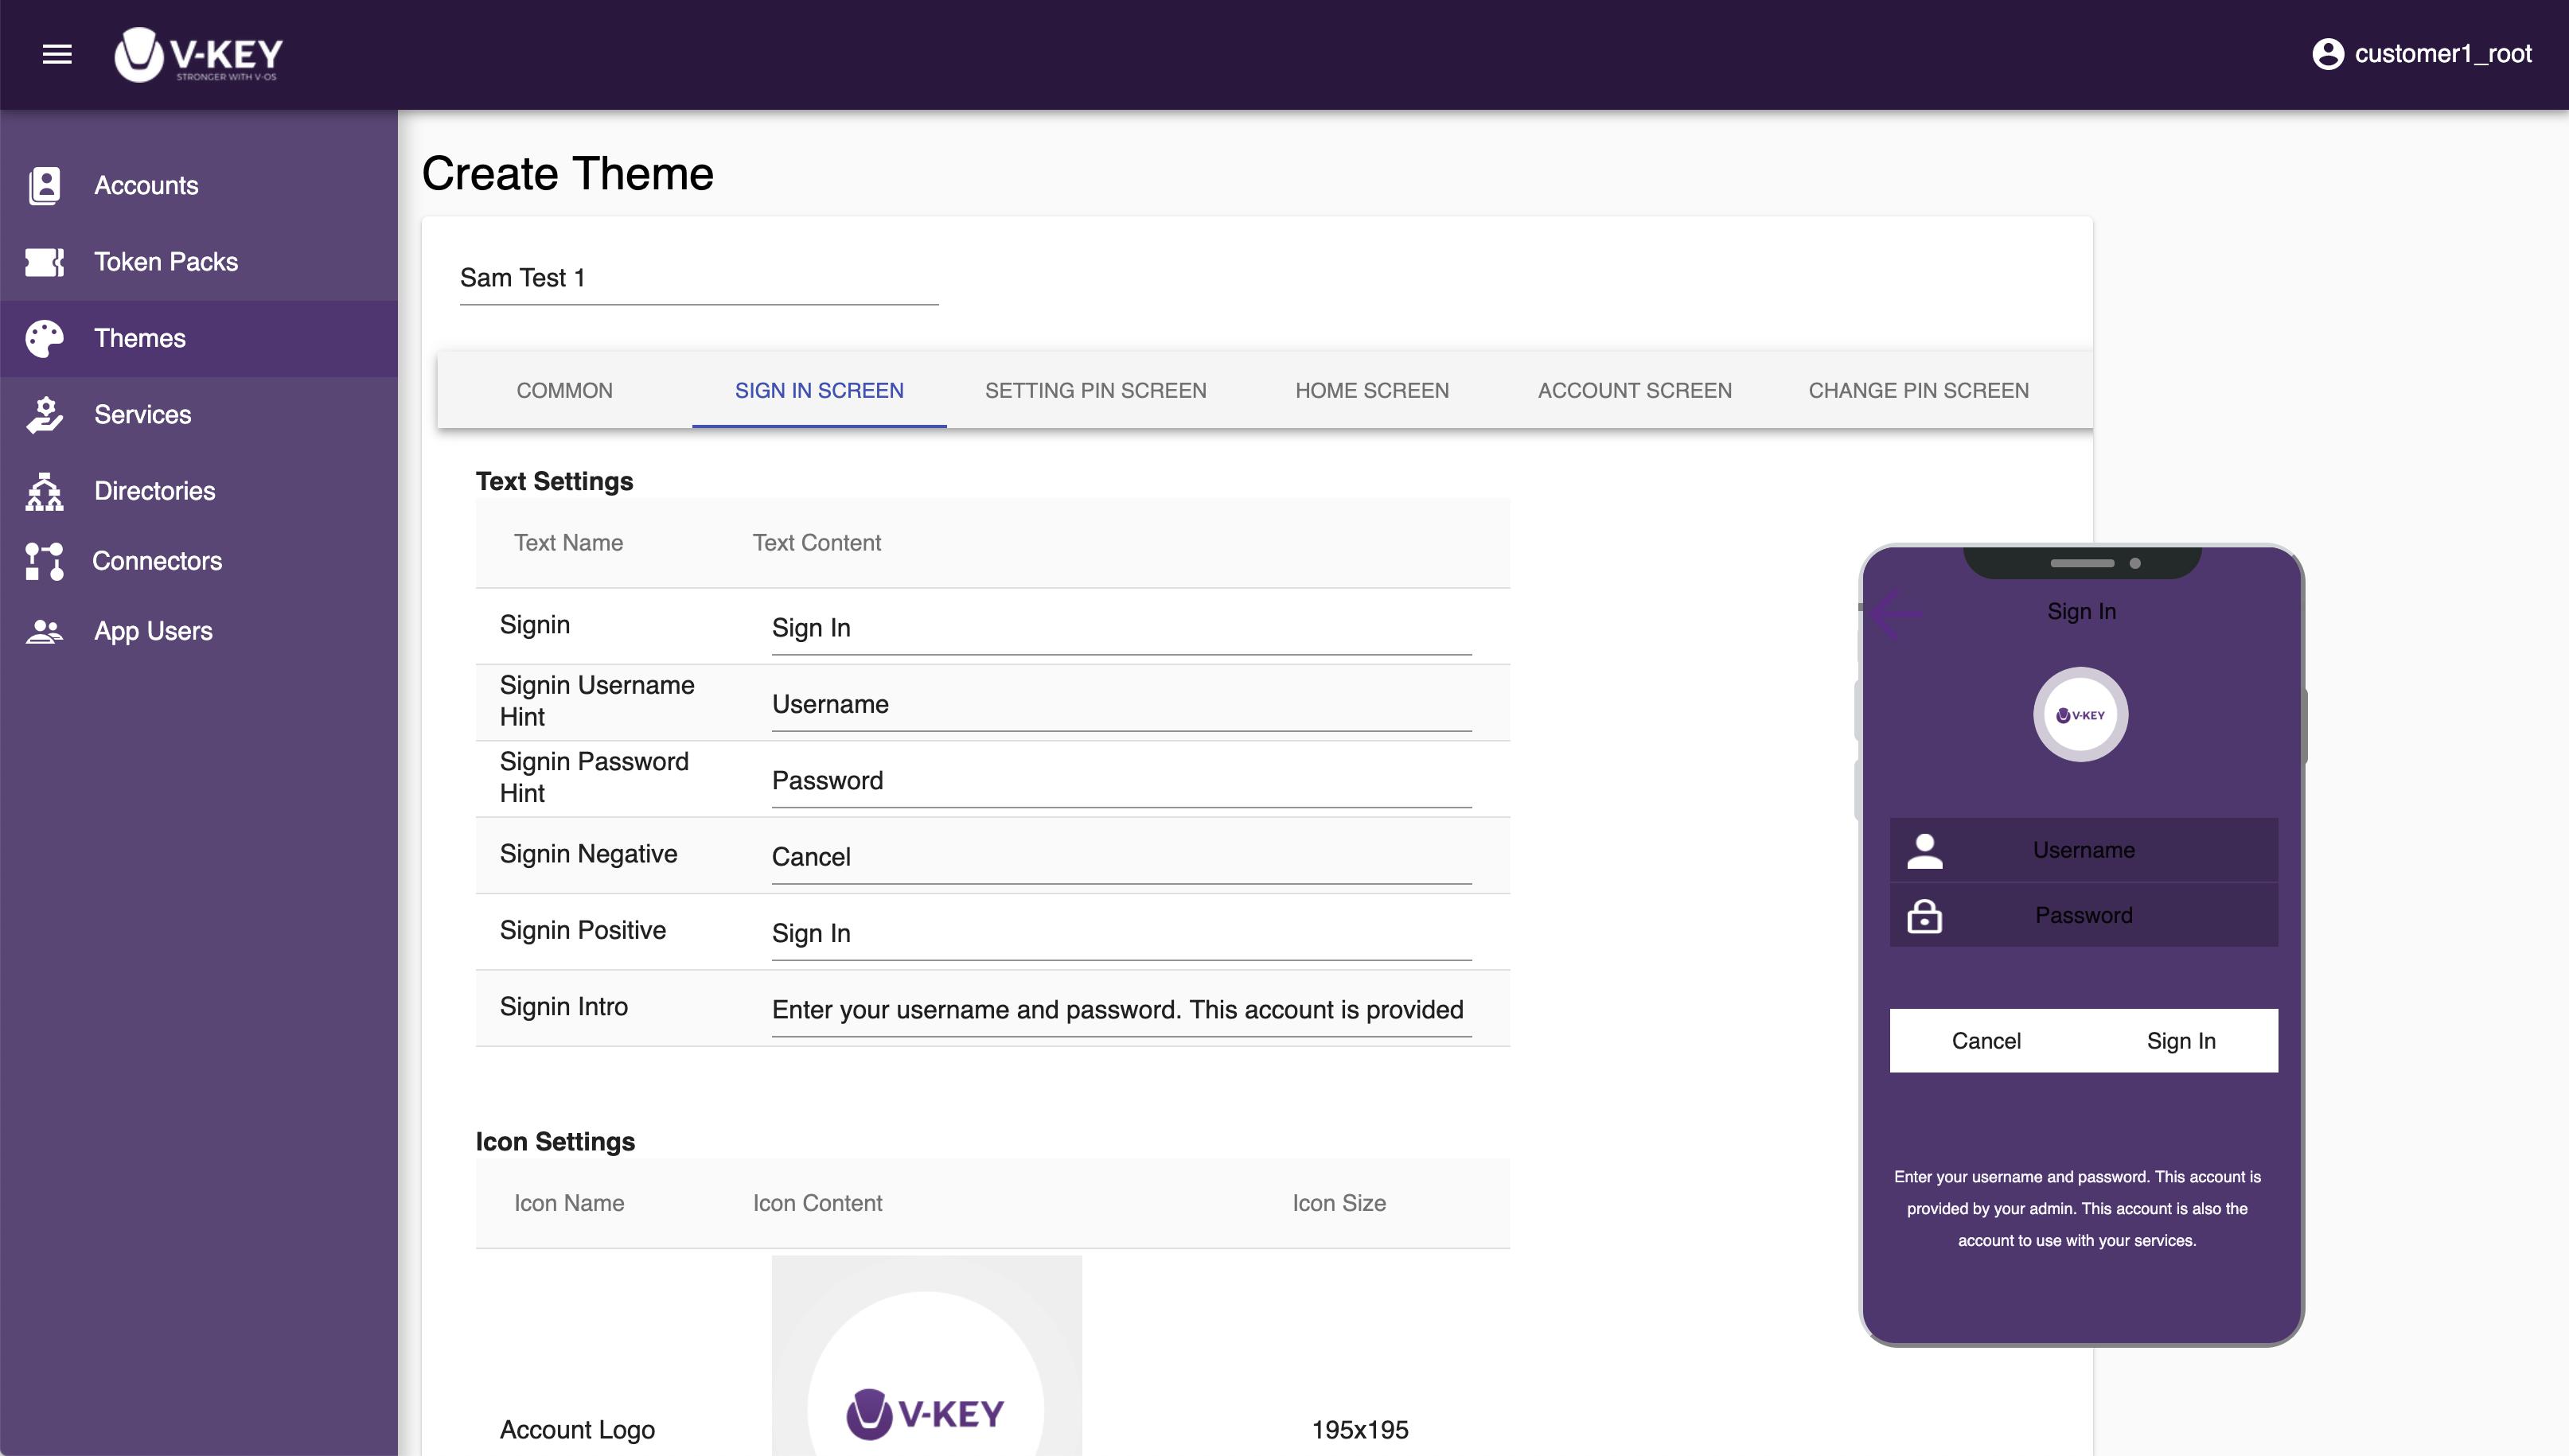
- Change the image, color, background, text to display according to your need. The sample phone screen at the right of the page reflects your changes in real-time for ease of visual inspection.
- Once you have done with the modifications, select the Submit button to submit the created theme for approval.
- If you see the status of your created theme become READY FOR USE, you can assign the created theme to a token pack. The app users onboard using the respective token pack will have the created theme applied to their V-Key app.
Modifying Theme
Modifying a theme is similar to creating one. Select the pencil icon at the right of the theme that you want to modify and start modifying. Once you are done with modifying the theme, submit the modified theme to V-Key again for approval.
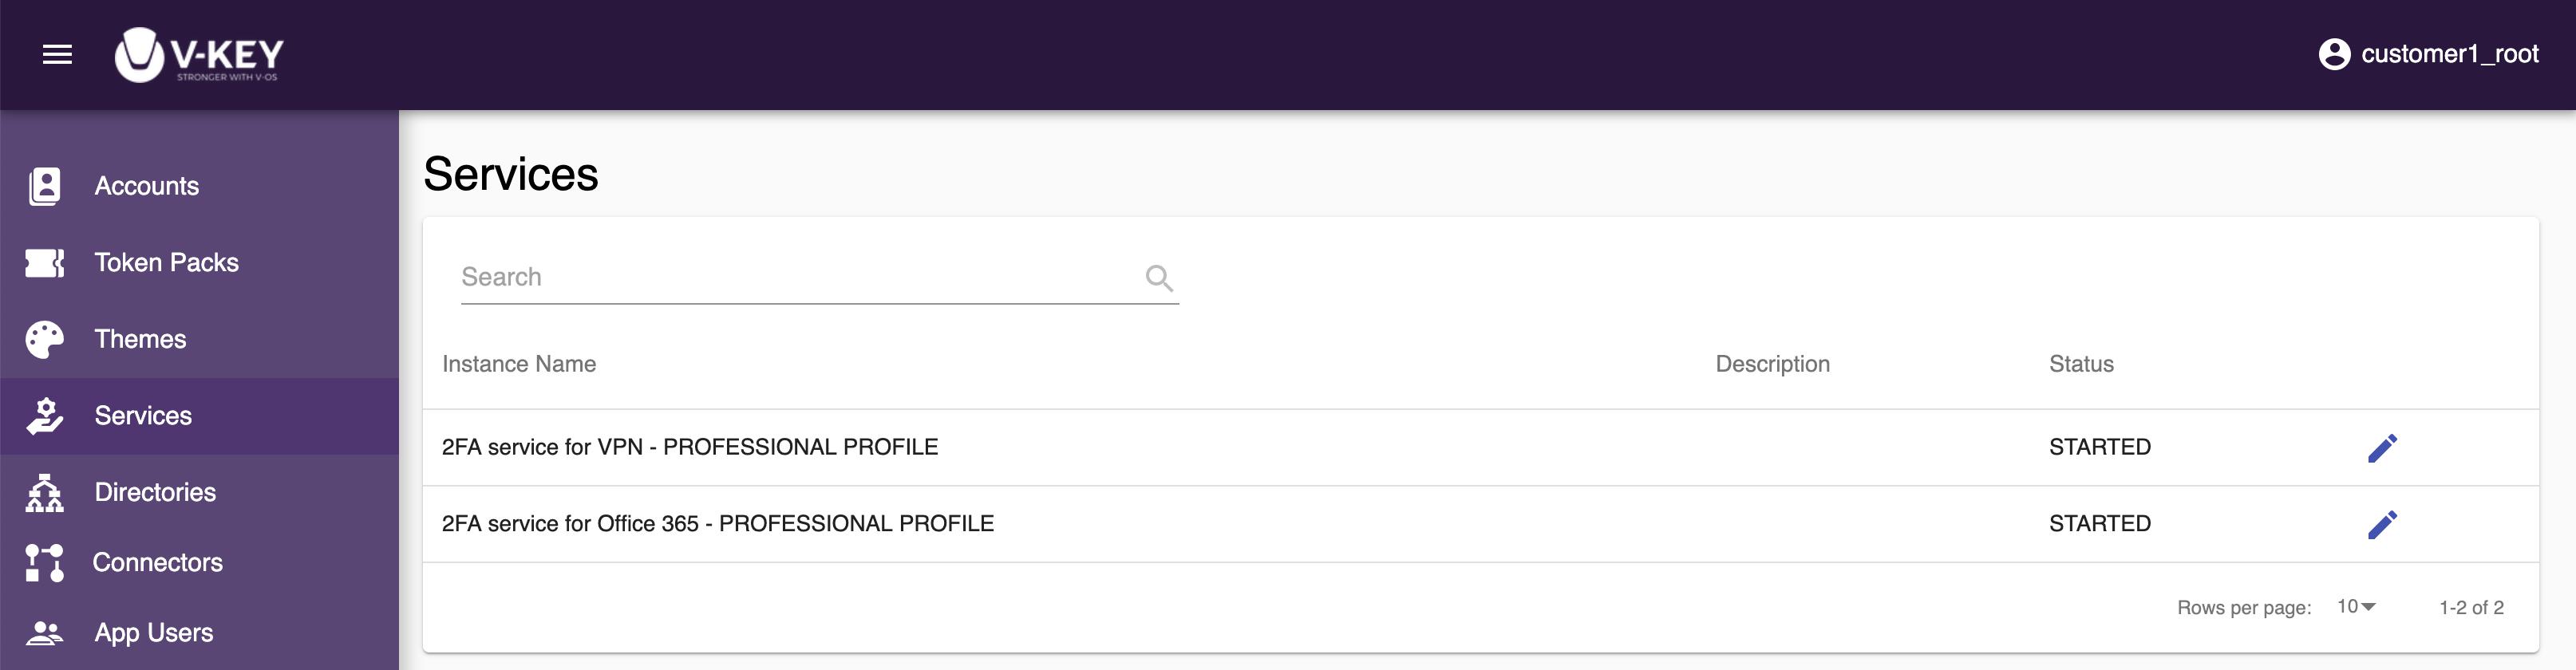
Services
The Services section lets you manage the services available in your subscription. You can configure the service by assigning the Directory and Connector applicable to the service, start/stop the 2nd factor authentication (2FA) for the users of the service, and add users to the deny list to bypass 2FA for specific users.
Note: Stopping/Disabling 2FA will not stop users from using the service. If the 2FA is stopped/disabled, users can still be authenticated and login to the service through the directory with the credentials.
Modifying Service
To modify the service, do the following steps:
- Log in to the Dashboard with a root account.
- Select the Services button on the left navigation bar.
- Select the service that you want to modify from the list shown on the screen.
- Edit the Instance Name, Description, Directory, and Radius/SAML as desired. If you wish to create a new directory or connector to be used in this service, select the + CREATE link and start the creation process.
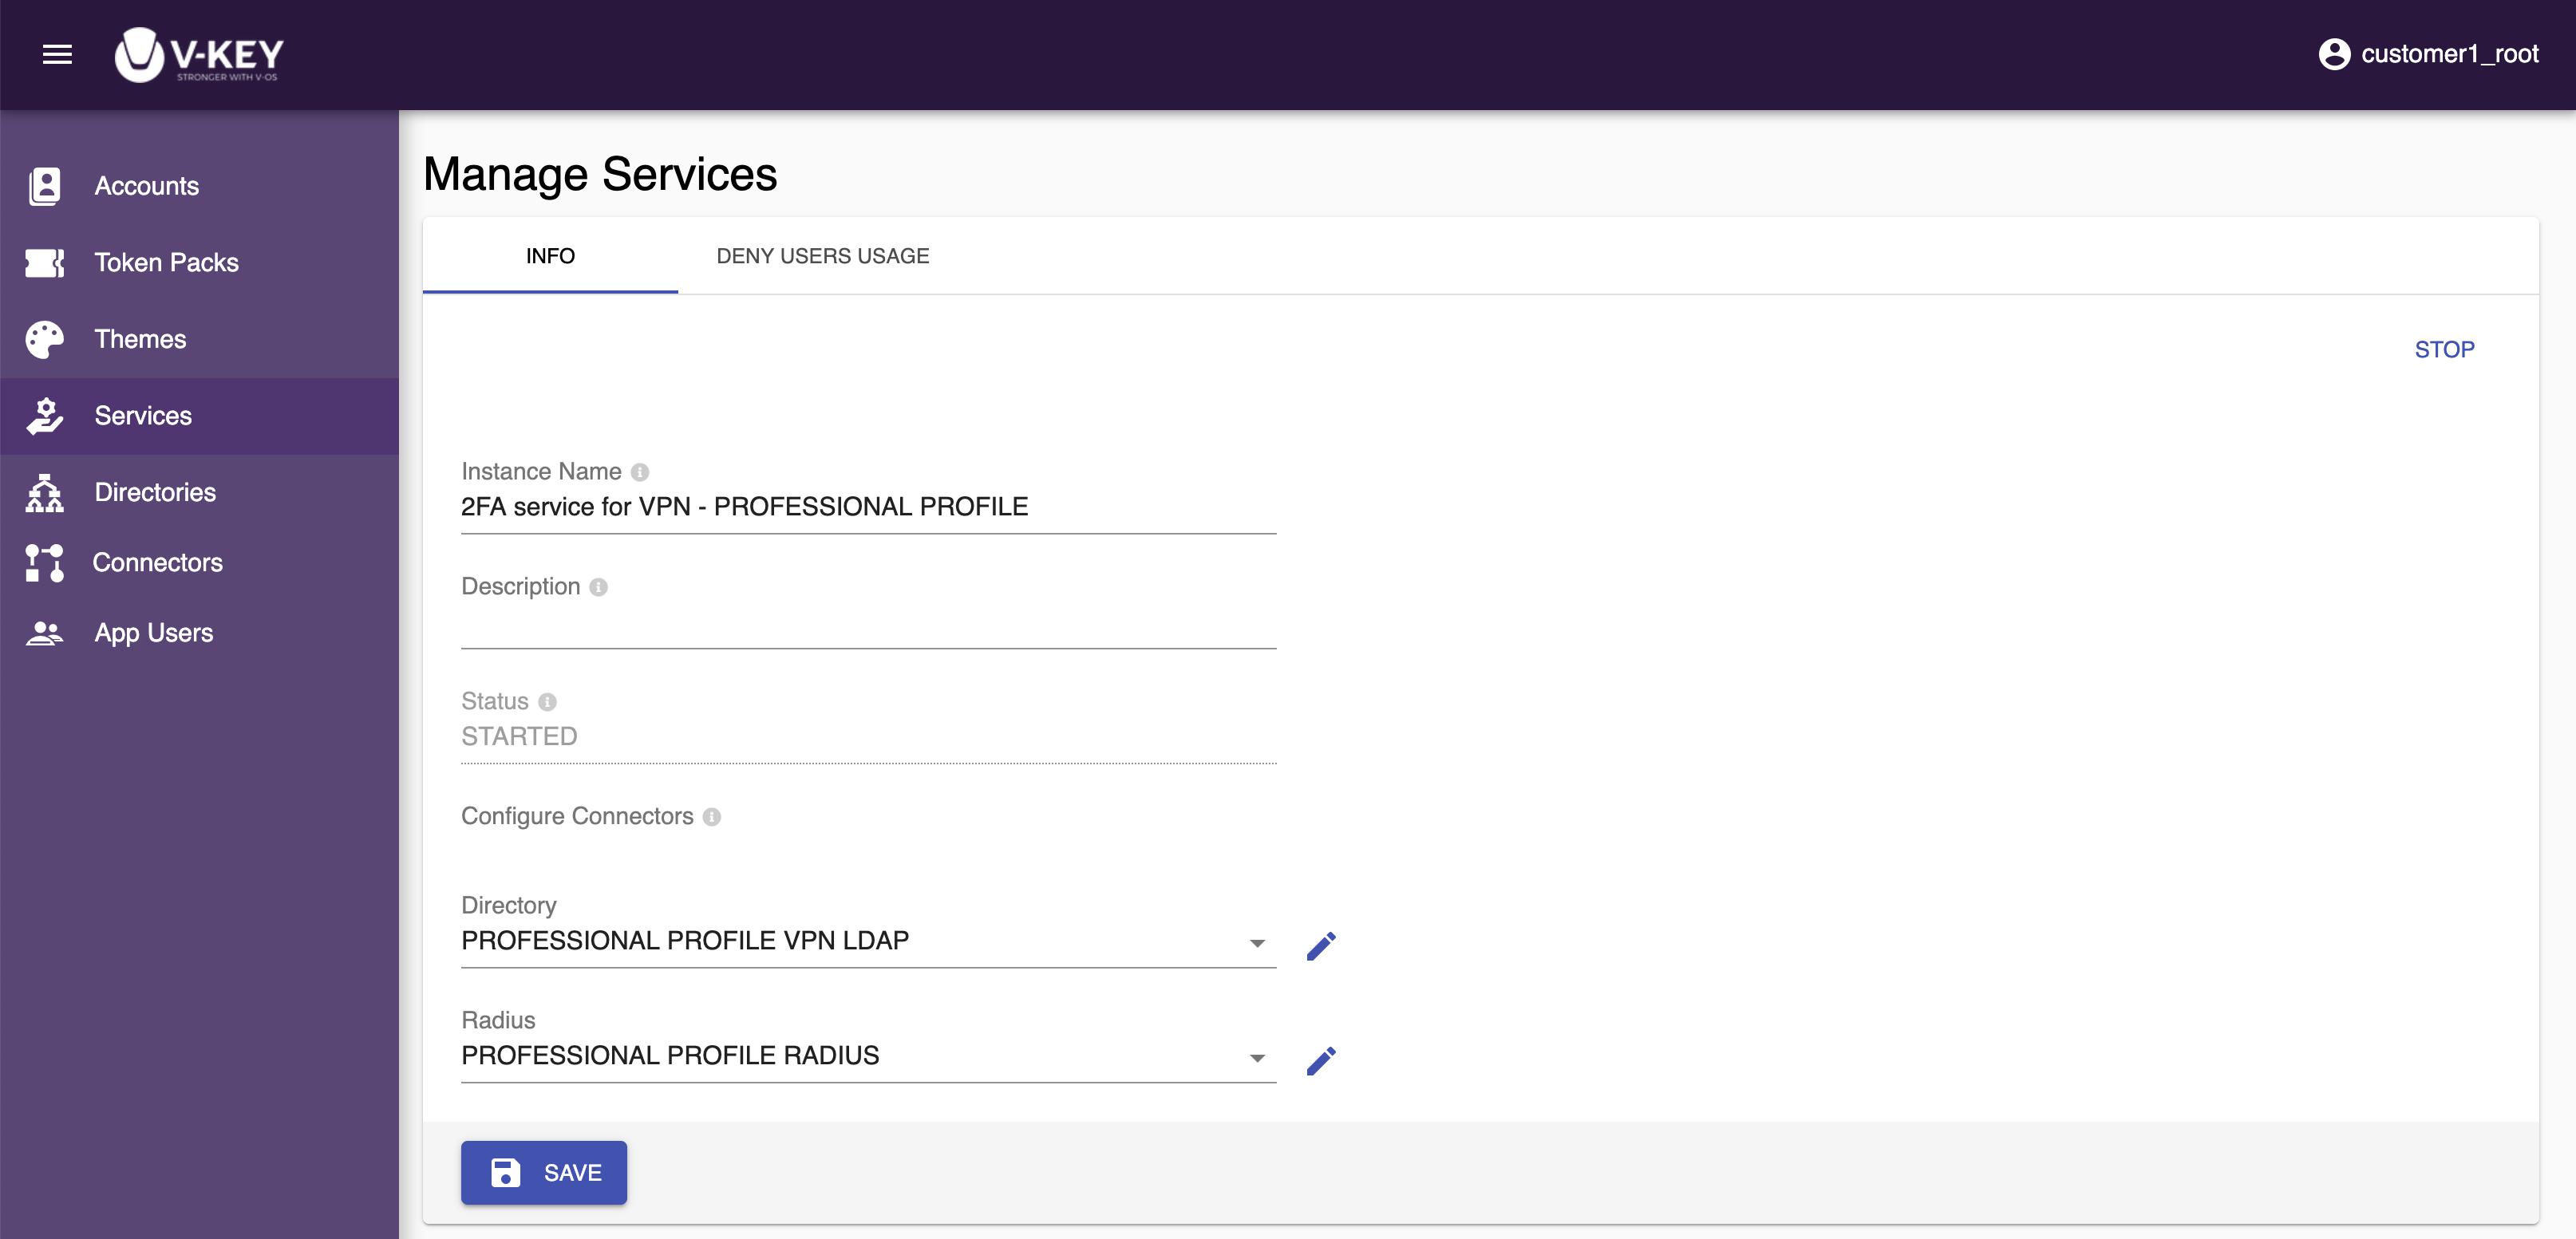
- You can also start/stop the 2FA through the modification screen. Select the START/STOP link at the top-right corner of the screen to start/stop the 2FA.
- Select the Save button to save the changes.
Adding User to Bypass 2FA Usage
If you wish to bypass 2FA for certain users without stopping 2FA for the entire service, do the following steps:
- Log in to the Dashboard with a root account.
- Select the Services button on the left navigation bar.
- Select the service that you want to modify from the list shown on the screen.
- Select the 2FA BYPASS LIST tab.
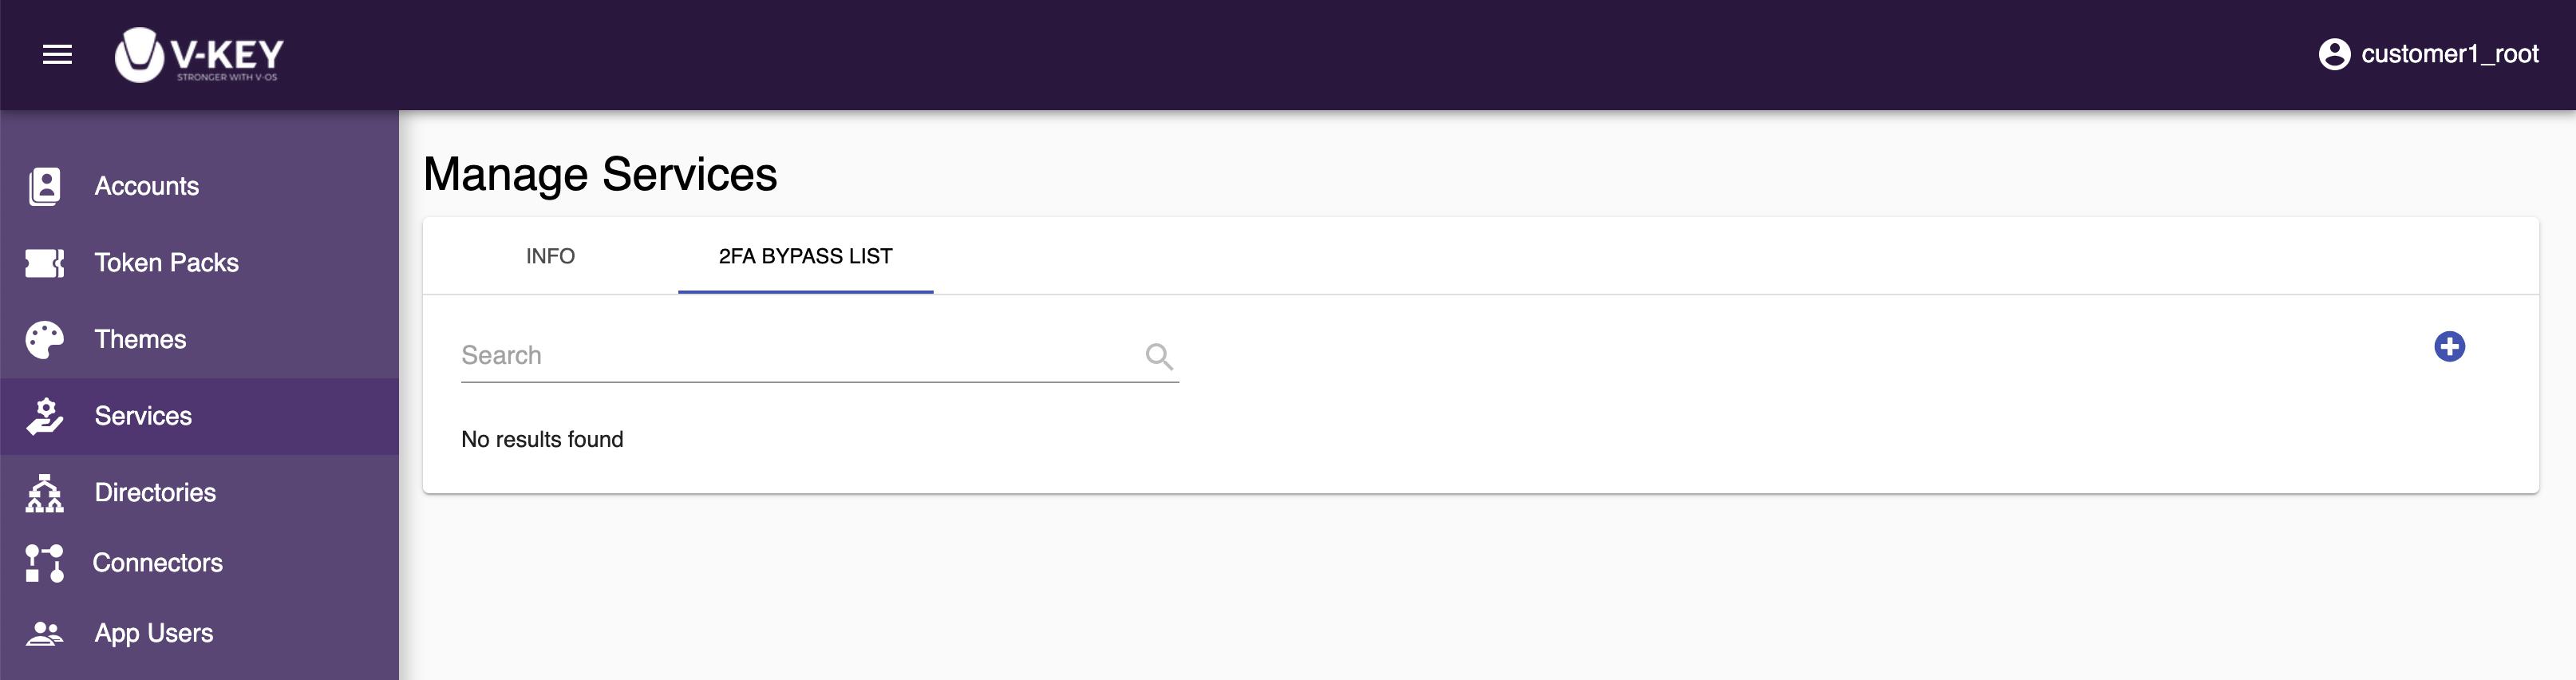
- Select the ⊕ icon at the top-right corner of the screen.
- Select the user you wish to bypass 2FA from the list.
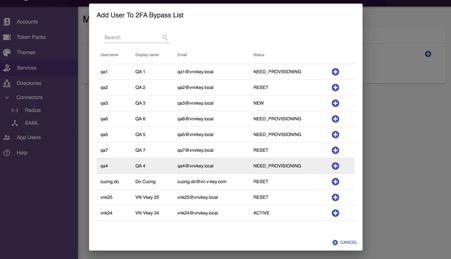
- The selected user is now bypassed from 2FA. The user can still access the service through the directory with the credentials.
- To remove the user from the 2FA bypass list, select the X icon to the right of the respective user.
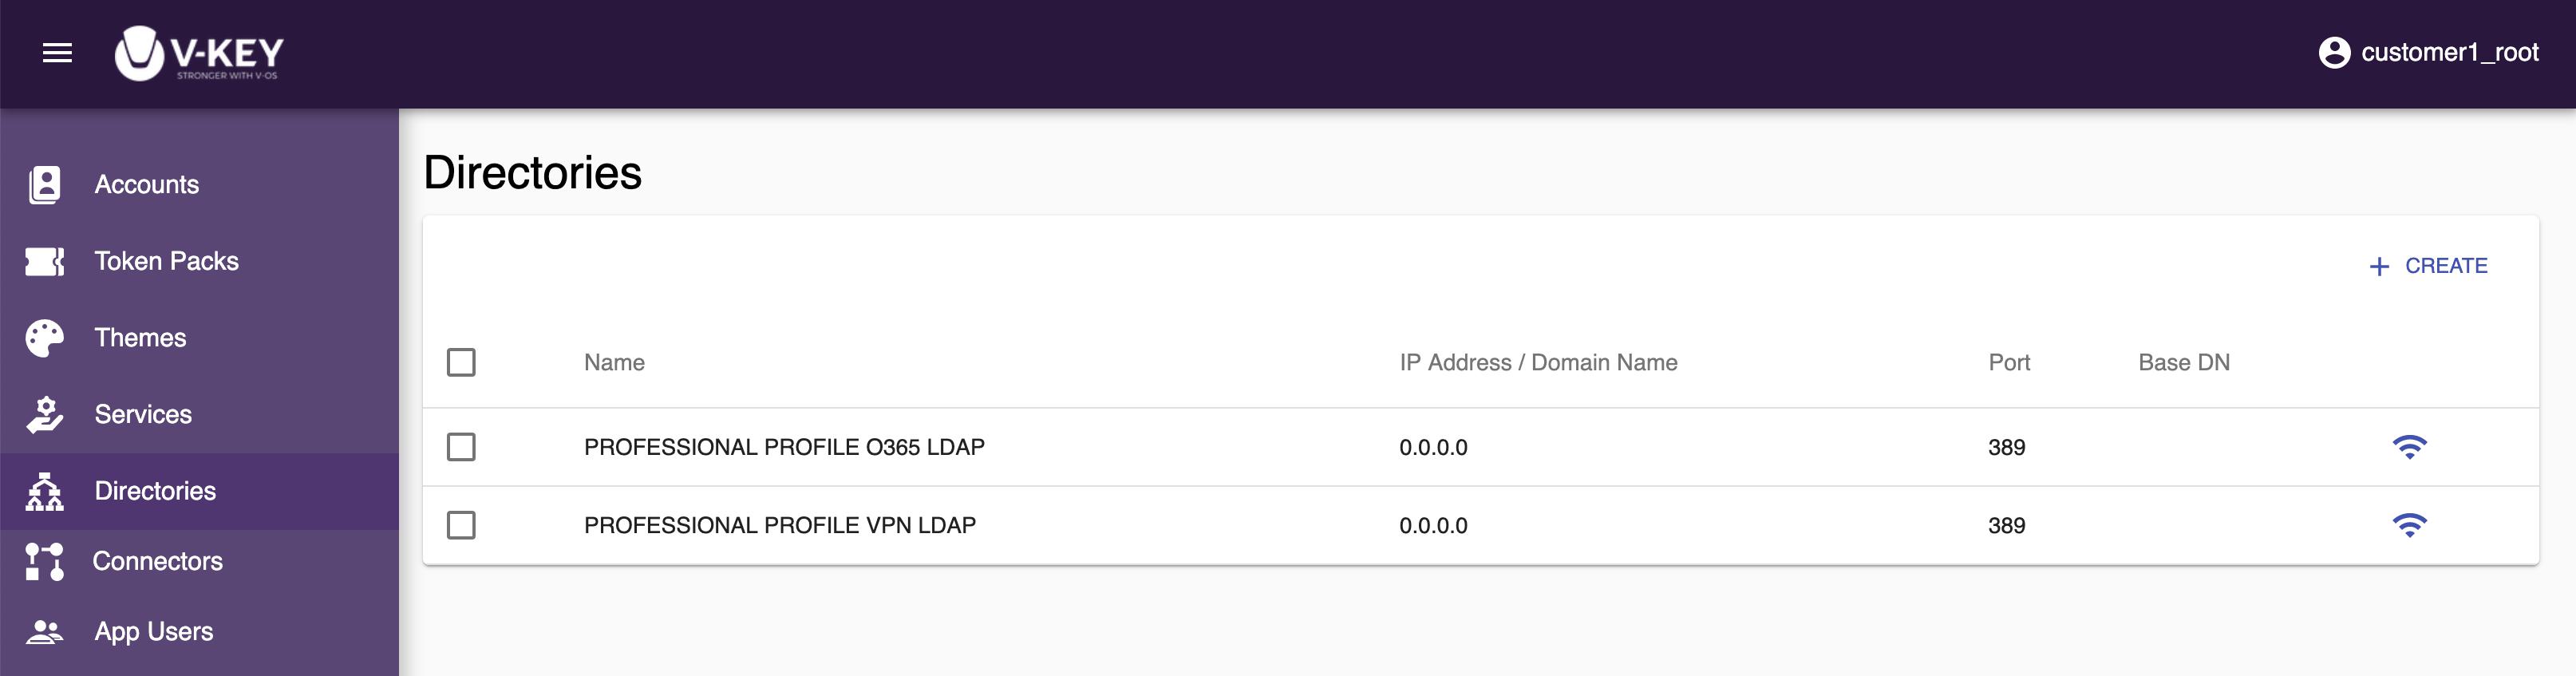
Directories
The Directories section lets you create and edit the directory connectors that can be used to connect to the directories in your organization for authentication purpose. Directories are required by the token pack, VPN service, and Office 365 service. Multiple directory connectors can be created to connect to different directories. If your organization only uses one directory for all the services, it is completely fine to have just one directory connector for all services.
Primary Directory Connector
The primary directory connector is the connector to the directory which will be attached to the token pack. VCAG will send LDAP query to the primary directory to authorize and authenticate users during user activation and V-Key app login. Default directory connectors for VPN 2FA and Office 2FA are available in the Dashboard for modification. You can choose to create a new directory connector for the token pack or use one of the available directory connectors for the services. If you choose to share the same directory connector for both token pack and 2FA service, users will use the same credentials for logging in to both the V-Key app and the VPN/Office 365 service.
Secondary Directory Connector
The secondary directory connector is the connector to the directory which is used for logging to the VPN/Office 365 service. This is for the first authentication before VCAG triggers the second authentication to the V-Key app. Similar to the primary directory connector, it can be the same directory connector that is used by other services or token pack.
The information required for a directory is:IPThe IP address of your local AD. The IP of your directory must be able to be connected by the external network.PortThe port of the directory. The default port for LDAP is 389, for LDAPS is 636.Base DNThe bind DN of your AD. It comprises of the user and the location of the user in the LDAP directory tree, e.g. OU=YourCompany,DC=example,DC=COM.User DN and PasswordThe credentials that are granted permissions to query into your LDAP server.Login PropertyThe property in your LDAP server.Email Mapping FieldThe field in your LDAP server which is mapped to the email field.Display Name MappingThe field in your LDAP server which is mapped to the display name field.Phone Mapping FieldThe field in your LDAP server which is mapped to the phone field.
Creating Directory
To create a directory, do the following steps:
- Log in to the Dashboard with a root account.
- Select the Directories button on the left navigation bar.
- Select the + CREATE link on the top-right corner of the screen.
- Assign a name to the directory that you want to create.
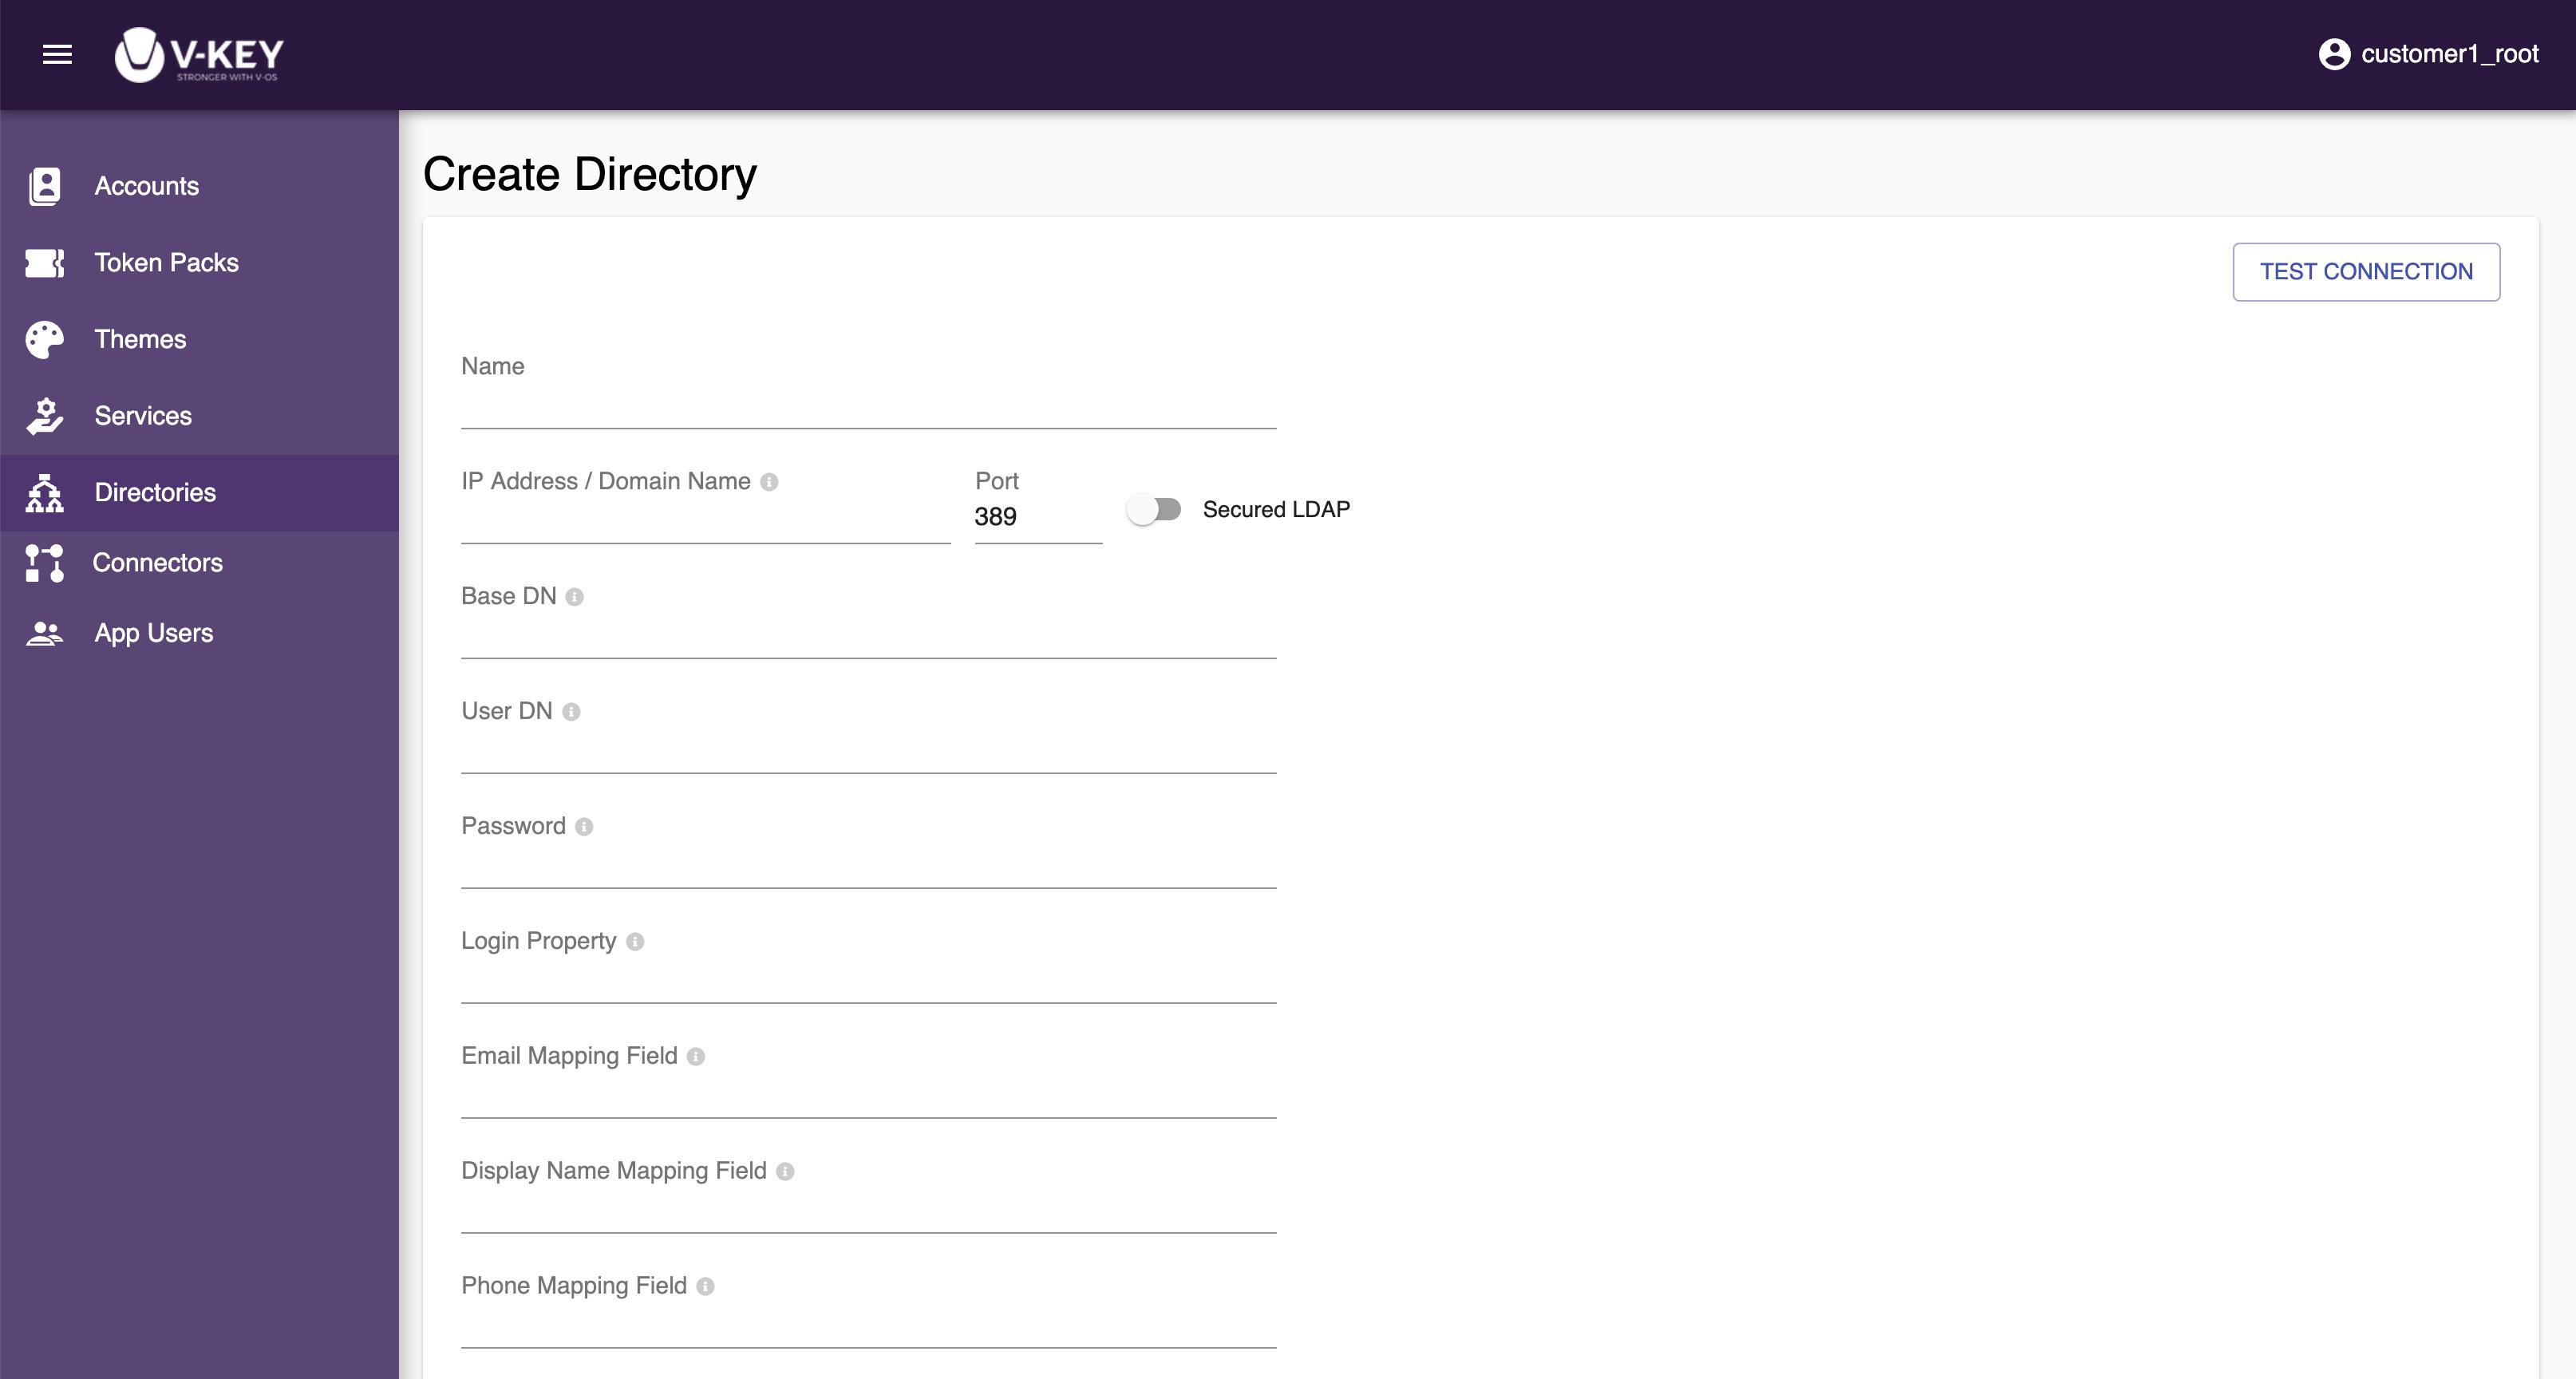
- Fill all the field on the page. All field are required.
- Select the TEST CONNECTION button to test the connection.
- Select the Save button to create the directory.
Modifying Directory
Modifying a directory is similar to creating one. Select the pencil icon at the right of the directory that you want to modify and start modifying. Once you are done with modifying the directory, select the Save button to save the changes.
Connectors
The Connectors section lets you create and edit the connectors (RADIUS for VPN, SAML for Office 365) that you want V-OS Cloud to connect to for 2FA.
RADIUS
RADIUS connector is used by V-OS Cloud to connect to the RADIUS server for 2FA on VPN service.
The information required for a RADIUS connector is:IP AddressThe IP address of your RADIUS server. The IP of your RADIUS server must be able to be connected by the external network.Shared SecretThe key for connecting to your RADIUS server.
Creating RADIUS Connector
To create a RADIUS connector, do the following steps:
- Log in to the Dashboard with a root account.
- Select the Connectors ⟶ RADIUS button on the left navigation bar.
- Select the + CREATE link on the top-right corner of the screen.
- Assign a name to the RADIUS connector that you want to create.
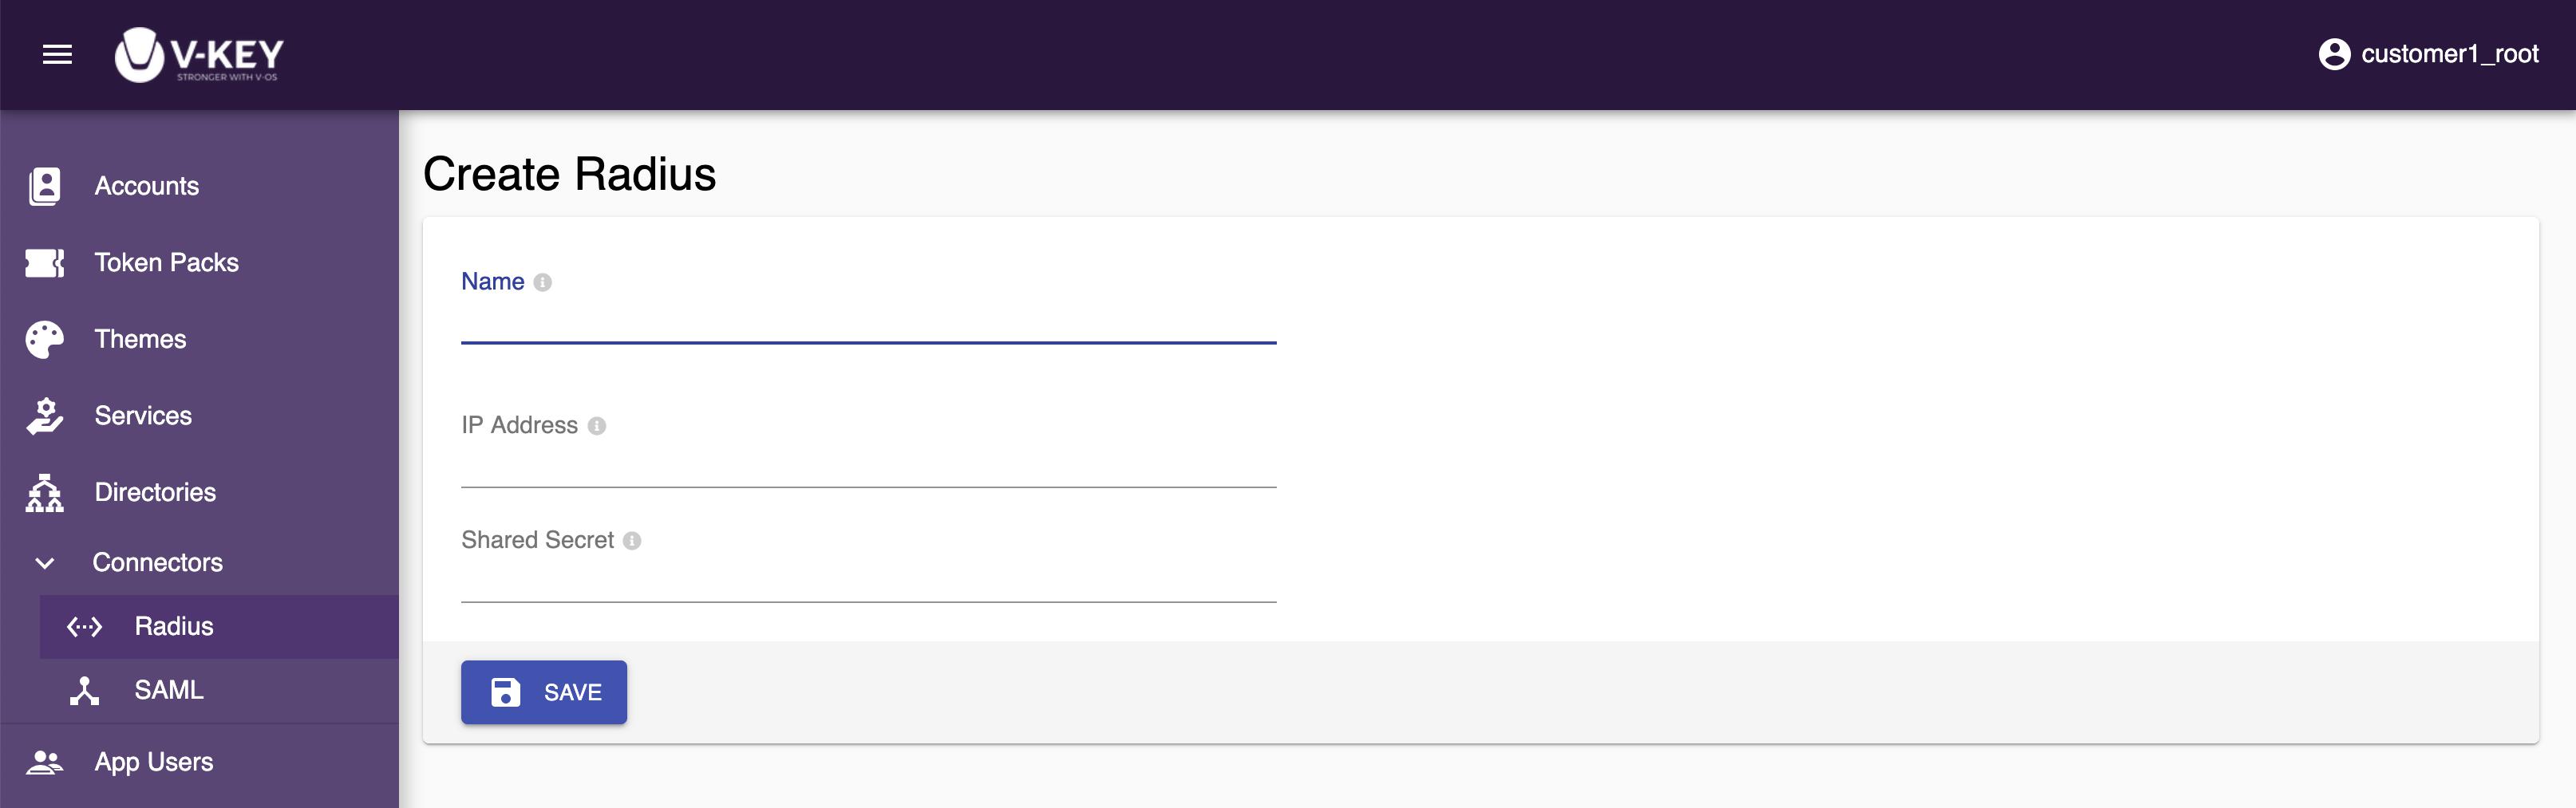
- Fill all the field on the page. All field are required.
- Select the Save button to create the directory.
Modifying RADIUS Connector
Modifying a SAML connector is similar to creating one. Select the pencil icon at the right of the connector that you want to modify and start modifying. Once you are done with modifying the connector, select the Save button to save the changes.
SAML
SAML connector is used by V-OS Cloud to connect to the SAML server for 2FA on Office 365 service.
The information required for a SAML connector is:DomainThe domain of your organization’s Office 365 tenant. It is used in Federate or UnFederate script to federate or stop federating with VCAG Login page. You need to verify this domain with your DNS of this domain on Microsoft Office 365 Tenant before federating.Select ScriptFor you to generate federation or unfederation script. Select the type of script and press the GENERATE SCRIPT button to generate the script. Download and run the script in PowerShell at Window PC which connected to your organization Office 365 tenant’s server.The federate script is the script to federate your Office 365 Tenant domain to VCAG. After the script is successfully executed, the Authentication mode of your Office 365 tenant will be set to Federated. Your users will be redirected to VCAG’s login page to do 2FA while login to Office 365.The unfederate script is the script to stop federating your Office 365 Tenant domain to VCAG. After the script is successfully executed, your users will login to Office 365 tenant directly, without redirecting to VCAG. The Authentication mode of your Office 365 tenant will be set back to Managed.
Creating SAML Connector
To create a SAML connector, do the following steps:
- Log in to the Dashboard with a root account.
- Select the Connectors ⟶ SAML button on the left navigation bar.
- Select the + CREATE link on the top-right corner of the screen.
- Assign a name to the SAME connector that you want to create.
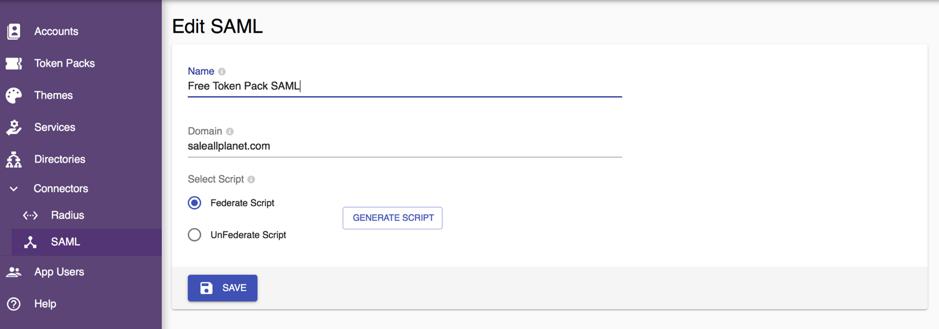
- Fill all the field on the page. All field are required.
- Select the Federate Script or UnFederate Script radio button based on your need.
- Select the GENERATE SCRIPT button to generate the script required to federate or unfederate your Office 365 tenant domain.
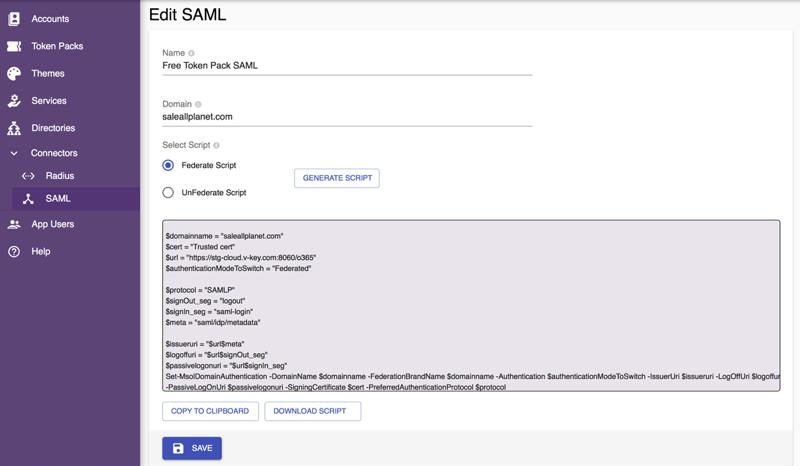
- Copy or download the script and execute the script in PowerShell. See Enabling Office 365 Federation.
- Select the Save button to create the directory.
Modifying SAML Connector
Modifying a SAML connector is similar to creating one. Select the pencil icon at the right of the connector that you want to modify and start modifying. Once you are done with modifying the connector, select the Save button to save the changes.
App Users
The App Users section shows the list of app users, in your organization, that are currently using the V-OS Cloud services. On this page, you can reset the token provisioning status of an app user and send token serial and activation PIN to the user via email for token provisioning.

The following information of the users are presented for each app user:UsernameThe username of the app user.Token PackThe token pack that the app user used for onboarding.Display NameThe display name of the app user.EmailThe username of the app user.StatusThe current token provisioning status of the app user, i.e. ACTIVE, NEED_PROVISIONING, or RESET.- ACTIVE: The app user is currently active. Token provisioning has already done.- NEED_PROVISIONING: Token provisioning has not been done by the app user.- RESET: The status has been reset, the app user needs to do the onboarding process again.
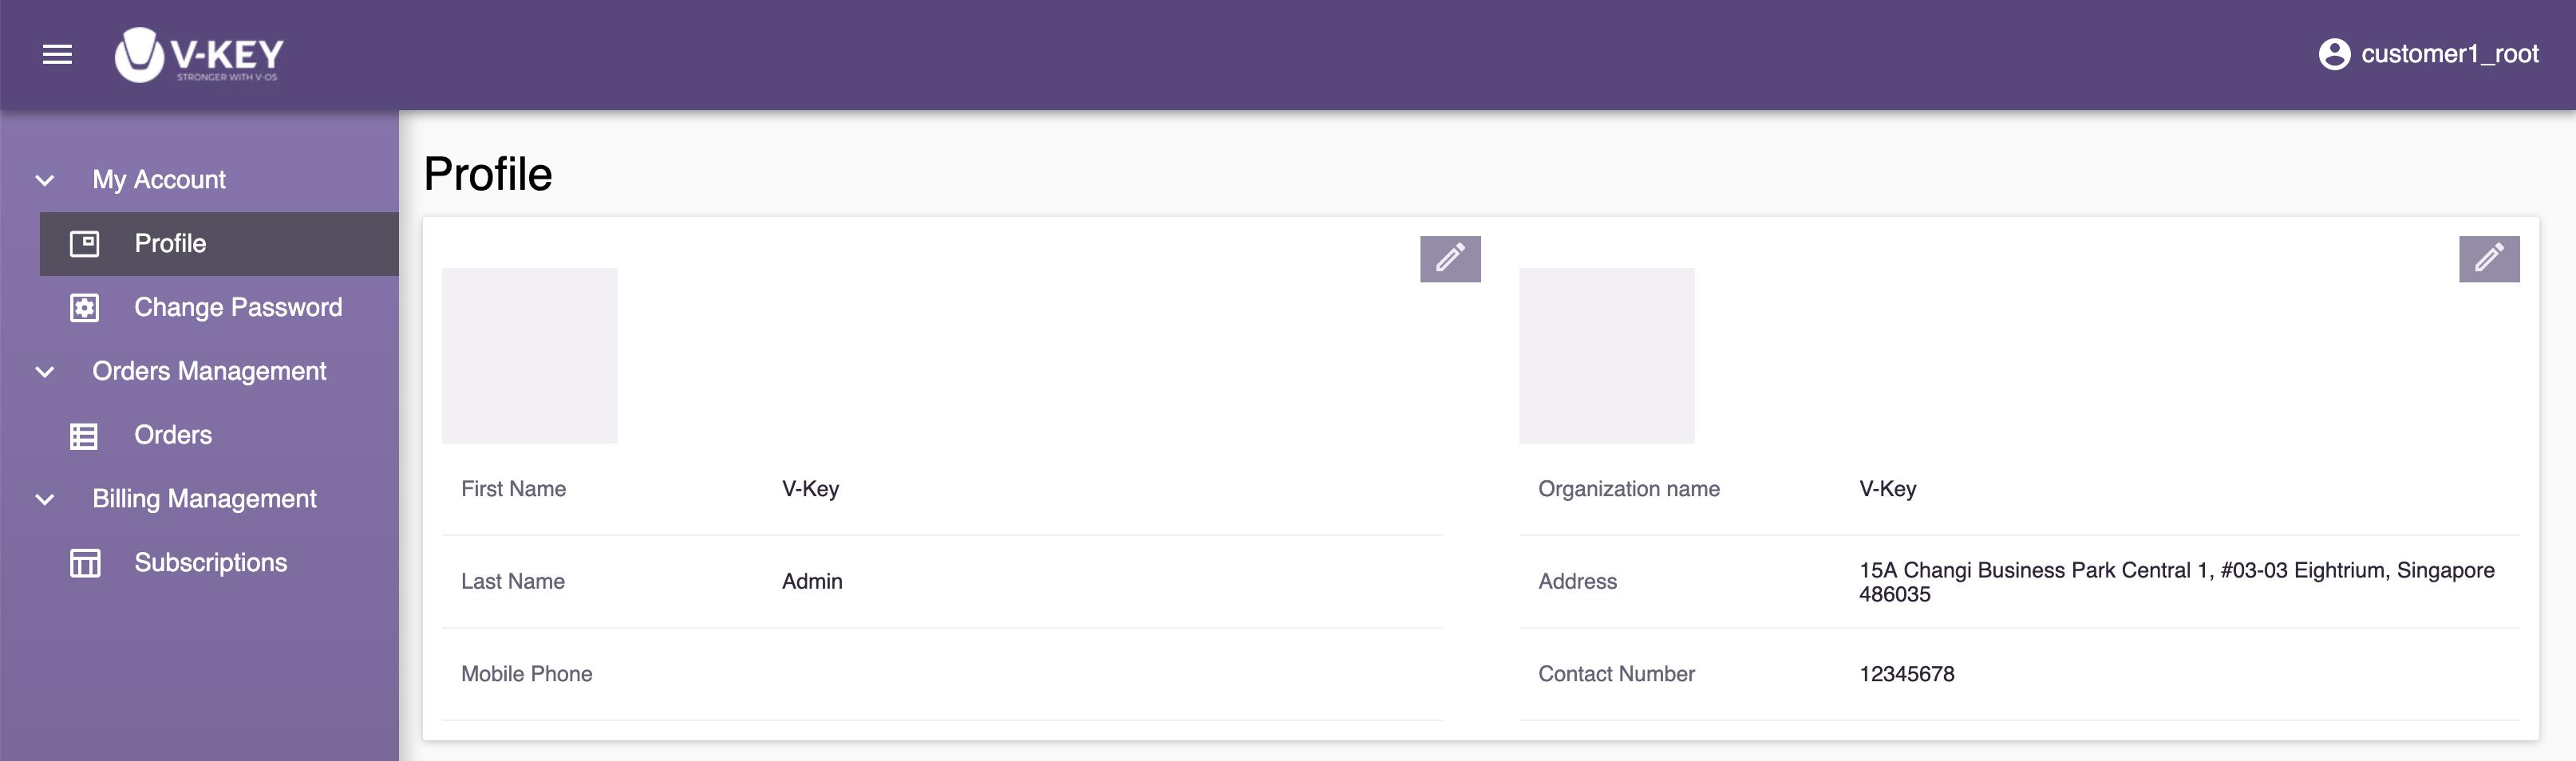
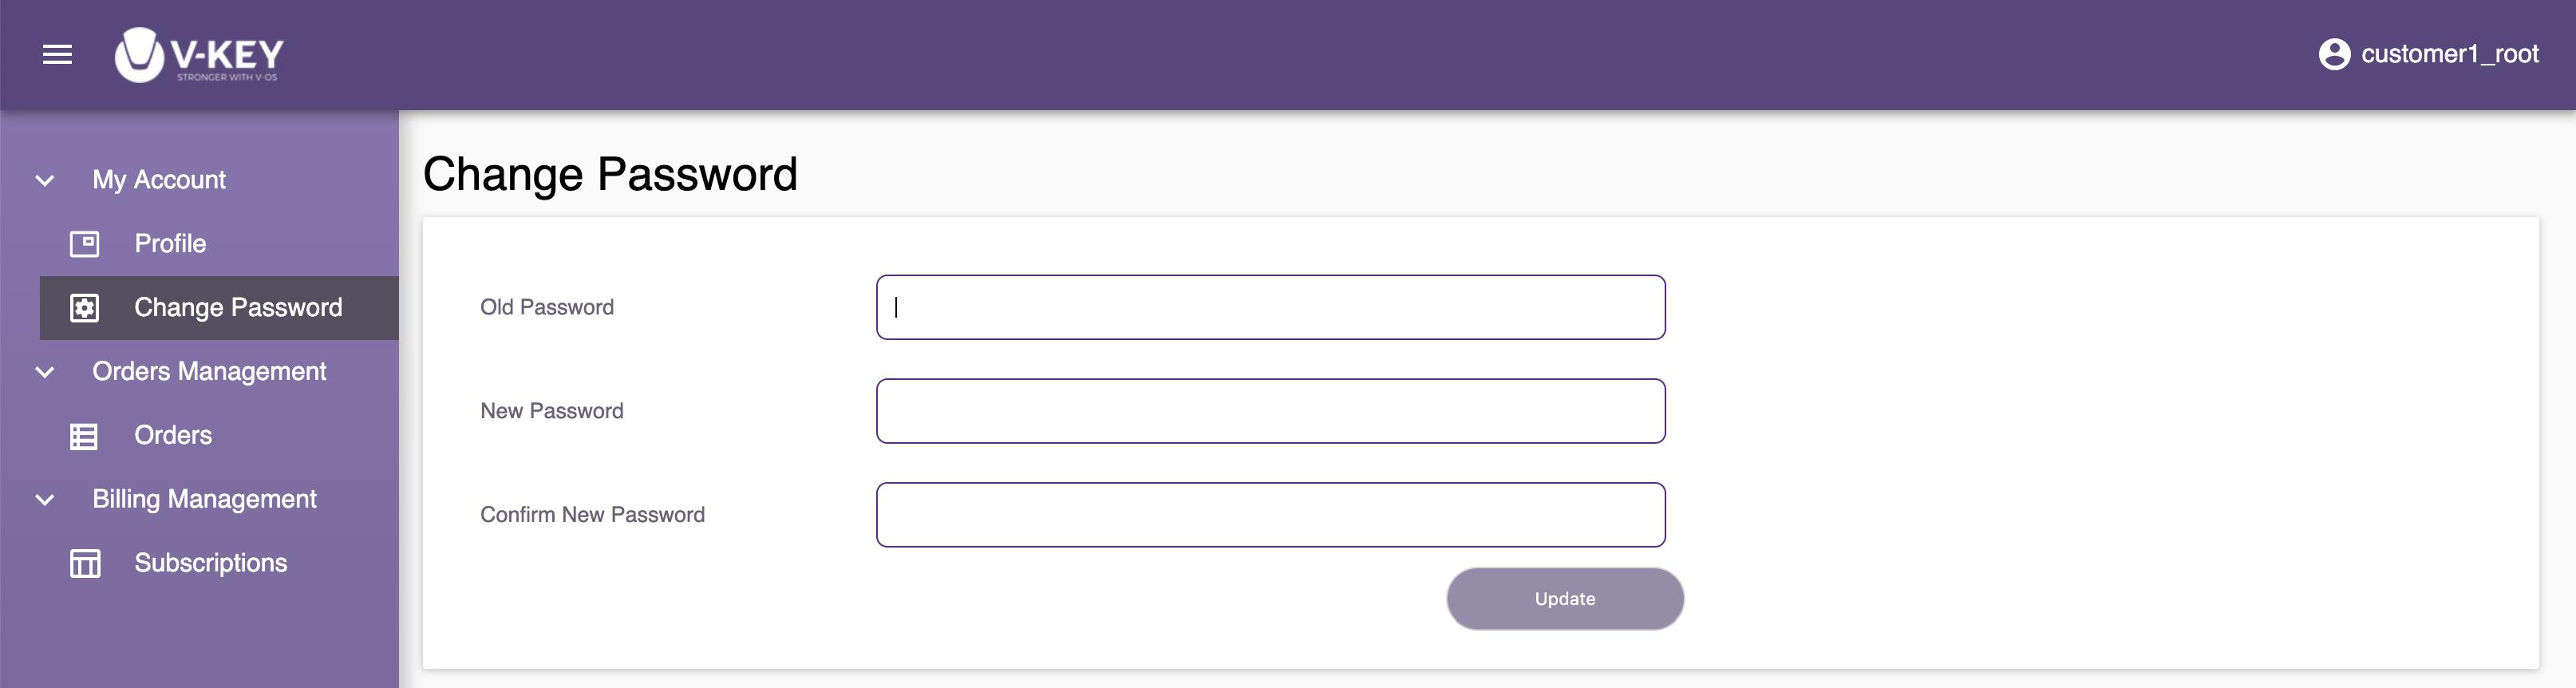
My Accounts
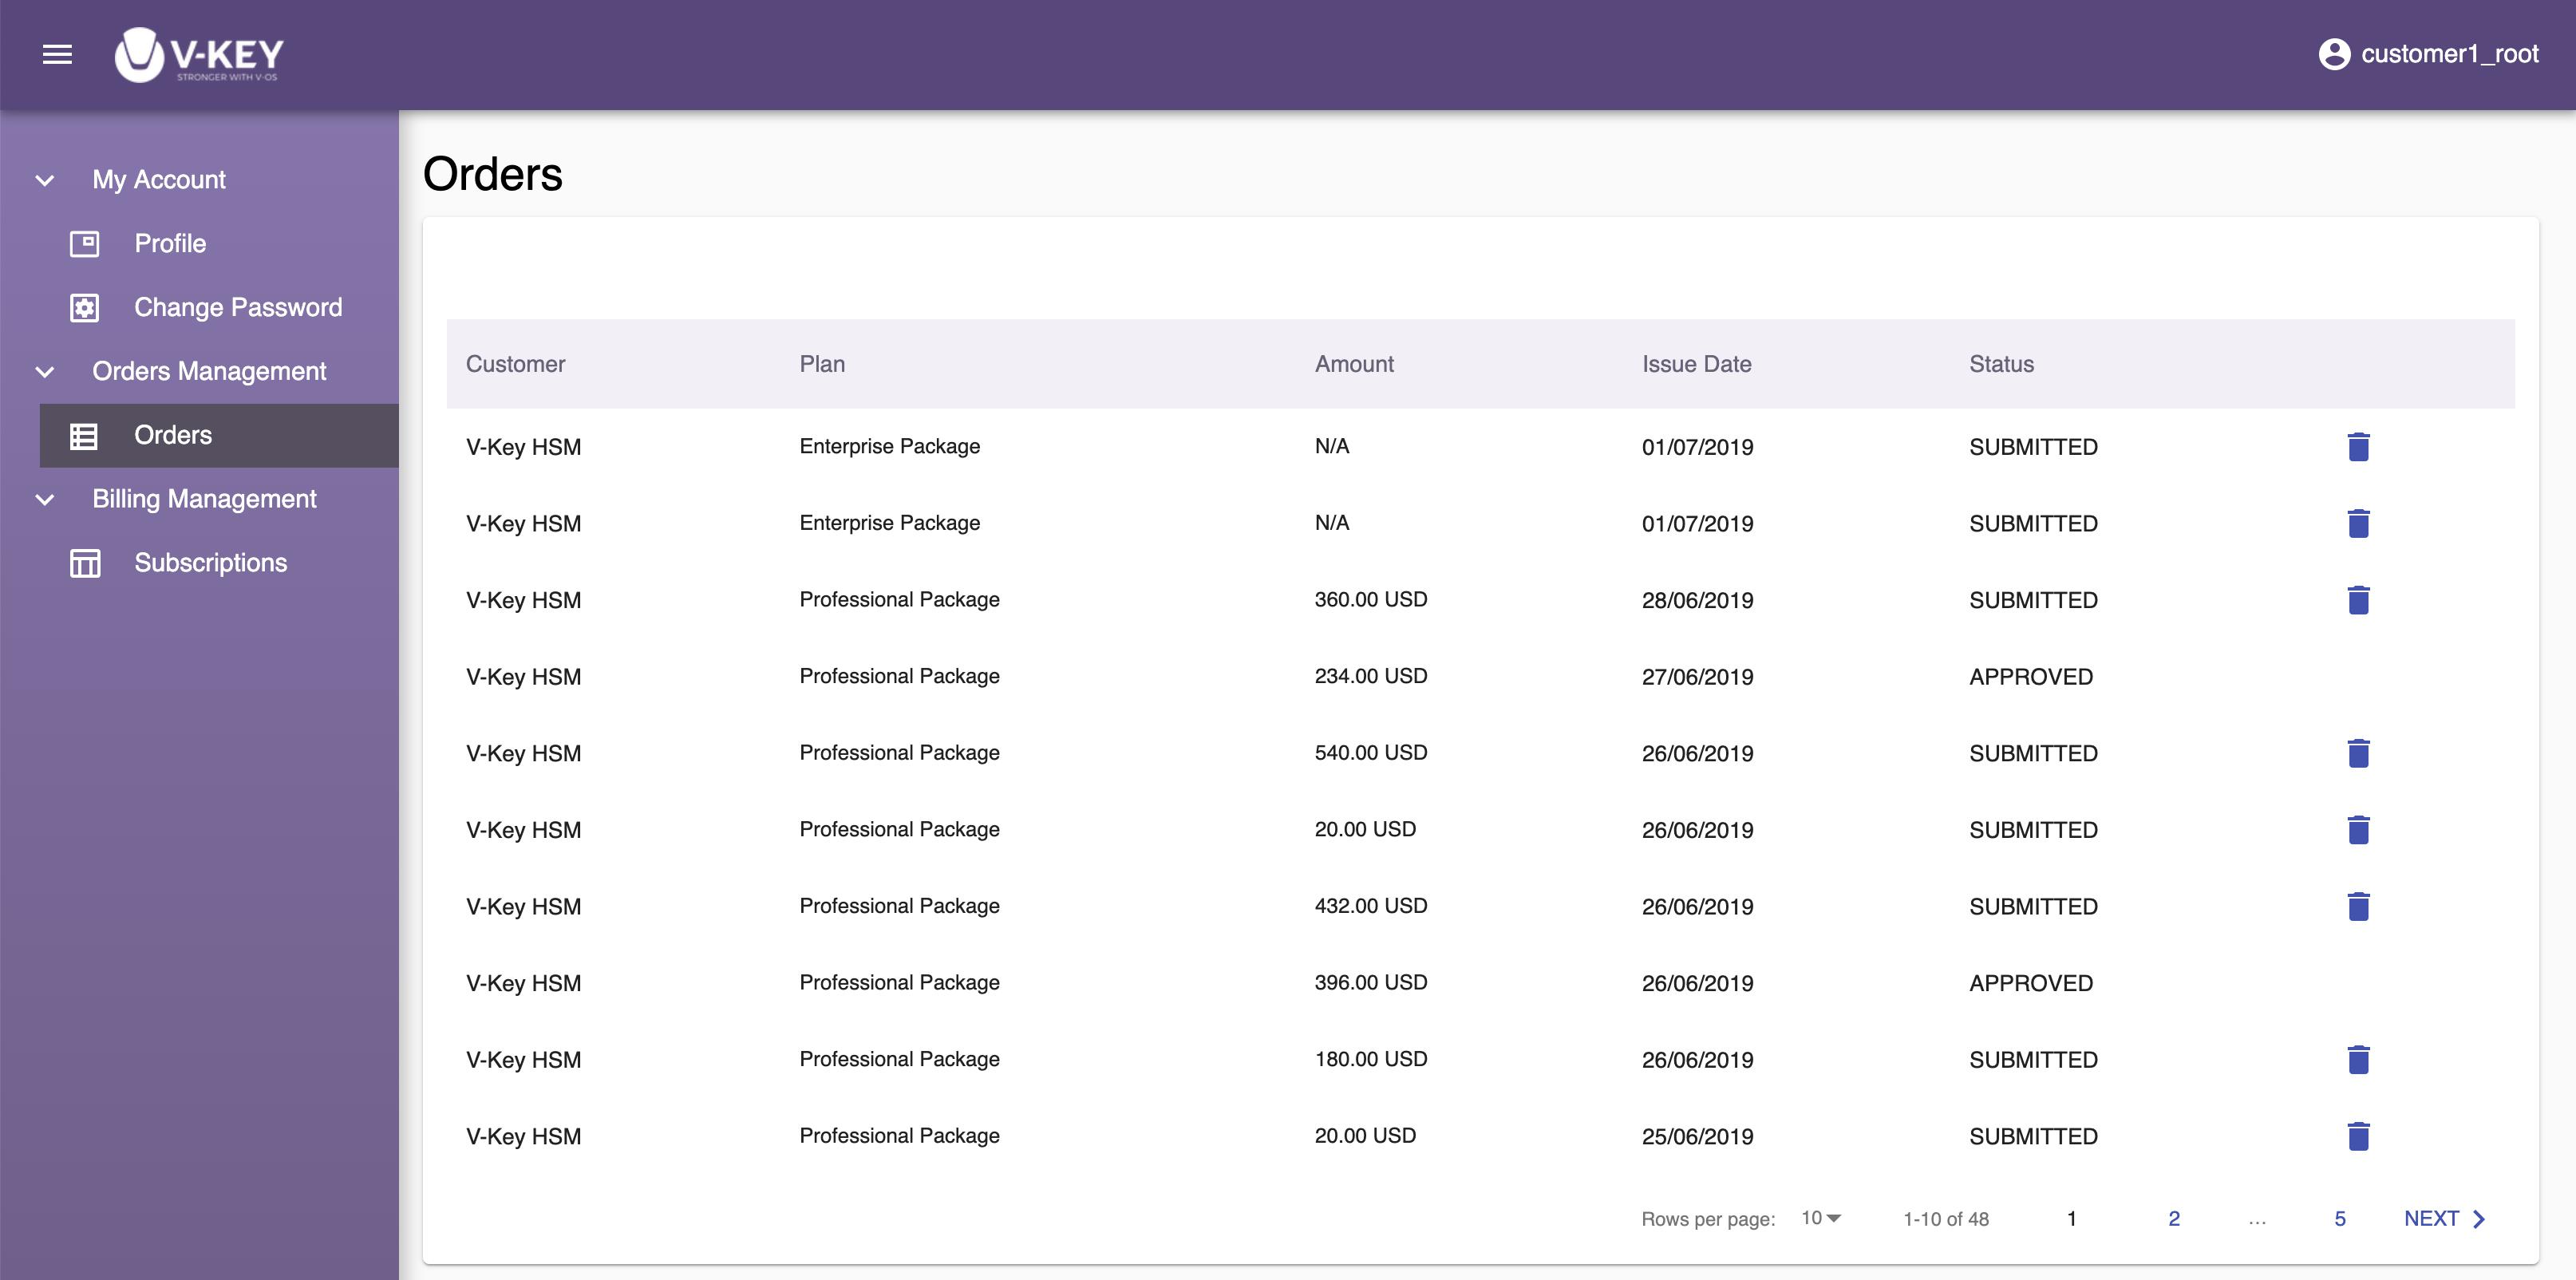
The My Accounts section lets you edit your profile, change password, and manage order and billing. The following subsections are available:
- My Accounts: for you to edit your profile details and change your account password in the Dashboard
- Order Management: for you to manage and view details of the orders
- Billing Management: for you to manage billing and subscriptions

Solution Configurations and Deployments
V-OS Cloud provides solutions that will help your organization to implement V-Key 2FA mechanism to protect the services in your organization.
2FA Service for VPN/RADIUS and Office 365 is based on the V-Key’s V-OS PKI Token solution hosted on by key components on V-OS Cloud, V-Key app on both Android and iOS platforms, and VCAG. 2FA Service for VPN/RADIUS can be integrated with on-premise or third-party components in your organization by RADIUS connectors and directory services. 2FA Service for O365/SAML can be integrated with on-premise or third-party components in your organization by SAML2.0 and LDAP connectors like Active Directory and Office 365 services.
2FA Service for VPN/RADIUS
In order to implement 2FA Service for VPN/RADIUS service for protecting VPN access to your organization, the following components from your organization are mandatory:Exposed Active DirectoriesV-OS Cloud needs to communicate with identity access management (IAM) of your organization to authorize and authenticate users during the onboarding process or to authenticate users. The connection to IAM, such as Active Directory of your organization, is mandatory. Exposed RADIUS ServerVCAG will connect to RADIUS Server to receive and respond to the authentication request. Therefore, an exposed RADIUS server is mandatory for this solution. The exposed IP of this server should be available before setting up the services.
Solution Architecture Overview (2FA for VPN)
2FA Service for VPN/RADIUS service is a software-as-a-service solution. The following architecture diagram shows how this service works when it is integrated with on-premise enterprise VPN components.
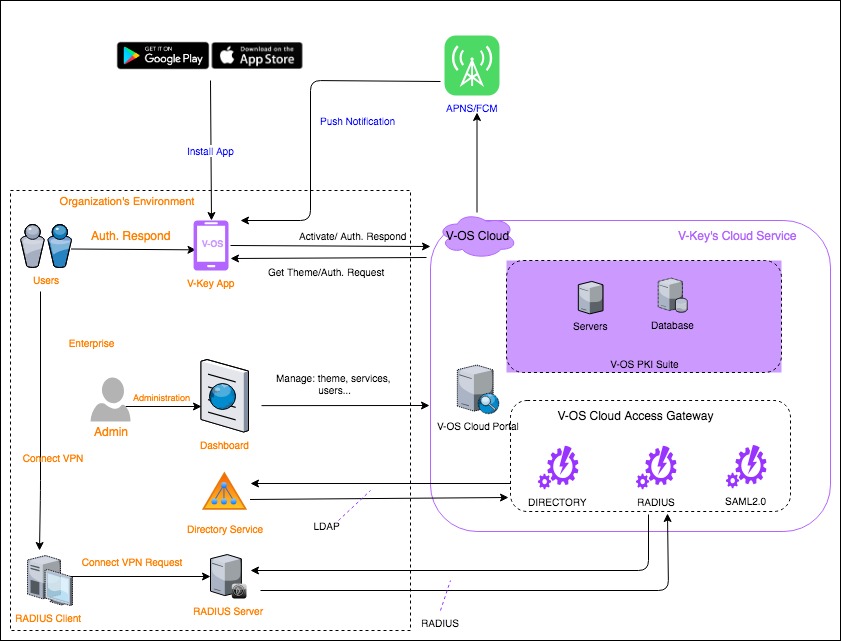
V-OS Cloud Components:
Organization’s Components:
Note: The following components in your organization are prerequisites and mandatory for V-OS Cloud.
Active DirectoryThe directory service of your organization where the credentials of end users are stored. VCAG will communicate to this directory by LDAP protocol to authorize users during login, V-Key app activation, and first authentication. It is mandatory to expose this AD to be able to query from VCAG while authorizing and authenticating.RADIUS ServerThe server which implements VPN services based on RADIUS protocol in your organization. It is mandatory to expose the server for communication between VCAG and RADIUS server during authentication. It receives connection requests from RADIUS client, then triggers authentication to VCAG and receives the response to approve or reject the request.RADIUS ClientThe client application on end users’ devices that initiating the VPN connection request. It triggers the VPN connecting request to the RADIUS server, then receives the result of authentication.
External Services:APNS/FCMThe push notification service of Apple (APNS) and Google (FCM).Apple App Store or Play StoreThe application store where V-Key app is hosted, upgraded and delivered to users worldwide.
Following diagram shows the process flow in the 2FA Service for VPN/RADIUS services through VCAG.
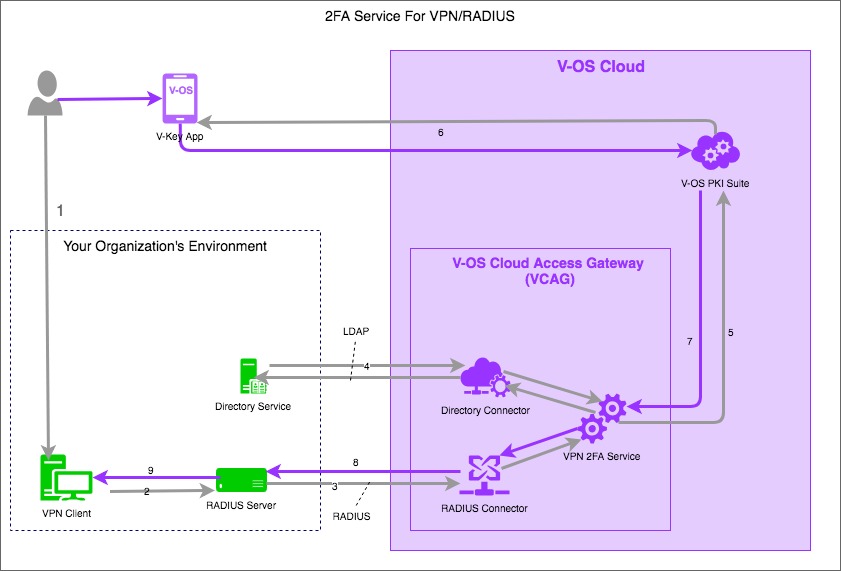
The general communication flow of 2FA for VPN service is as follows:
- Step 1: User login to V-Key app, VCAG queries to your primary directory to authorize and authenticate the user.
- Step 2: User trigger the VPN connecting from their PC, which needs to be VPN connected.
- Step 3: VCAG do 1st FA with your secondary directory, and triggers 2nd FA request to V-Key app on user’s device.
- Step 4: User confirm 2nd FA on user’s device. The confirmation will be sent back to the RADIUS server in your organization.
Note: You can configure different directories, e.g. primary and secondary, to make the solution more adapted to demands of your organization. However, you can have only one directory for V-OS Cloud service.
Configuration
To utilized the 2FA Service for VPN/RADIUS service, you need to complete the following configurations:
- Create directory connectors for token pack and VPN service. See Directory Connectors (2FA for VPN).
- Create RADIUS connector for 2FA. See RADIUS Connector (2FA for VPN).
- Modify service instance. See Service Instance (2FA for VPN).
- Create token pack. See Token Pack (2FA for VPN).
Directory Connectors (2FA for VPN)
Directory connector is required by both token pack and VPN service. You can use the same directory for both the token pack and VPN service or create different connectors for the two. For how to create directory connector, see Creating Directory.
RADIUS Connector (2FA for VPN)
In order to enable the connection between V-OS Cloud and your RADIUS server, you need to setup RADIUS connector. For how to create RADIUS connector, see Creating RADIUS Connector.
Service Instance (2FA for VPN)
To deploy the 2FA Service for VPN/RADIUS service, you need to modify the respective service to link to the directory connectors and RADIUS connector that you created in the previous steps. For how to modify services, see Modifying Services.
Token Pack (2FA for VPN)
You need to create a token pack and send to app users for onboarding and service activation. You need to create a token pack and link the primary directory connector and service instance that you have created in the previous step. See Creating Token Pack.
At this step, the service is ready. After your app user got onboard with the token pack you sent, they are ready to approve or reject login request to the VPN service in your organization.
2FA Service for O365/SAML
To implement V-Key 2FA Service for O365/SAML service for protecting Office 365 access to your organization, the following components from your organization and actions are mandatory:Exposed Active DirectoriesV-OS Cloud needs to communicate with identity access management (IAM) of your organization to authorize and authenticate users during the onboarding process or to authenticate users. The connection to IAM, such as Active Directory of your organization, is mandatory.Synchronized DirectoryIn case that your organization uses the local AD to manage users’ credentials, you need to synchronize the credentials between your local AD and Azure AD tenant. You need to install Azure AD connector, and Microsoft component to synchronize users’ accounts from local to online Azure AD. This synchronization is to make sure that immutable ID in Office 365 and Object GUID of the user account in your local AD is exactly the same.Turn on Modern AuthenticationIn order to support 2FA for Outlook and Skype apps, your organization must switch authentication mode to support Modern Authentication on Microsoft Exchange servers of Office 365 tenant. Follow the guideline from Microsoft to turn on Modern Authentication mode: http://bit.ly/o365_modern_auth.Microsoft Office Global Administration AccountThe administration account provided while registering in Office 365 of Microsoft. This account and credential are necessary to connect Office 365 Servers and federating.Verified Your Own Domain NameThe domain which will be federated between your Office 365 tenant and your Login page on VCAG. You need to verify this domain on your Office 365 tenant. For how to add a domain name to Office 365, see http://bit.ly/o365_add_domain_name. The domain to federate cannot be the default domain on Microsoft Office 365 tenant, the one with ‘.onmicrosoft.com’ postfix.Window PC/Server, PowerShell, and MSOnline ModuleIn order to federate (the activity that binds Login page of Office 365 tenant to your organization’s Login page, or Single-Sign-On setting in other words), you need to run scripts or commands in PowerShell which uses MSOnline module to remote access to Microsoft Exchange from your local Window PC/server.
Solution Architecture Overview (2FA Service for O365/SAML)
V-Key 2FA Service for O365/SAML service is a software-as-a-service solution. The following architecture diagram shows how this service works when it is integrated with Microsoft Office 365’s tenant.
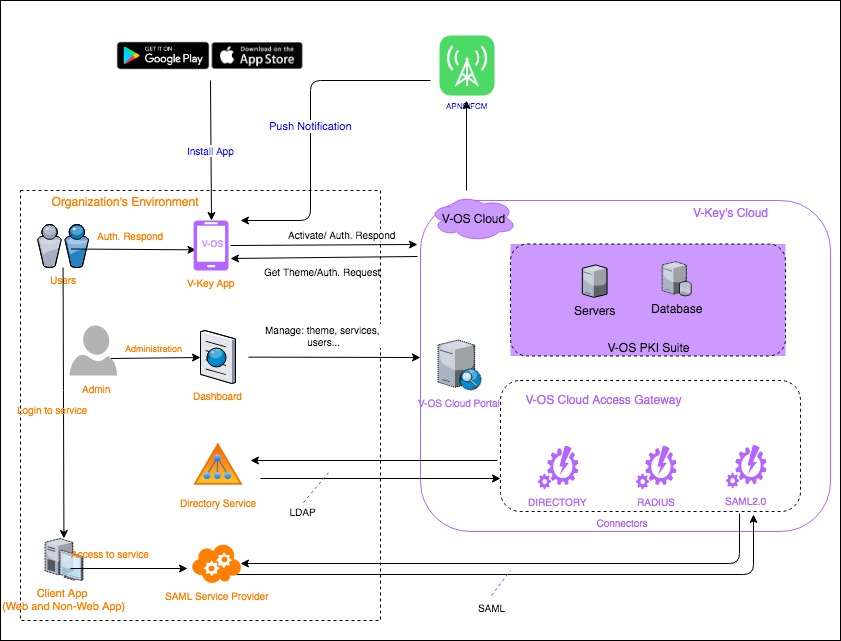
V-OS Cloud Components:
Organization’s Components:
Note: The following components in your organization are prerequisites and mandatory for V-OS Cloud.
Active DirectoryThe directory service of your organization where the credentials of end users are stored. VCAG will communicate to this directory by LDAP protocol to authorize users during login, V-Key app activation, and first authentication. It is mandatory to expose this AD to be able to query from VCAG while authorizing and authenticating.Microsoft Office 365 Service TenantThe Office 365 tenant of your organization which needs to be protected by 2FA service of V-OS Cloud. Microsoft Office 365 service will be integrated with VCAG by SAML2.0 protocol. Office 365 is SAML2.0 service provider, and VCAG is SAML2.0 identity provider. VCAG receives SAML authentication request from Office 365, and triggers 2FA with V-Key app, then respond SAML2.0 assertion to Office 365 service.Office 365 ClientThe web application or non-web application of Microsoft, such as Outlook, Teams, OneDrive, Skype for Business apps, the ones users need to log in to. In order to support these apps as much as possible, your organization needs to turn on Modern Authentication in Office 365 Tenant’ servers.
External Services:APNS/FCMThe push notification service of Apple (APNS) and Google (FCM).Apple App Store or Play StoreThe application store where V-Key app is hosted, upgraded and delivered to users worldwide.
Following diagram shows the process flow in the 2FA Service for O365/SAML services through VCAG.
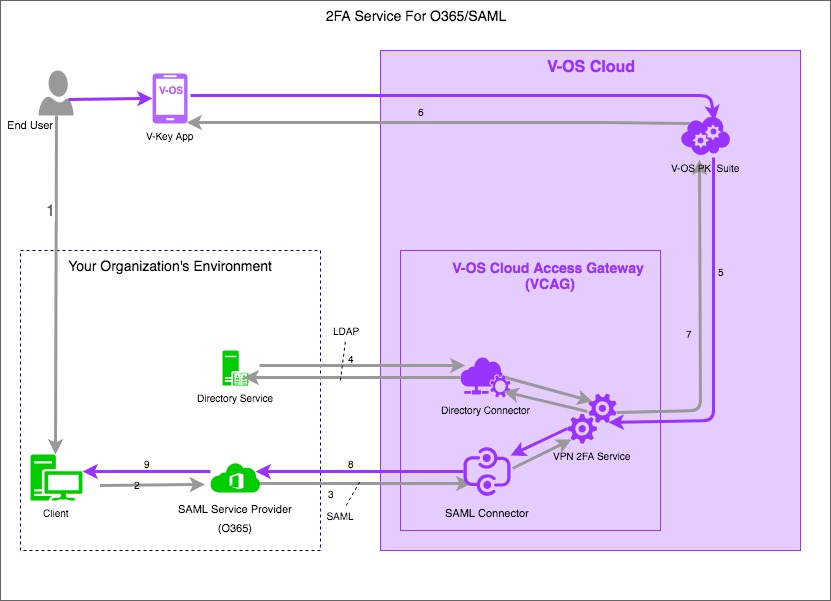
The general communication flow of 2FA Service for O365/SAML service is as follows:
- Step 1: User login to V-Key app, VCAG queries to your primary directory to authorize and authenticate the user.
- Step 2: User trigger the Office 365 login session from browser or Microsoft Office 365 application (Outlook, Skype, etc.) on their PC/mobile, which needs to be logged in. User will be redirected to the Login page on VCAG to input their credentials for authentication.
- Step 3: VCAG do 1st FA with your secondary directory, and triggers 2nd FA request to V-Key app on user’s device.
- Step 4: User confirm 2nd FA on user’s device. The confirmation will be sent back to VCAG, then VCAG responses to Microsoft Office 365 server.
Note: You can configure different directories, e.g. primary and secondary, to make the solution more adapted to demands of your organization. However, you can have only one directory for V-OS Cloud service.
Preparing Your Office 365
Do the steps in the following sections to prepare your Office 365.
Installing PowerShell and Azure AD
Do the following steps to install and set up these tools:
- Install PowerShell. See http://bit.ly/install_powershell.
- Open PowerShell with Run as Administrator and install MSOnline Module with the following command:
Install-Module MSOnline - Install the Azure Active Directory Module for Windows PowerShell (64-bit version), by running the following command:
Install-Module -Name AzureAD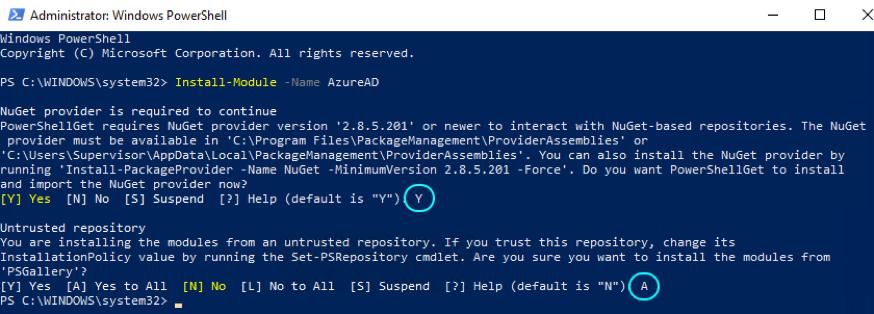
- Enter
Yon the command prompt to proceed with the installation.
Enabling Office 365 Federation
To enable Office 365 federation, do the following steps:
Note: Do the following steps if you have not generated the federation script already generated. Otherwise, execute the script directly.
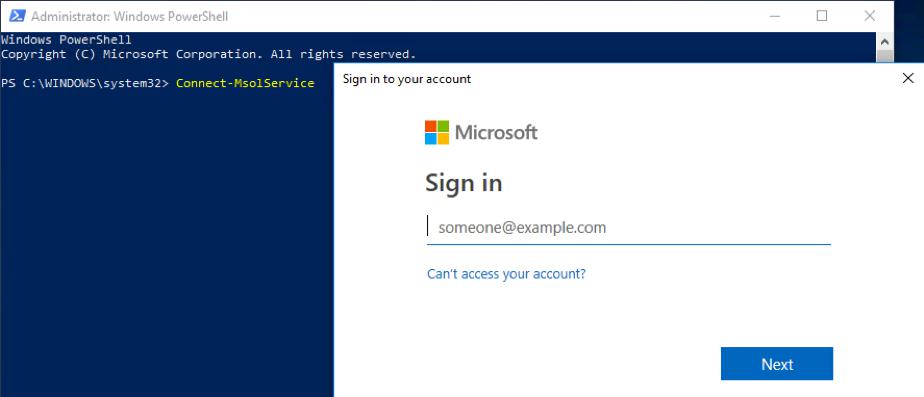
- Open PowerShell with Run as Administrator and run the following command to connect to Microsoft Office Online Service:
PS C:\Users\Administrator> Connect-MsolService - You will be prompted for Office 365 global admin credentials. Input your Office 365 admin credentials to establish the connection.
- On PowerShell, check the current domain name in your Office 365 tenant with the following command:
PS C:\Users\Administrator> Get-MsolDomain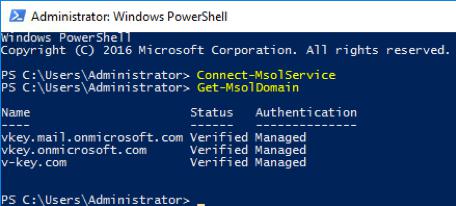
- Declare information and parameters to be used for federated authentication, e.g.
saleallplanet.com, with the following commands:PS C:\Users\Administrator> $domainname = "saleallplanet.com" PS C:\Users\Administrator> $logoffuri = "https://cloud.v-key.com/sso/o365/sign-out" PS C:\Users\Administrator> $passivelogonuri = "https://cloud.v-key.com/sso/o365/sign-in" PS C:\Users\Administrator> $cert = "---CERTIFICATE CONTENT---" PS C:\Users\Administrator> $issueruri = "https://cloud.v-key.com/sso/o365/metadata" PS C:\Users\Administrator> $protocol = "SAMLP" - Switch that domain name to use Federated Authentication with the following command:
PS C:\Users\Administrator> Set-MsolDomainAuthentication -DomainName $domainname -FederationBrandName $domainname -Authentication Federated -IssuerUri $issueruri -LogOffUri $logoffuri -PassiveLogOnUri $passivelogonuri -SigningCertificate $cert -PreferredAuthenticationProtocol $protocol - Check again the current domain names in your Office 365 tenant after switching to federated authentication with the following command:
PS C:\Users\Administrator> Get-MsolDomain - The output should show the domain being federated as follows:
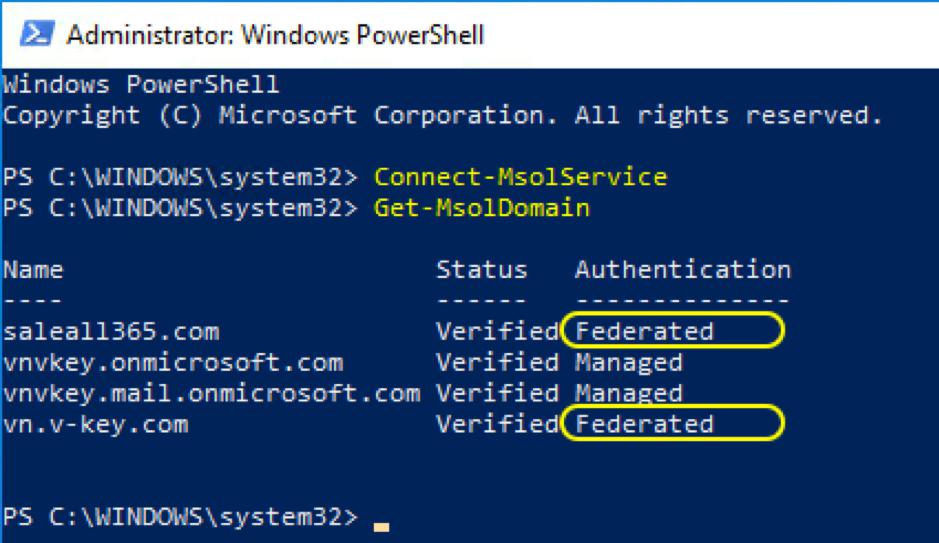
- In the Azure AD portal, you can verify the same information.
 Note: Please be noted that user accounts cannot be created manually with Federated domain in Office 365/Azure AD Portal. Users with Federated domain in Office365/Azure AD can only be generated by synchronization from On-Premise Infrastructure.
 - After federation is succeeded, go to
www.office.comfrom your browser. - Select the Sign in button at the upper-right corner of the page.
- Input your email address on the Sign in page and select next.
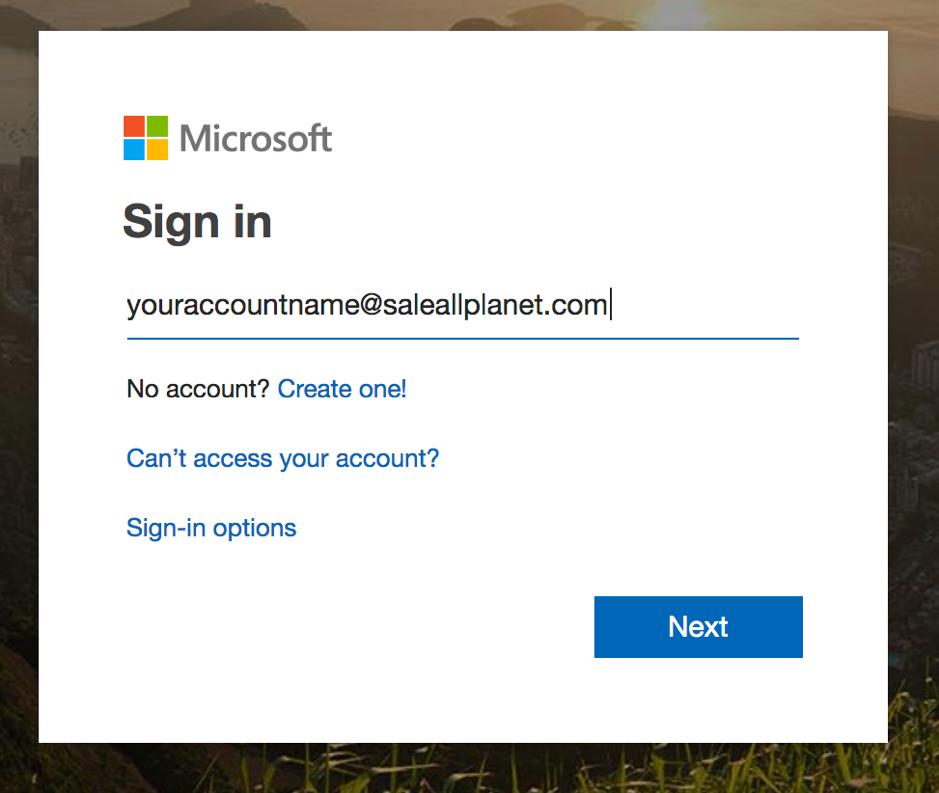
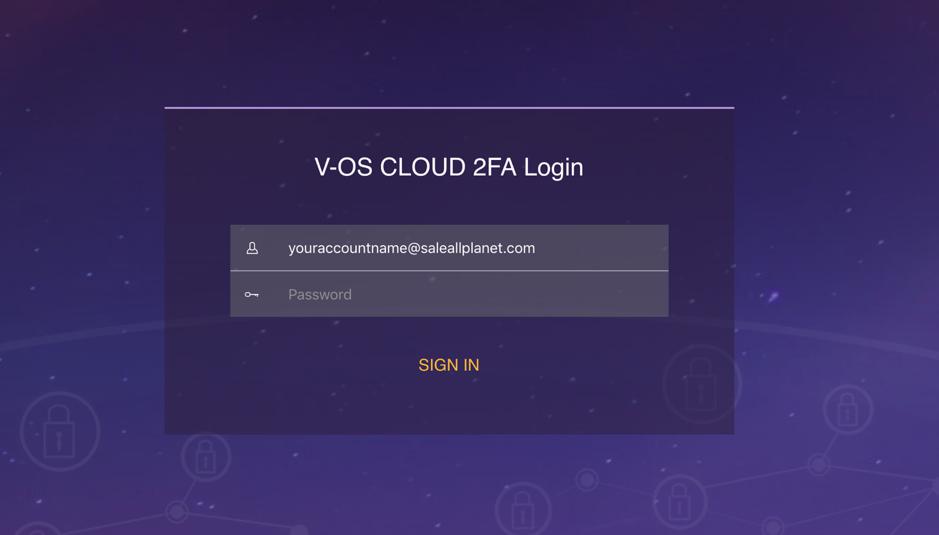
- If you are redirected to VCAG’s Login page, your federation is successful. Otherwise, double check your federating parameters.
Turn on Modern Authentication for Outlook
To turn on modern authentication for Outlook to ensure that Outlook can work on both Windows and Mac, do the following steps:
- Open PowerShell with Run as Administrator and run the following command to connect to Microsoft Office Online Service:
PS C:\Users\Administrator> Connect-MsolService - Run the following command to enable modern authentication connections to Exchange Online by Outlook 2013 or later client version.
PS C:\Users\Administrator> Set-OrganizationConfig -OAuth2ClientProfileEnabled $trueNote: This command does not block or prevent Outlook 2013 or later clients from using basic authentication connections. If you need to set modern authentication off in the future, run the following command:PS C:\Users\Administrator> Set-OrganizationConfig -OAuth2ClientProfileEnabled $false - Verify if the change is successful, run the following command:
Get-OrganizationConfig | Format-Table Name,OAuth* -Auto
Turn on Modern Authentication for Skype/Lynch
To turn on modern authentication for Skype/Lynch, do the following steps:
- Open PowerShell with Run as Administrator and run the following command to connect to Microsoft Office Online Service:
PS C:\Users\Administrator> Connect-MsolService - Run the following command to connect to Skype Online Service:
PS C:\Users\Administrator> Import-Module SkypeOnlineConnector PS C:\Users\Administrator> $userCredential = Get-Credential PS C:\Users\Administrator> $sfbSession = New-CsOnlineSession -Credential $userCredential PS C:\Users\Administrator> Import-PSSession $sfbSession - Run the following command to check the current status:
PS C:\Users\Administrator> Get-CsOAuthConfiguration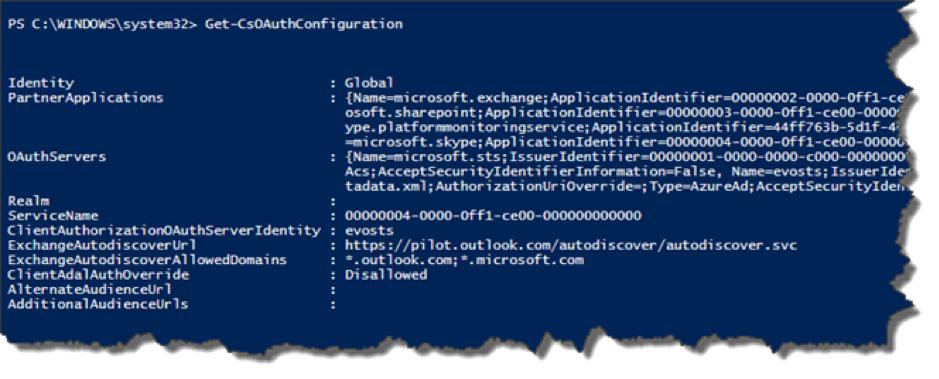
- If
ClientAdalAuthOverrideisDisallowed, fun the following command to change the setting:PS C:\Users\Administrator> Set-CsOAuthConfiguration -ClientAdalAuthOverride Allowed - Run the
Get-CsOAuthConfigurationcommand to check theClientAdalAuthOverridestatus again.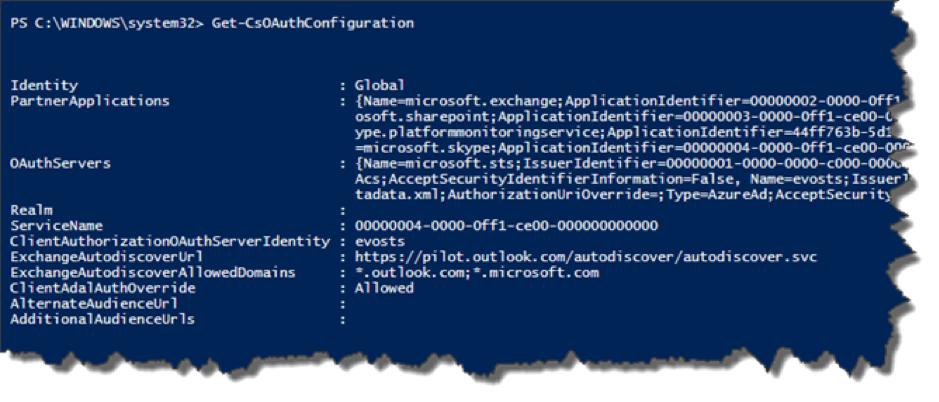
Configuration
To utilized the 2FA Service for O365/SAML service, you need to complete the following configurations:
- Create directory connectors for token pack and Office 365 service. See Directory Connectors (2FA for VPN).
- Create SAML connector for 2FA. See SAML Connector (2FA Service for O365/SAML).
- Modify service instance. See Service Instance (2FA Service for O365/SAML).
- Create token pack. See Token Pack (2FA Service for O365/SAML).
Directory Connectors (2FA Service for O365/SAML)
Directory connector is required by both token pack and Office 365 service. You can use the same directory for both the token pack and Office 365 service or create different connectors for the two. For how to create directory connector, see Creating Directory.
SAML Connector (2FA Service for O365/SAML)
SAML connector is the gateway that VCAG communicates with your organization Office 365 tenant. For how to create SAML connector, see Creating SAML Connector.
Service Instance (2FA Service for O365/SAML)
To deploy the 2FA Service for O365/SAML service, you need to modify the respective service to link to the directory connectors and SAML connector that you created in the previous steps. For how to modify services, see Modifying Services.
Token Pack (2FA Service for O365/SAML)
You need to create a token pack and send to app users for onboarding and service activation. You need to create a token pack and link the primary directory connector and service instance that you have created in the previous step. See Creating Token Pack.
At this step, the service is ready. After your app user got onboard with the token pack you sent, they are ready to approve or reject login request to all services of Microsoft 365 services in both web browser, and desktop/mobile applications.