Prerequisites
To implement V-OS Cloud MFA for VPN / RADIUS service, you need to have the followings ready in advance:
Exposed Directories: A directory for user authentication. The directory must be accessible from an external network. Currently, V-OS Cloud supports the following directories:
Note: You must configure your firewall settings on your directory server to allow external access to the LDAP TCP ports, i.e., 389 and/or 636. If you do not wish to open the said TCP ports publicly accessible to all, you can update your NAT configurations to only allow (whitelist) V-OS Cloud from the IP address 20.43.189.122 to access your directory.
- Microsoft Active Directory (on-premises): The directory that is installed in an on-premises environment. If you use this directory service, you must make sure that the directory can be integrated with V-OS Cloud from outside of the enterprise network
- Azure Active Directory (AAD): The AAD service associated with your Office 365 subscription. Because AAD only supports Secure LDAP (LDAPS), to integrate with V-OS Cloud, your AAD must activate AAD Domain Name Services (AAD DNS). See price and details of enabling and configuring AAD DNS in your AAD tenant from Microsoft
- Online 3rd-Party Directory Services: If you use other 3rd-party directory services, you must configure your directory to allow external LDAP queries from V-OS Cloud
- V-Key LDAP: If you do not have an existing directory service in place or wish to use a separate directory service for your V-OS Cloud usage, you can choose to use V-Key LDAP as the directory service provider
- Other LDAPs: V-OS Cloud is compatible with other directory services that support LDAP authentication, such as OpenLDAP. You should configure the LDAP service to allow integration with V-OS Cloud
Note: If your organization uses both local AD and AAD to manage user credentials, you need to synchronize the credentials between your local AD and AAD tenant. You need to install AAD connector, the Microsoft component for synchronizing user accounts from local AD to AAD.
A directory (optional): for VPN service if you use a different directory from the above directory.
A working VPN/RADIUS service: the VPN service of your organization, which supports RADIUS protocol, such as SonicWall, OpenVPN.
Note: You shall also make sure that the firewall rules are in place to allow HTTP(s) communication with V-OS Cloud IDM.
Step 1: Configure Directory Connector
Firstly, setup directory connectors that can be used by the V-OS Cloud IDM to connect to the directories for authenticating the users. This is the 1stfactor authentication. If you use different directories for different services, you can setup multiple directory connectors that connect to different directories. You shall have a directory connector that can be used for authenticating user login of the V-Key app and a directory connector for authenticating user access of the 3rd-party services such as Office 365, VPN, Salesforce, etc. It is fine to have just one directory connector for both the V-Key app and all services if they are sharing the same directory for different purposes.
Note: By default, one template directory connector is generated for you to configure. If you are reusing the same connector with other services that you have already configured in V-OS Cloud Dashboard previously, you can skip this step.
Setting Up Directory Connector for V-Key LDAP Directory
To set up the V-Key LDAP directory connector, do the following steps:
Note: If you already have your directory service in place and wish to configure a directory connector for your existing directory, go to Setting Up Directory Connector for 3rd-party Directories.
- Log in to the V-OS Cloud Dashboard with an admin account.
- Click Directories on the left sidebar.
- Click + CREATE at the upper-right portion of the page to create a new connector from scratch.
- Assign a Name to the directory connector for easy identification, e.g., V-Key Directory Connector. This can be any name.
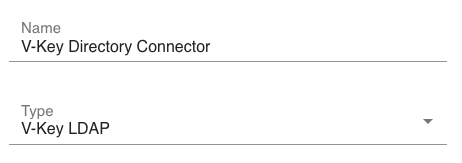
Fig 1: Create V-Key Directory Connector - Select V-Key LDAP from the Type drop-down.
- Click Save to create the V-Key directory connector.
- Click the “pencil” icon next to the new directory connector that you have just created.
- You can choose to create users one by one or in batches.
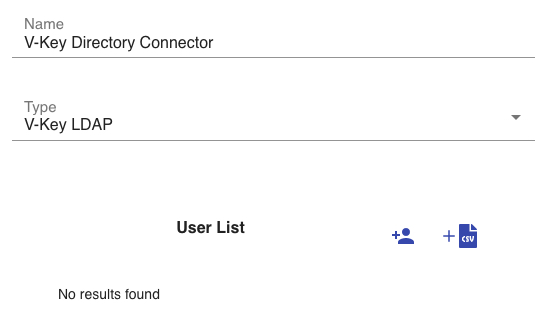
Fig 2: Add Users - To create users one by one, do the following steps:
- Click the “+ user” icon at the middle-right of the page to show the add user popup.
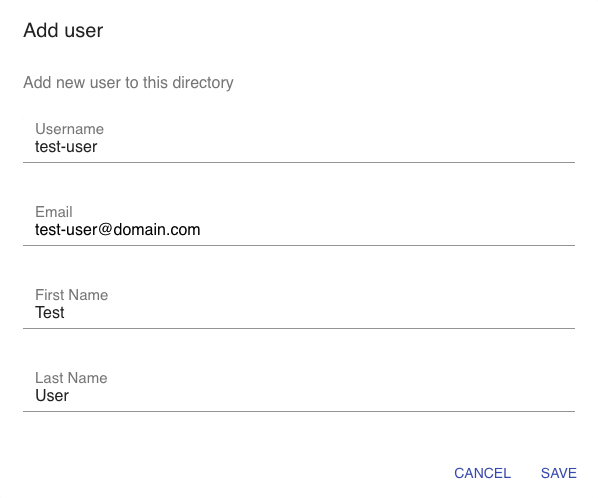
Fig 3: Add User – Single - Key in the Username, Email, First Name, and Last Name of the user.
- Click SAVE. This triggers the creation of the user in the directory and sends an email to the user’s email address. This email contains the username, temporary password, and login link to V-OS Cloud
.
Fig 4: Single User EntryNote: User logs in to V-OS Cloud for the first time will require the setting of a new password. The users must reset their password before the account is activated and can be used for V-Key app onboarding. - Repeat the steps to continue creating another user.
- Click the “+ user” icon at the middle-right of the page to show the add user popup.
- To create users in a batch, do the following steps:
- Click the “+ CSV” icon at the middle-right of the page to show the add user popup.
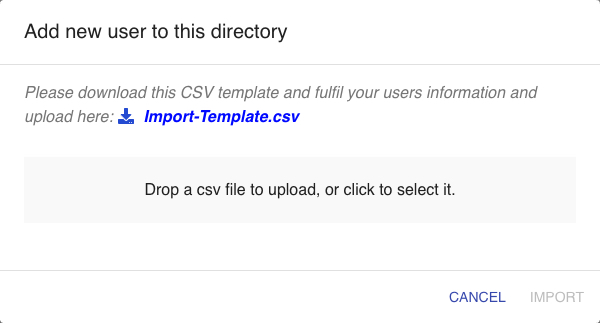
Fig 5: Add User – Batch - Open the template and follow the format of the sample data to populate the user details. Only Username is the mandatory field in the CSV.

Fig 6: CSV Template - After the CSV has been populated, drag the CSV file into the add user popup that you have opened in the previous step and click IMPORT. Similar to creating single users, the user entries in the CSV file will be automatically created in the directory. An email with a temporary password will also be sent to each user in the CSV file. Users are required to log in and change the password. If there is an error during this batch creation, a file containing the error that occurred during the process will be automatically generated.
- Click the “+ CSV” icon at the middle-right of the page to show the add user popup.
- After the users are created in the directory, the directory connector is ready to be consumed by V-OS Cloud IDM.
Setting Up Directory Connector for 3rd-party Directories
To set up directory connectors, do the following steps:
- Log in to the V-OS Cloud Dashboard with an admin account.
- Click Directories on the left sidebar.
- Click the “pencil” icon of the template directory connector from the list on the Directories page or click + CREATE at the upper-right portion of the page if you want to create a new connector from scratch.
- Assign a Name to the directory connector for easy identification, e.g., XYZ Directory Connector. This can be any name.
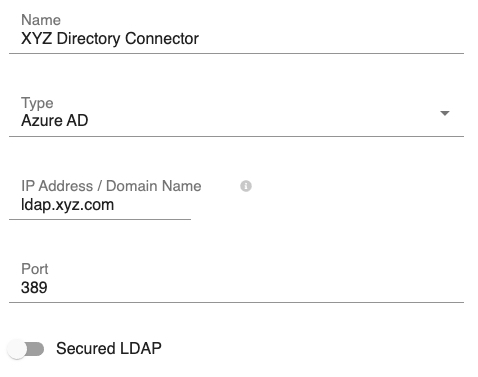
Fig 7: Edit Directory Connector – Part 1 - Select the type of directory connector from the Type drop-down, i.e., Azure AD, Local AD, Open LDAP, etc. If your directory type is not in the list, select Other.
- Key in your directory IP Address/Domain Name and Port.Note: The default ports are 389 (standard) and 636 (secured).
- If you use secured LDAP, enable the Secured LDAP option.
- Fill the Base DN field with the base distinguished name (DN) of your directory, e.g.,
dc=xyz,dc=com.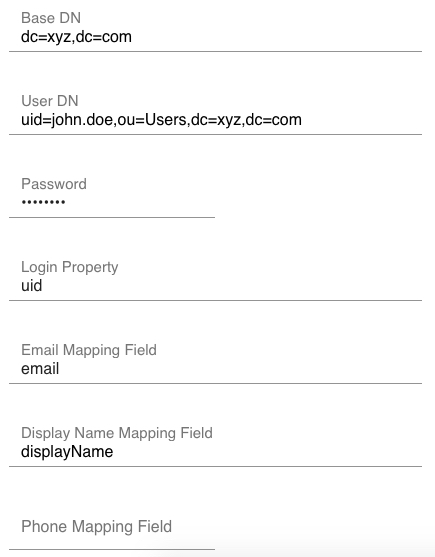
Fig 8: Edit Directory Connector – Part 2 - Fill the User DN and Password fields with the DN and password of the directory admin account, respectively.
- Fill the Login Property.Note: This is the corresponding directory property that the user will use to log in, e.g., if a DN of the user John Doe is
cn=john.doe,ou=users,dc=xyz,dc=comand John will be using the usernamejohn.doeto login. Then the Login Property shall becn. - Fill the Email Mapping Field with the email field in your directory, e.g.,
email. - Fill the Display Name Mapping Field with the display name field in your directory, e.g.,
displayName. - Fill the Phone Mapping Field with the phone field in your directory, e.g.,
telephoneNumber. This field is optional. - Click Save to confirm the directory connector creation.
- You can test the connection by clicking on the “signal” icon at the right of the connection that you just created. You will be prompted with the error when V-OS Cloud IDM fails to establish the connection. Correct the error and test again until you see Connection successful!.
- Repeat the above steps if you have a separate directory for user authentication. Otherwise, the directory connector setup is done.
Note: Integration step for different types of directories can be different. You should confirm with the directory provider for more details related to the directory that you use.
- If you use Azure AD, you may refer to this page to know how to get connected with Azure AD
- If you use on-premises AD, make sure that it can be accessed from an external network through the specified ports
Step 2: Configure RADIUS Connector
After you have created the necessary directory connectors, you need to set up a connector for RADIUS that can be used by the V-OS Cloud IDM to connect to the RADIUS server.
To create the RADIUS connector, do the following steps:
- Log in to the V-OS Cloud Dashboard with an admin account.
- Click Connectors > RADIUS on the left sidebar.
- Select the template RADIUS connector from the list or click + CREATE on the upper-right corner if you want to create a new connector from scratch.
- Assign a name to the RADIUS connector for easy identification, e.g., VPN Connector. This can be any name.
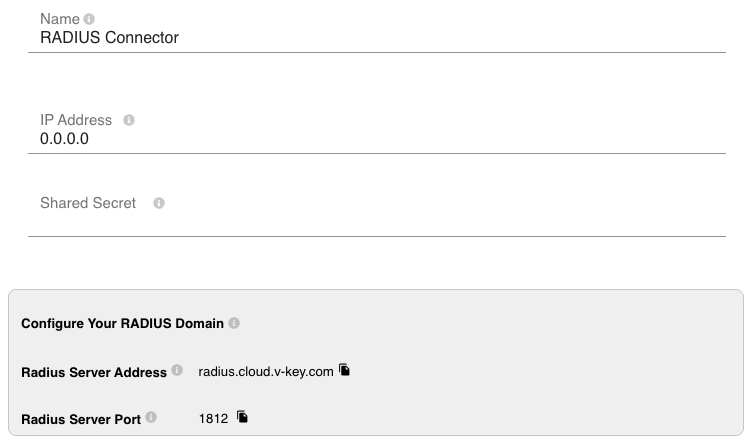
Fig 9: RADIUS Connector Configuration - Fill the IP Address field with the IP address of the VPN server.Note: If your VPN service does not have a fixed IP address, you need to request a static IP dedicated to your VPN service from V-OS Cloud (additional charges may apply) and fill the IP Address field with the static IP assigned.
- Fill the Shared Secret field with the password that is used at your VPN server. You can obtain the password from your VPN server.
- Click Save to create the RADIUS connector.
- Copy the RADIUS connector information (the address and port under Configure Your RADIUS Domain section) and configure them at your VPN RADIUS server.
Note: If you use the static IP address assigned by V-OS Cloud, you must use the same IP address as the RADIUS server address instead of the default “radius.cloud.v-key.com” indicated on the page.
Note: At your VPN router, UDP port 1812 must be opened in the outbound rules/policies at your network to allow the V-OS Cloud RADIUS connector to communicate to the VPN router through this port.
Step 3: Configure Service Instance
After the RADIUS connector is created, you can create the VPN service instance and assign the directory and RADIUS connector to the VPN service instance. The assigned connector will be used for authenticating the VPN service access.
To create the VPN service instance and add connectors to it, do the following steps:
- Log in to the V-OS Cloud Dashboard with an Admin account.
- Click Services on the left navigation bar.
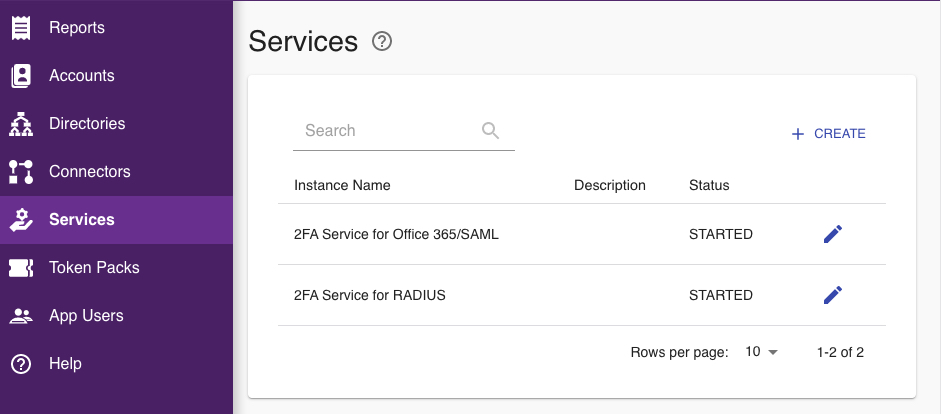 Fig 10: Services
 - Click the RADIUS service instance that you want to edit from the page.
- Replace the Icon of the service instance, if desired. This icon will be shown as the icon of the service on the V-Key app.
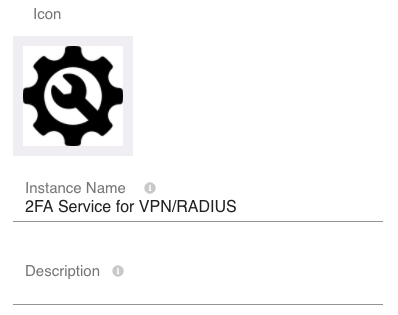
Fig 11: Icon, Instance Name, and Description - Edit the Instance Name and Description for easy identification. These can be any text.
- Select the directory connector for VPN from the Directory drop-down. Select the pencil icon at the right to edit the connector, if necessary.

Fig 12: Directory - Select the RADIUS connector from the RADIUS Connector drop-down.
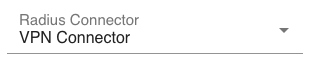
Fig 13: RADIUS Connector - Select Save to save the changes.
- Select START, if available, at the upper-right corner to start the 2FA service instance.
Step 4: Configuring Token Pack
After the service instance is set up and started, you can start creating a token pack, which can be sent to the V-Key app users, in the form of a QR code, for onboarding purposes.
To create and send a token pack, do the following steps:
- Log in to the V-OS Cloud Dashboard with an admin account.
- Click Token Packs on the left sidebar.
- Click the “pencil” icon of the pre-generated token pack from the list.
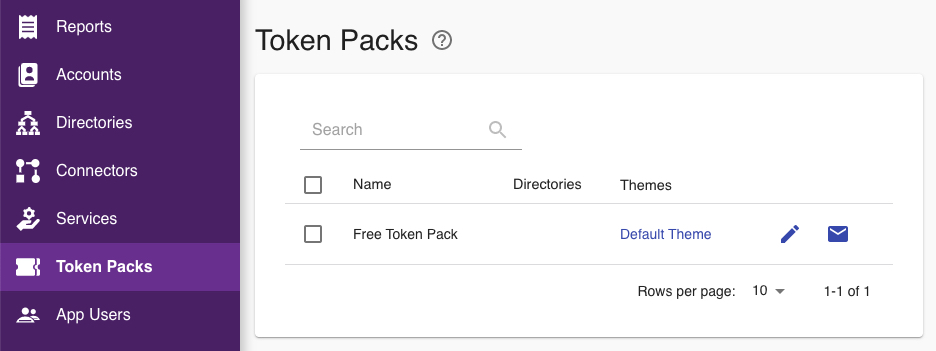 Fig 14: Token Packs
 - Assign a Name to the token pack for easy identification, e.g., Service Token Pack. This can be any name.
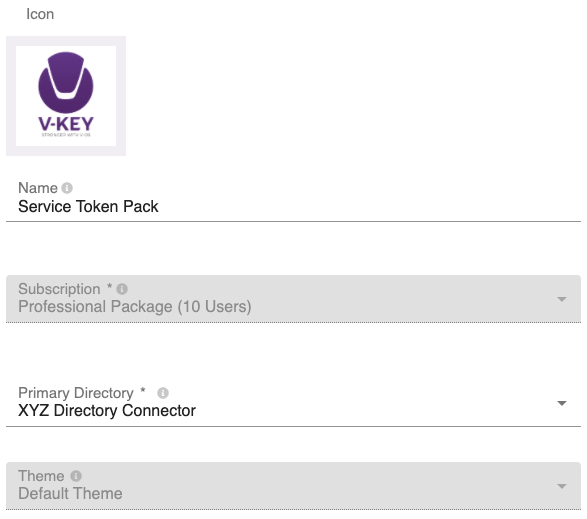
Fig 15: Edit Token Pack – Connector - Click the icon field and assign an icon to the token pack, if desired.
- Select the Primary Directory and Theme to be assigned to the token pack from the respective dropdown.Note: The Primary Directory is the directory used for authenticating users of the V-Key app. It can be the same or different directory configured in the service instance. The Theme is the theme that you wish to apply to your V-Key app when this token pack is used. You can configure different themes for different token packs.
- Pick the desired Service that you want to enable in the token pack.
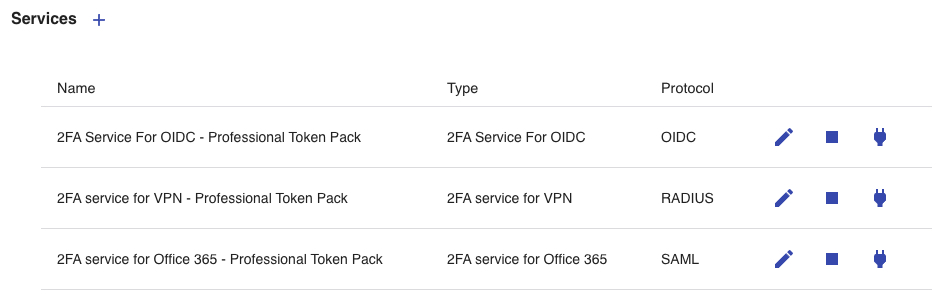 Fig 16: Service Selection
Note: A token pack can contain the 2FA services for multiple services. If you intend to have multiple services under the same token pack, select the service accordingly by toggling the “power plug” icon. - Click Save to create the token pack.
- If you wish to allow users connected to the selected network to be exempted from manual token provisioning, continue with the following steps. Otherwise, the created token pack is ready to be tested before being sent to app users for onboarding.
- Click the TRUSTED NETWORKS tab.
- Click + CREATE at the upper-right portion of the page.
- Assign a Name to the trusted network entry for easy identification. This can be any name.
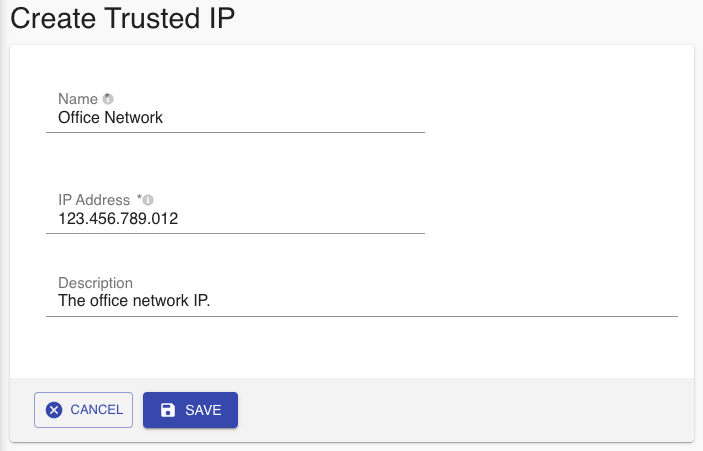
Fig 17: Create Trusted IP - Key in the IP Address that you want to add as the trusted network.
- Key in the Description, as desired. This is optional.
- Click Save to add the trusted IP address for the token pack.
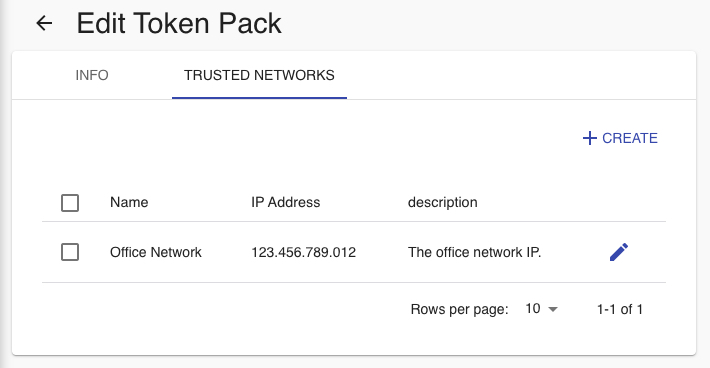
Fig 18: Trusted Networks - Go back to the INFO tab and click Save to save the token pack.
Step 5: Test Your Setup
In this step, all setups should have been done. You should test your setup before distributing the token pack to the app users.
To test your setup, do the following steps:
- Log in to the V-OS Cloud Dashboard with an admin account.
- Click Token Packs on the left sidebar.
- Click the “envelope” icon at the right of the token pack that you wish to test from the list.
- Input your email and click SEND. An email containing the QR code of the token pack is sent to your inbox.
- Download and install the V-Key app if you have not done so. Click or scan the applicable QR code to start the installation:
Fig 19:
Fig 20: - Launch the V-Key app on your mobile device after installation and scan the token pack QR code that you have received.
- Type in your username and password. This username and password should be tagged to an account in the directory that you had specified during token pack creation.Note: The username is the value of the user entry attribute that you have specified as the Login Property in when you create/configure your directory. Go back to the directory connector page to confirm if you are uncertain about this. If you use V-Key LDAP, it will be the same as the username of your account in the directory.
- After you have successfully logged in, you will be prompted to provide an email address to receive the email that contains the QR code of the soft token.
- Upon receiving the QR code, scan the QR code with the V-Key app and follow the prompts to complete the app activation.
- Once the app is activated, try to log in to your VPN client.
- You should receive a push notification that popped up on your mobile device requesting login approval.
- Tap Approve on the V-Key app popup to approve the login request. If you can connect to VPN successfully after tapping Approve on the popup, the token pack is correctly configured. You can proceed to distribute the token pack to the end-users.
For more details of the V-Key app, see V-Key User Guide. For technical support, contact V-OS Cloud via cloud-support@v-key.com
2FA for VPN/RADIUS Flow Diagram
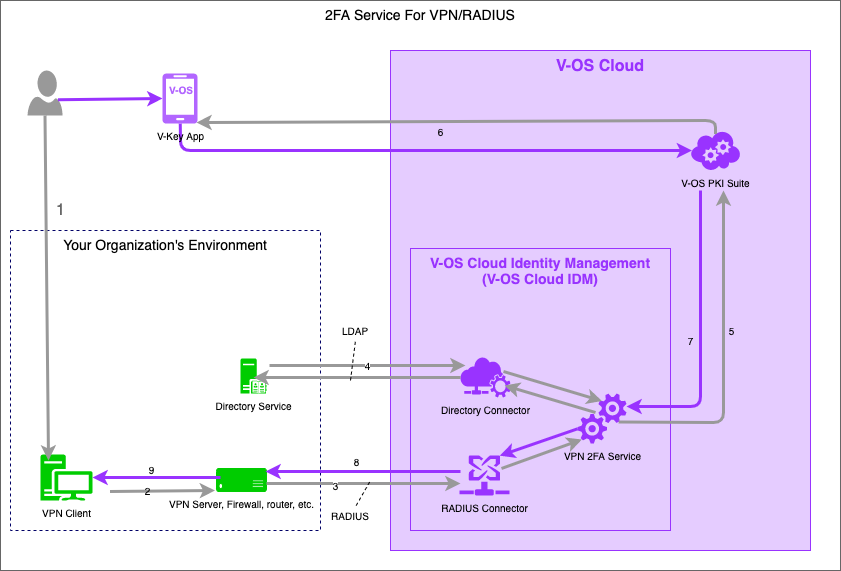
- End-user logs in to the VPN client app.
- Primary authentication initiated to RADIUS service.
- An authentication request triggered to RADIUS connector.
- Primary authentication using directory connector integrating with the organization’s directory service.
- Secondary authentication is triggered by V-OS Cloud’s PKI Suite.
- The end-user uses the V-Key app to approve the login request.
- V-OS Cloud IDM receives an authentication response.
- V-OS Cloud IDM replies to the RADIUS server.
- VPN client access is granted.